Table Of Contents
The screenplay shown in screenshots are from the 2019 film Knives Out. The original screenplay can be downloaded from here and all rights for the screenplay rests with its owners. We are using the screenplay only for explaining features in the product.
Capturing The Logline
Logline is a 2-3 line pitch for your entire screenplay. Typically the logline of your screenplay ends up as short description of your film on IMDB.
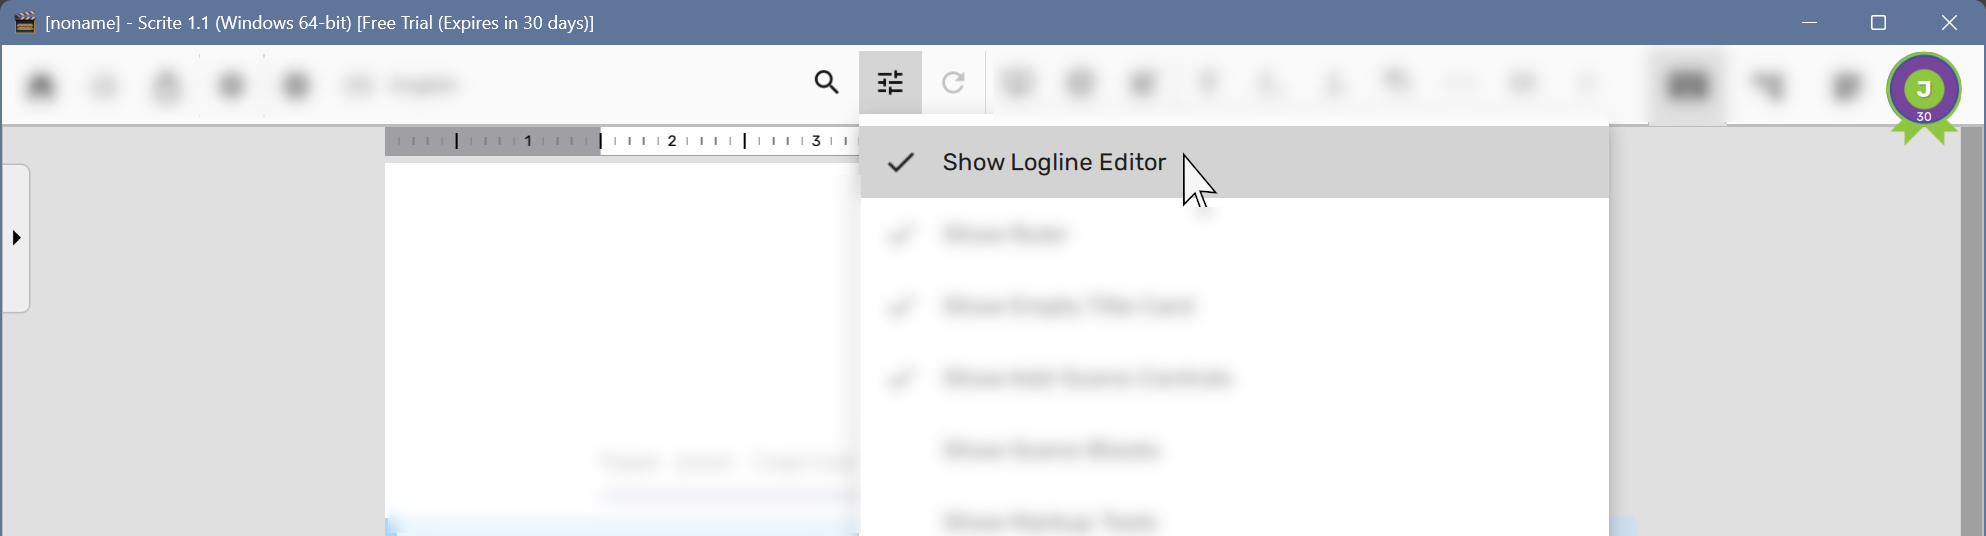
If you want to capture the logline of your screenplay in Scrite, you can toggle the logline editor in the Screenplay Editor Options Menu.
Once enabled, Scrite will present a logline field below the title page on the Screenplay Editor.
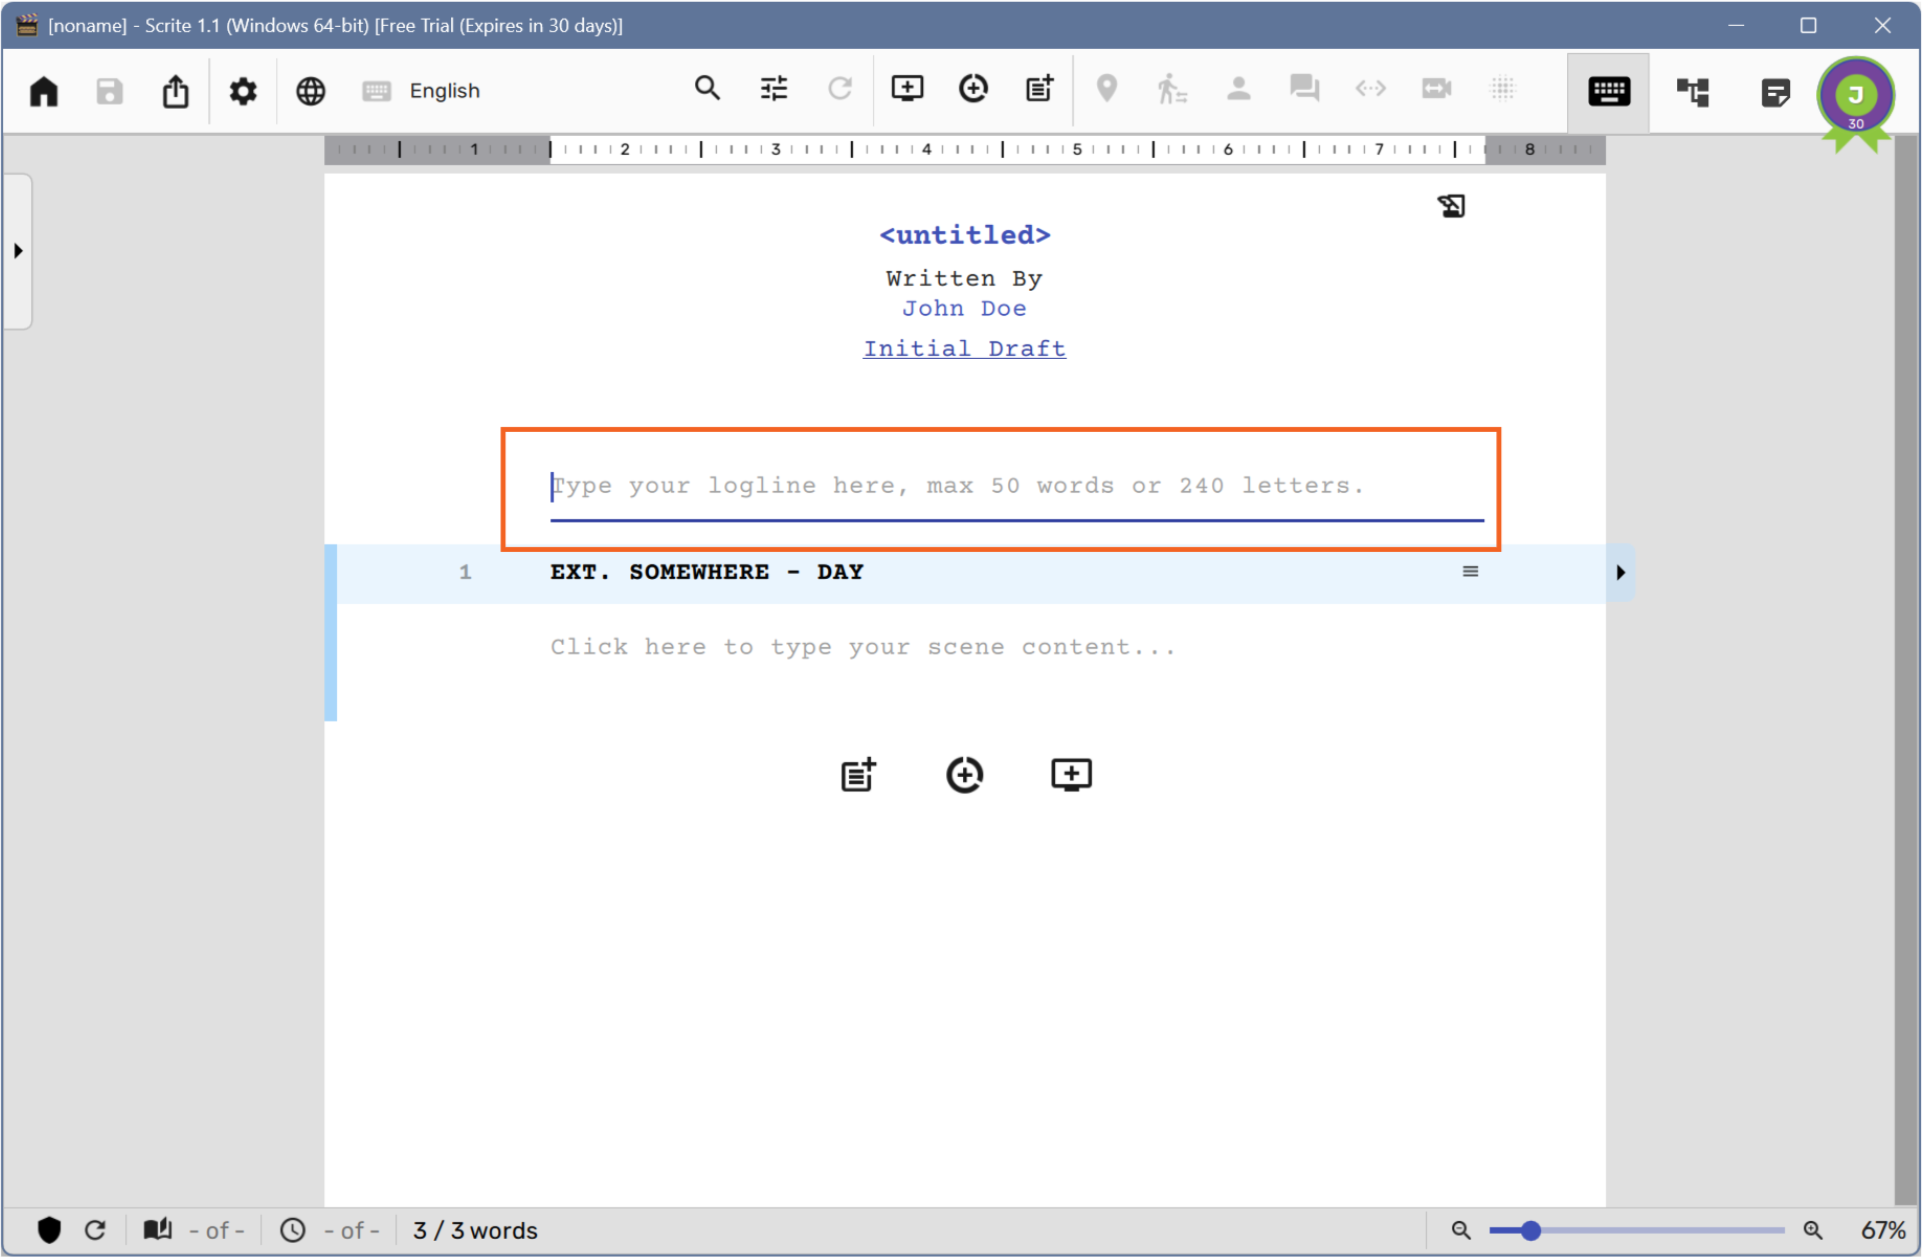
You can capture the logline in this field.
Color Coding Scenes
While plotting your story, you probably use post-it notes on a pin board.

Some writers prefer to use colored post-it notes, some prefer using colored pens and some don’t prefer using any color at all. But if you are the kind of writer who prefers color coding your scenes, you can do that in Scrite as well.
Simply pull out the scene options menu…
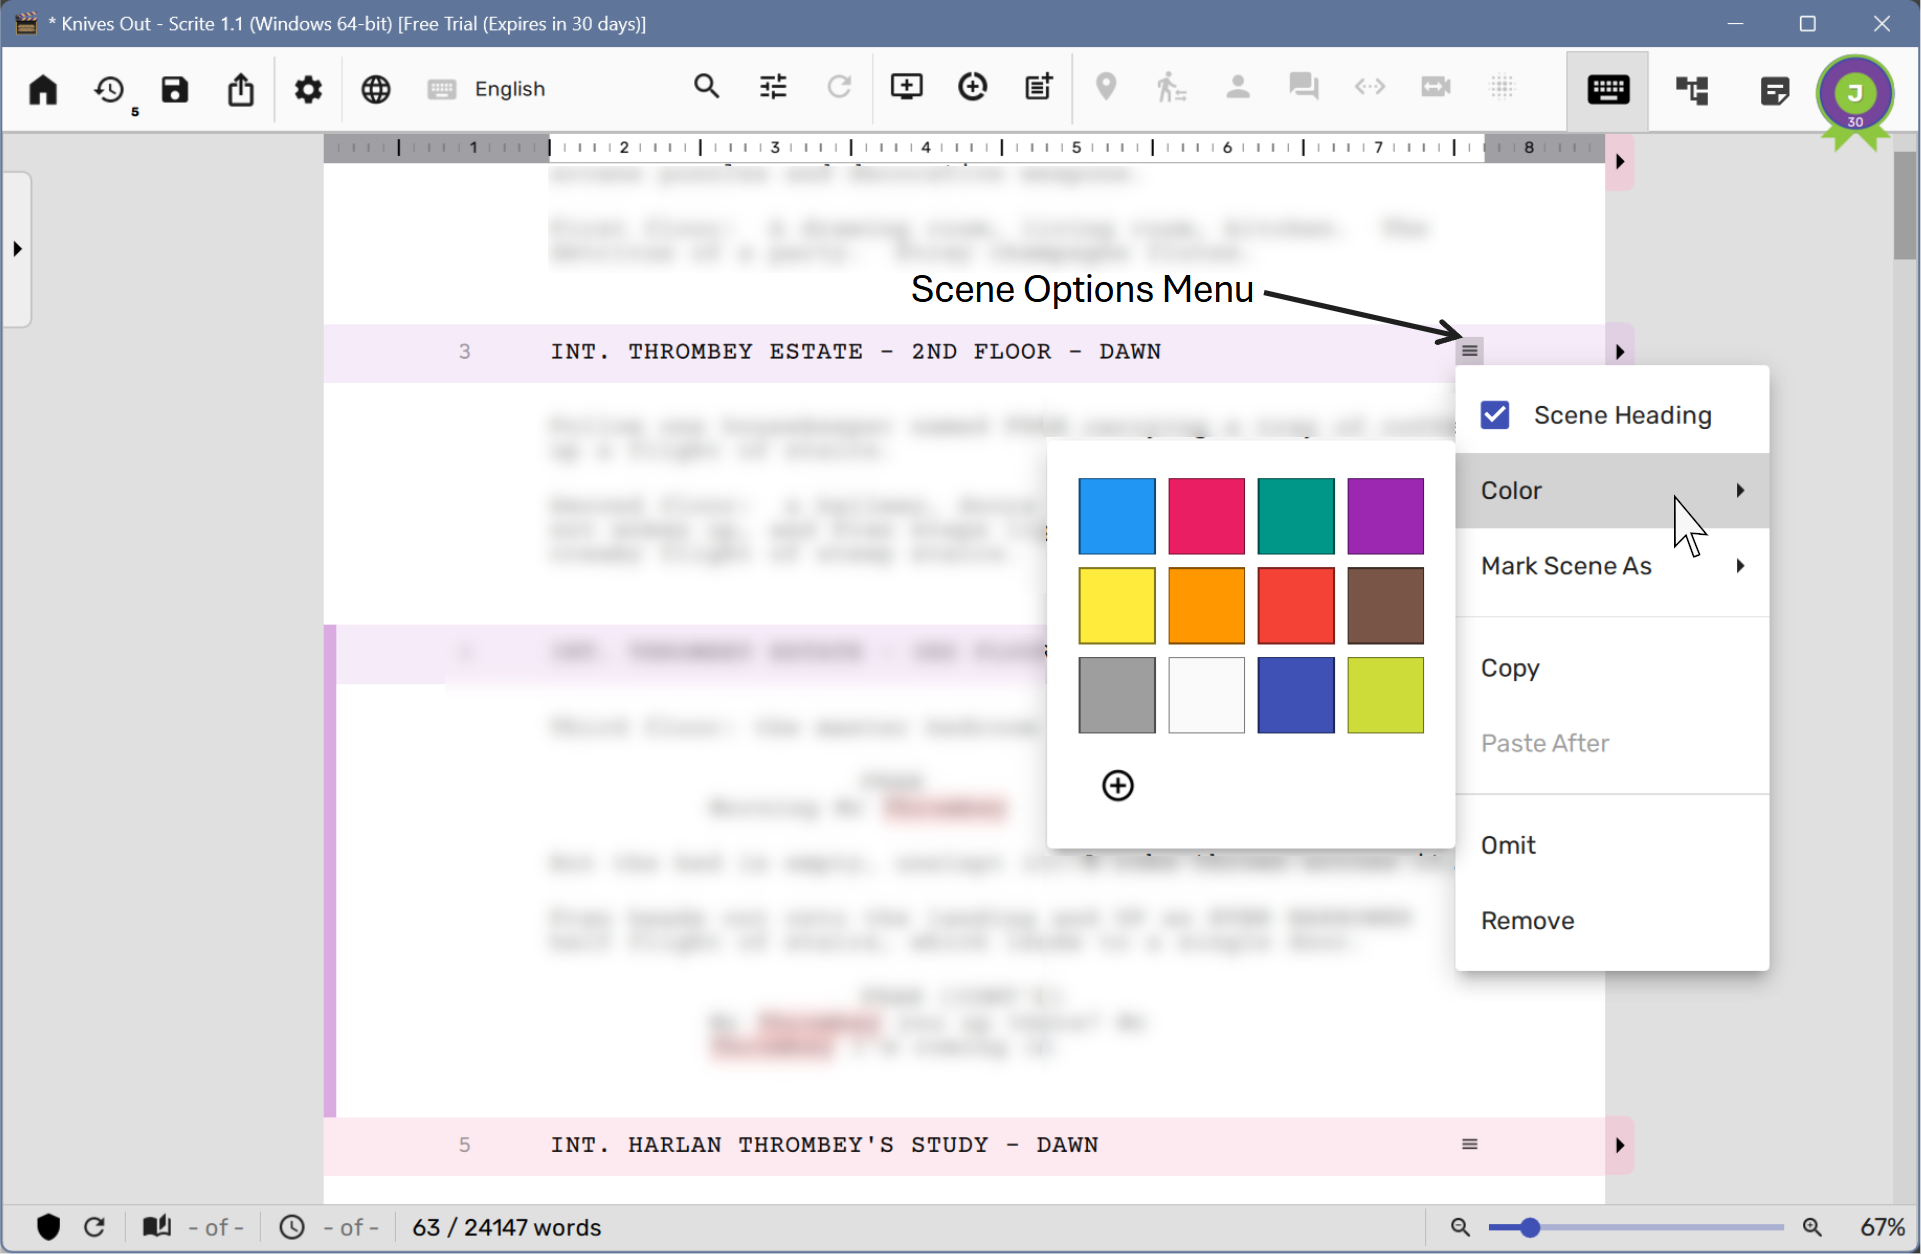
…and assign a color of your choice.
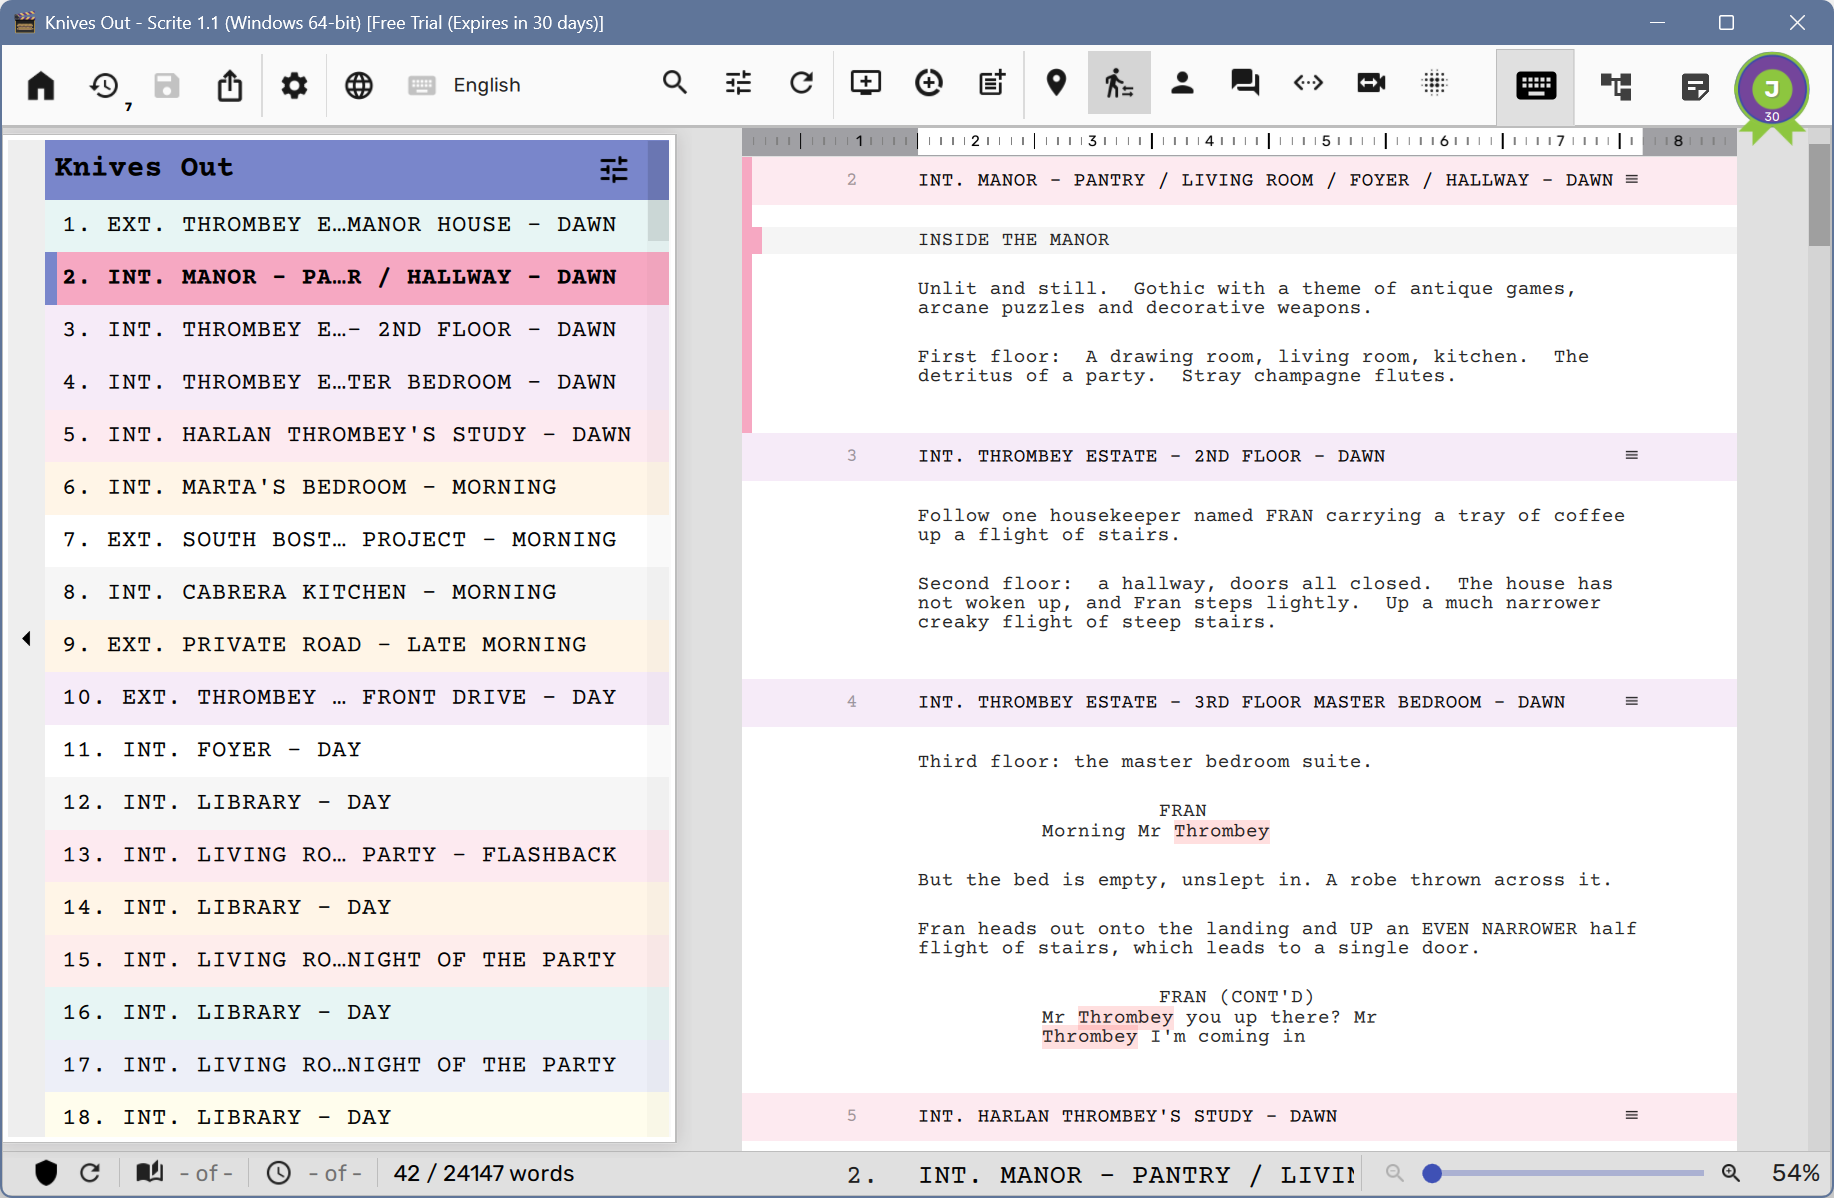
As you assign colors to different scenes, you will notice that the scene list panel on the left uses the same color coding to display scene headings.
Scene List Panel
You can toggle the visibility of the scene list panel by clicking on the button along the left edge of the app window.
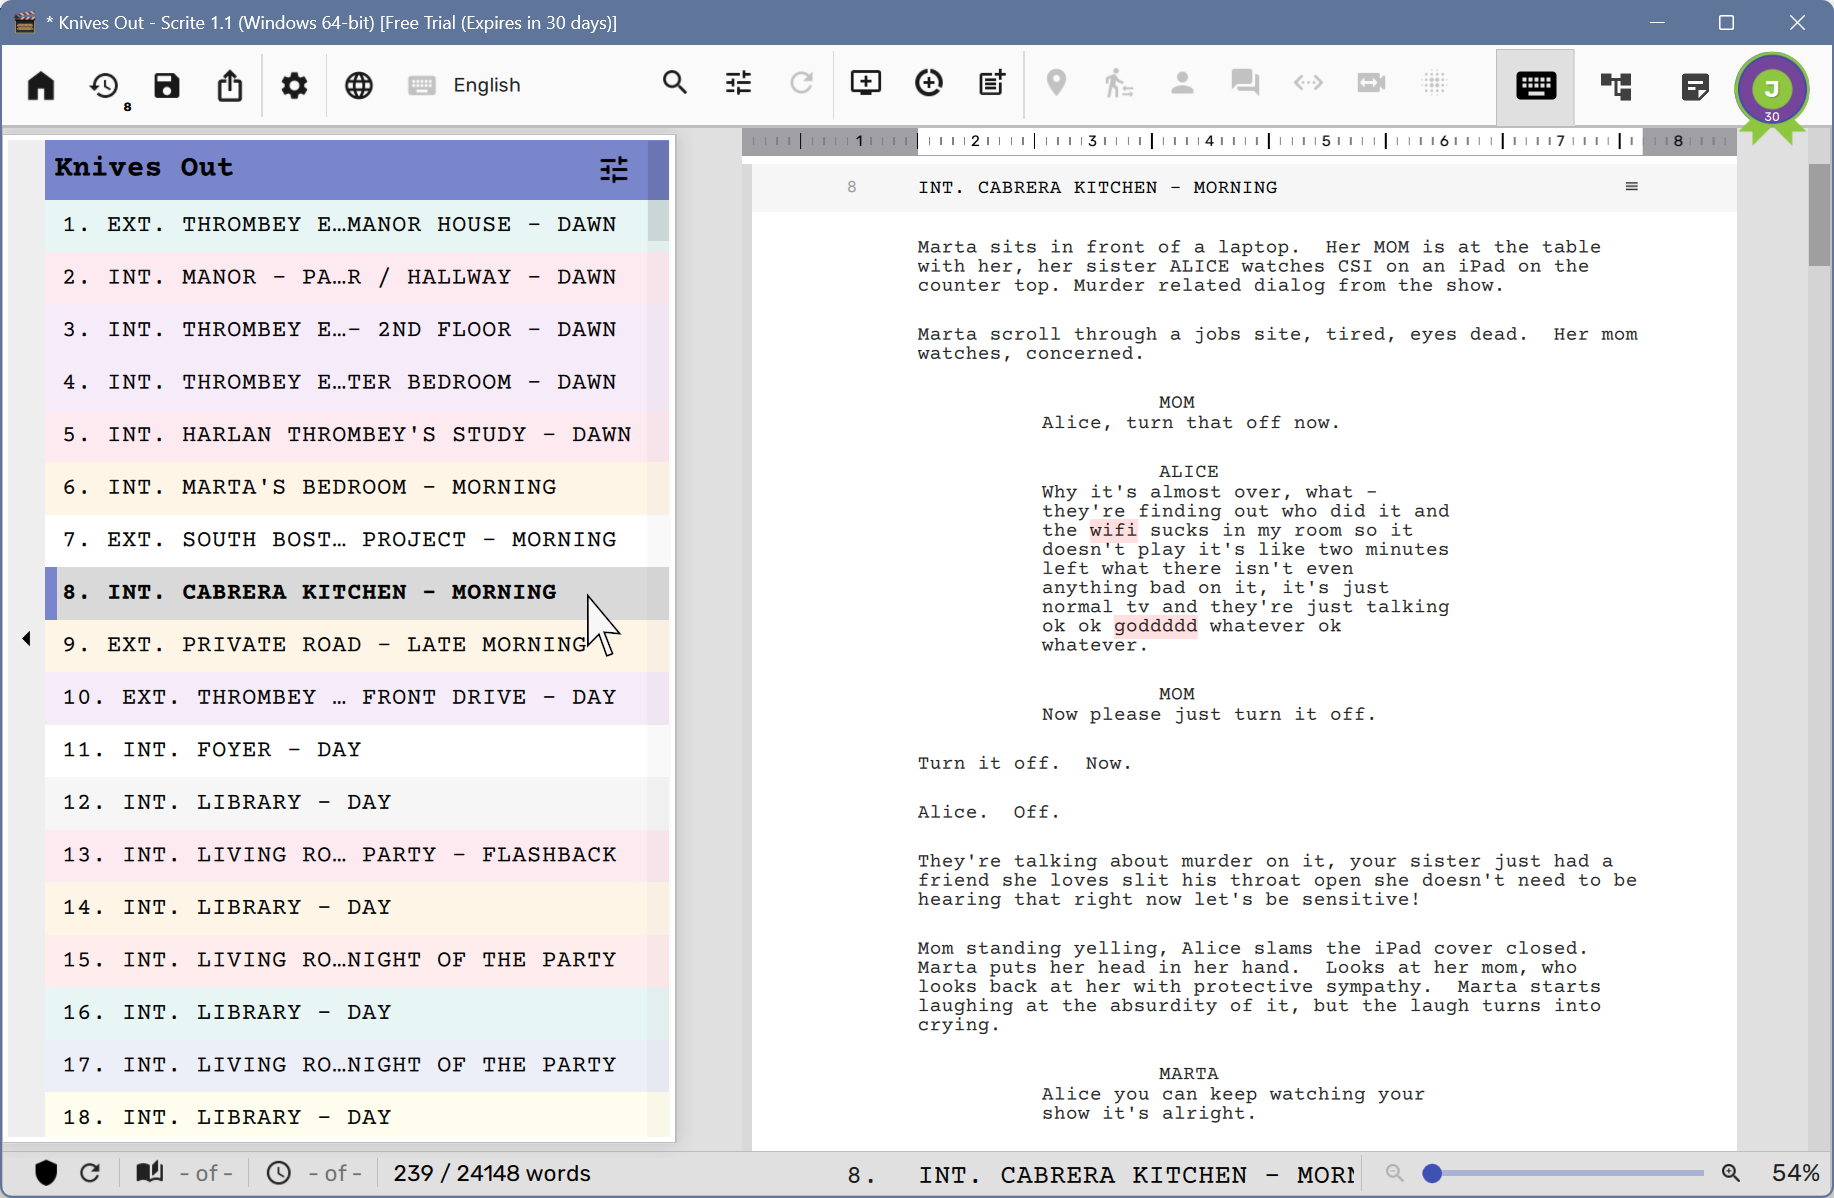
Using the Scene List Panel, you can rapidly jump to a scene. For instance, in the screenshot above you can see how clicking on Scene #8, caused the screenplay editor to jump to that scene.
By default, clicking on a scene in the scene list panel causes the scene to get selected. You can select a bunch of scenes by using Ctrl+Click.
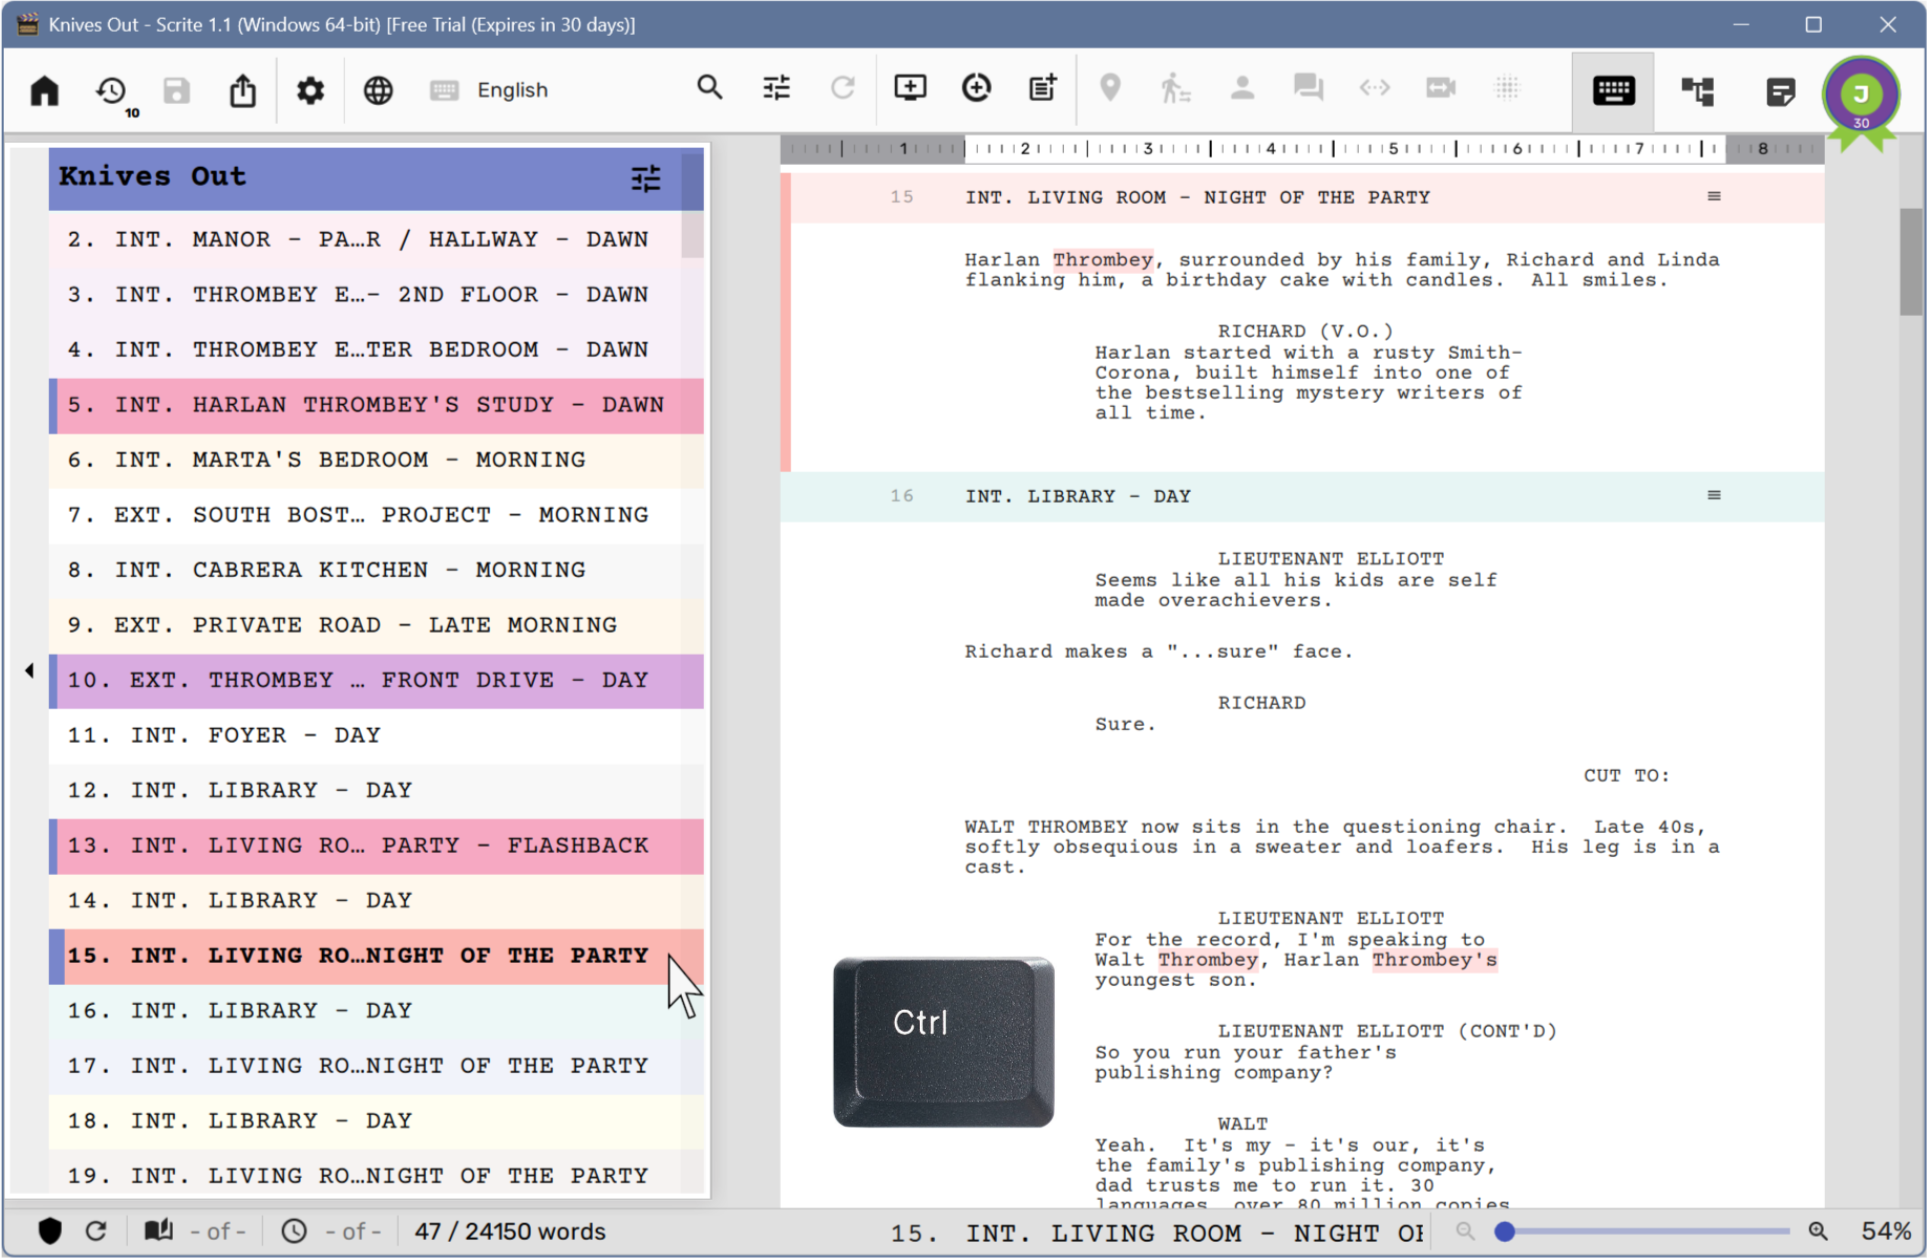
By holding the Shift key and clicking a scene, you will be able to select all scenes between the current scene and the newly clicked scene.

Whether you have selected a single scene, or a bunch of scenes, you can right click and change colors of all selected scenes at once.

You can also Copy contents of the selected scenes in Fountain format to the clipboard, so that you can paste in another app or another Scrite window.
The Paste After gets automatically enabled if the clipboard has plain-text or fountain-text. Selecting that option will cause contents of the clipboard to be pasted after the current scene. This aspect is especially useful while working with GenAI tools like ChatGPT while ideating screenplays.
Empty Scene Icon
The scene list panel shows an “empty-scene” icon for scenes in the screenplay that may only have a scene-heading, but no content. This icon disappears as soon as some content is typed or pasted into the scene.

Page Number and Screen Time
Although Scrite does not offer a page-centric UI, we realize that it is important for writers to get a clear understanding of the page-count and also the page they are currently on for two reasons:
- Each page roughly translates to 1 minute of screen time, so writers may want to keep track of how long a story they have written
- Many popular screenplay structures are page-centric. For example, the popular Save The Cat structure requires you to break into the second act at the 25th page.
Scrite lets you keep track of current page, total page count, current time and total time by reporting these stats on the status bar.
However, this is turned off by default. Estimating page count and time while working on the screenplay is a computationally intensive operation. This causes the app to appear slow and sluggish while working on large screenplays. We are working on building new algorithms to make this process optimal and fast, however until then we figured its best to disable page counting (and time estimation as well).
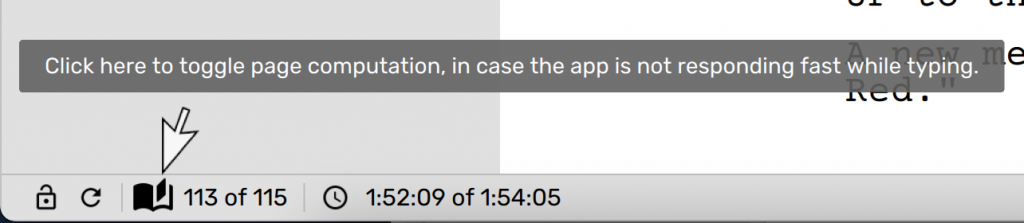
Whenever you open a Scrite document, you will notice a tooltip like this along the bottom left corner of the screenplay editor.
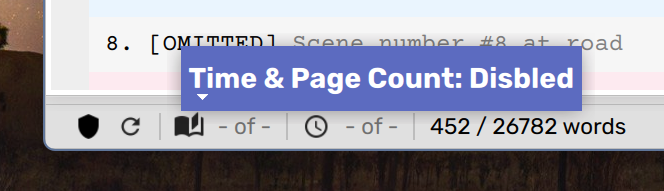
You can always toggle page counting on by clicking on the page icon pointed to here.
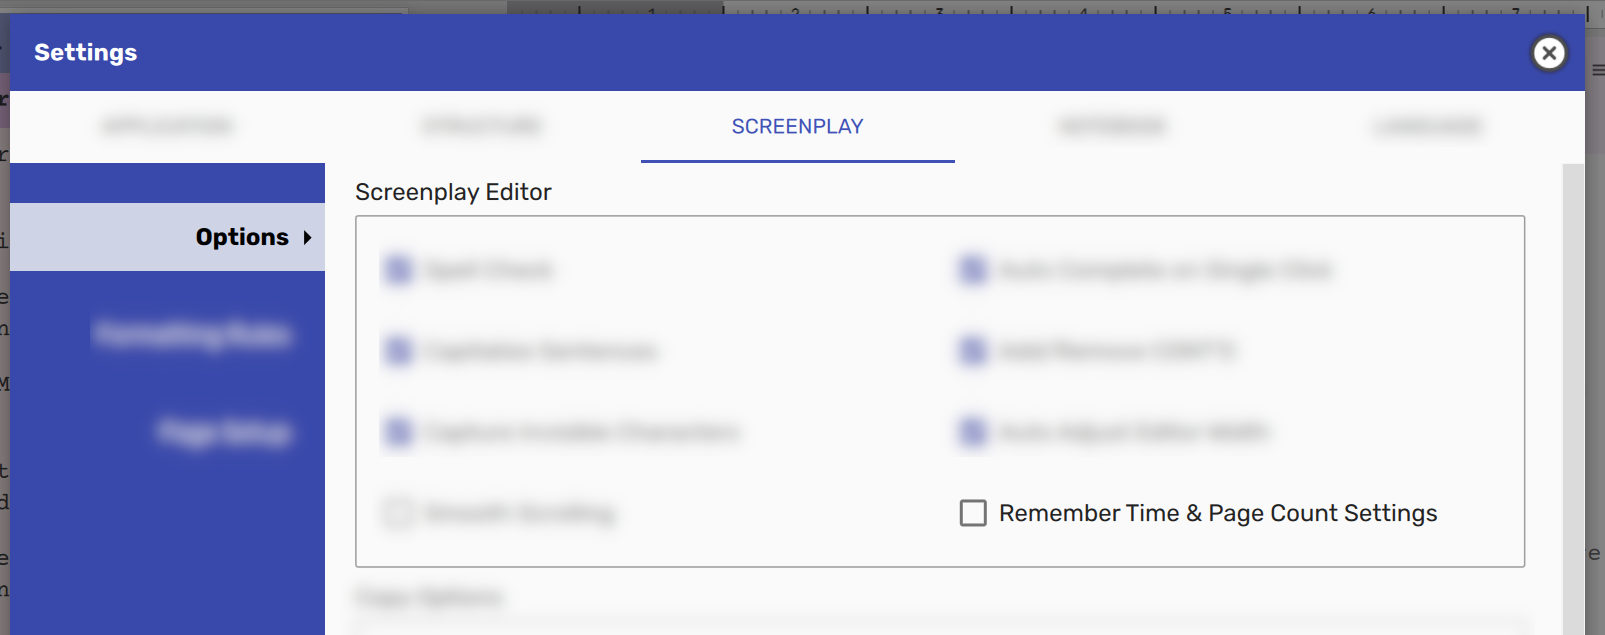
Please note that page counting will be disabled if you happen to close and reopen the same or another document, even if you have toggled it on in the current session. To preserve you preference across sessions, head to Settings > Screenplay > Options tab and toggle the “Remember Time & Page Count Settings” on.
In anycase, as mentioned before, you can toggle time & page counting at anytime by clicking on the book / time icon towards the bottom left corner on the status bar of the screenplay editor.
When enabled, you will notice that the status bar shows page number at cursor, total page count, time at cursor, and total time. You will also notice a page break marker with page number just to the left of the page boundary in the screenplay editor.
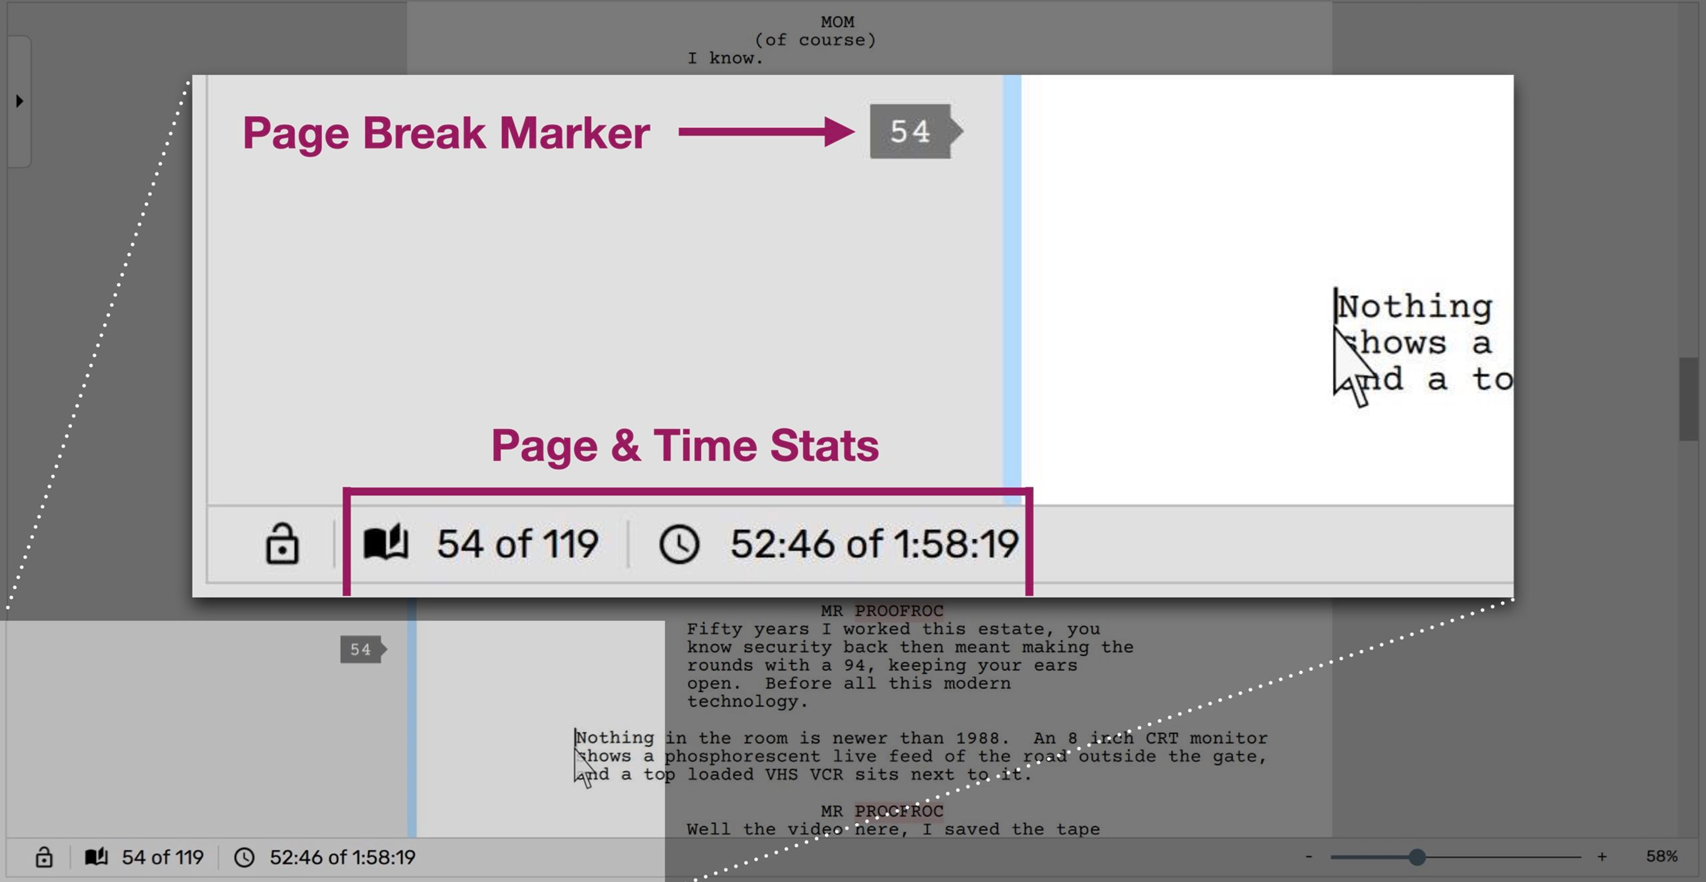
As you move the cursor, Scrite updates the values of page and time values displayed on the status bar. As you scroll you will notice page number bubbles on the left that give you a notion of where the page breaks within your scene.
Please note, that when you export the screenplay to PDF the page count may increase on the PDF depending on your use of MORE and CONT’D markers.
Also, the time values computed are approximate and are based on the assumption that each page translates to 1 minute of screen time. But if you are writing a screenplay where each page translates to 90 seconds of screen time, for example, then you can head to Settings -> Screenplay -> Page Setup and alter the “Time Per Page” value.

NOTE: Page count and breaks vary from app to app. We have seen cases where Final Draft reports page count as 116, Scrite reports page count for the same screenplay as 119 and Fade In Pro reports it as 126. From what we understand, it is nearly impossible to get page counts to be consistent across all apps.
Viewing Scene Lengths on the Scene List Panel
With page-counting turned ON, you can optionally toggle scene-lengths in the scene list panel.
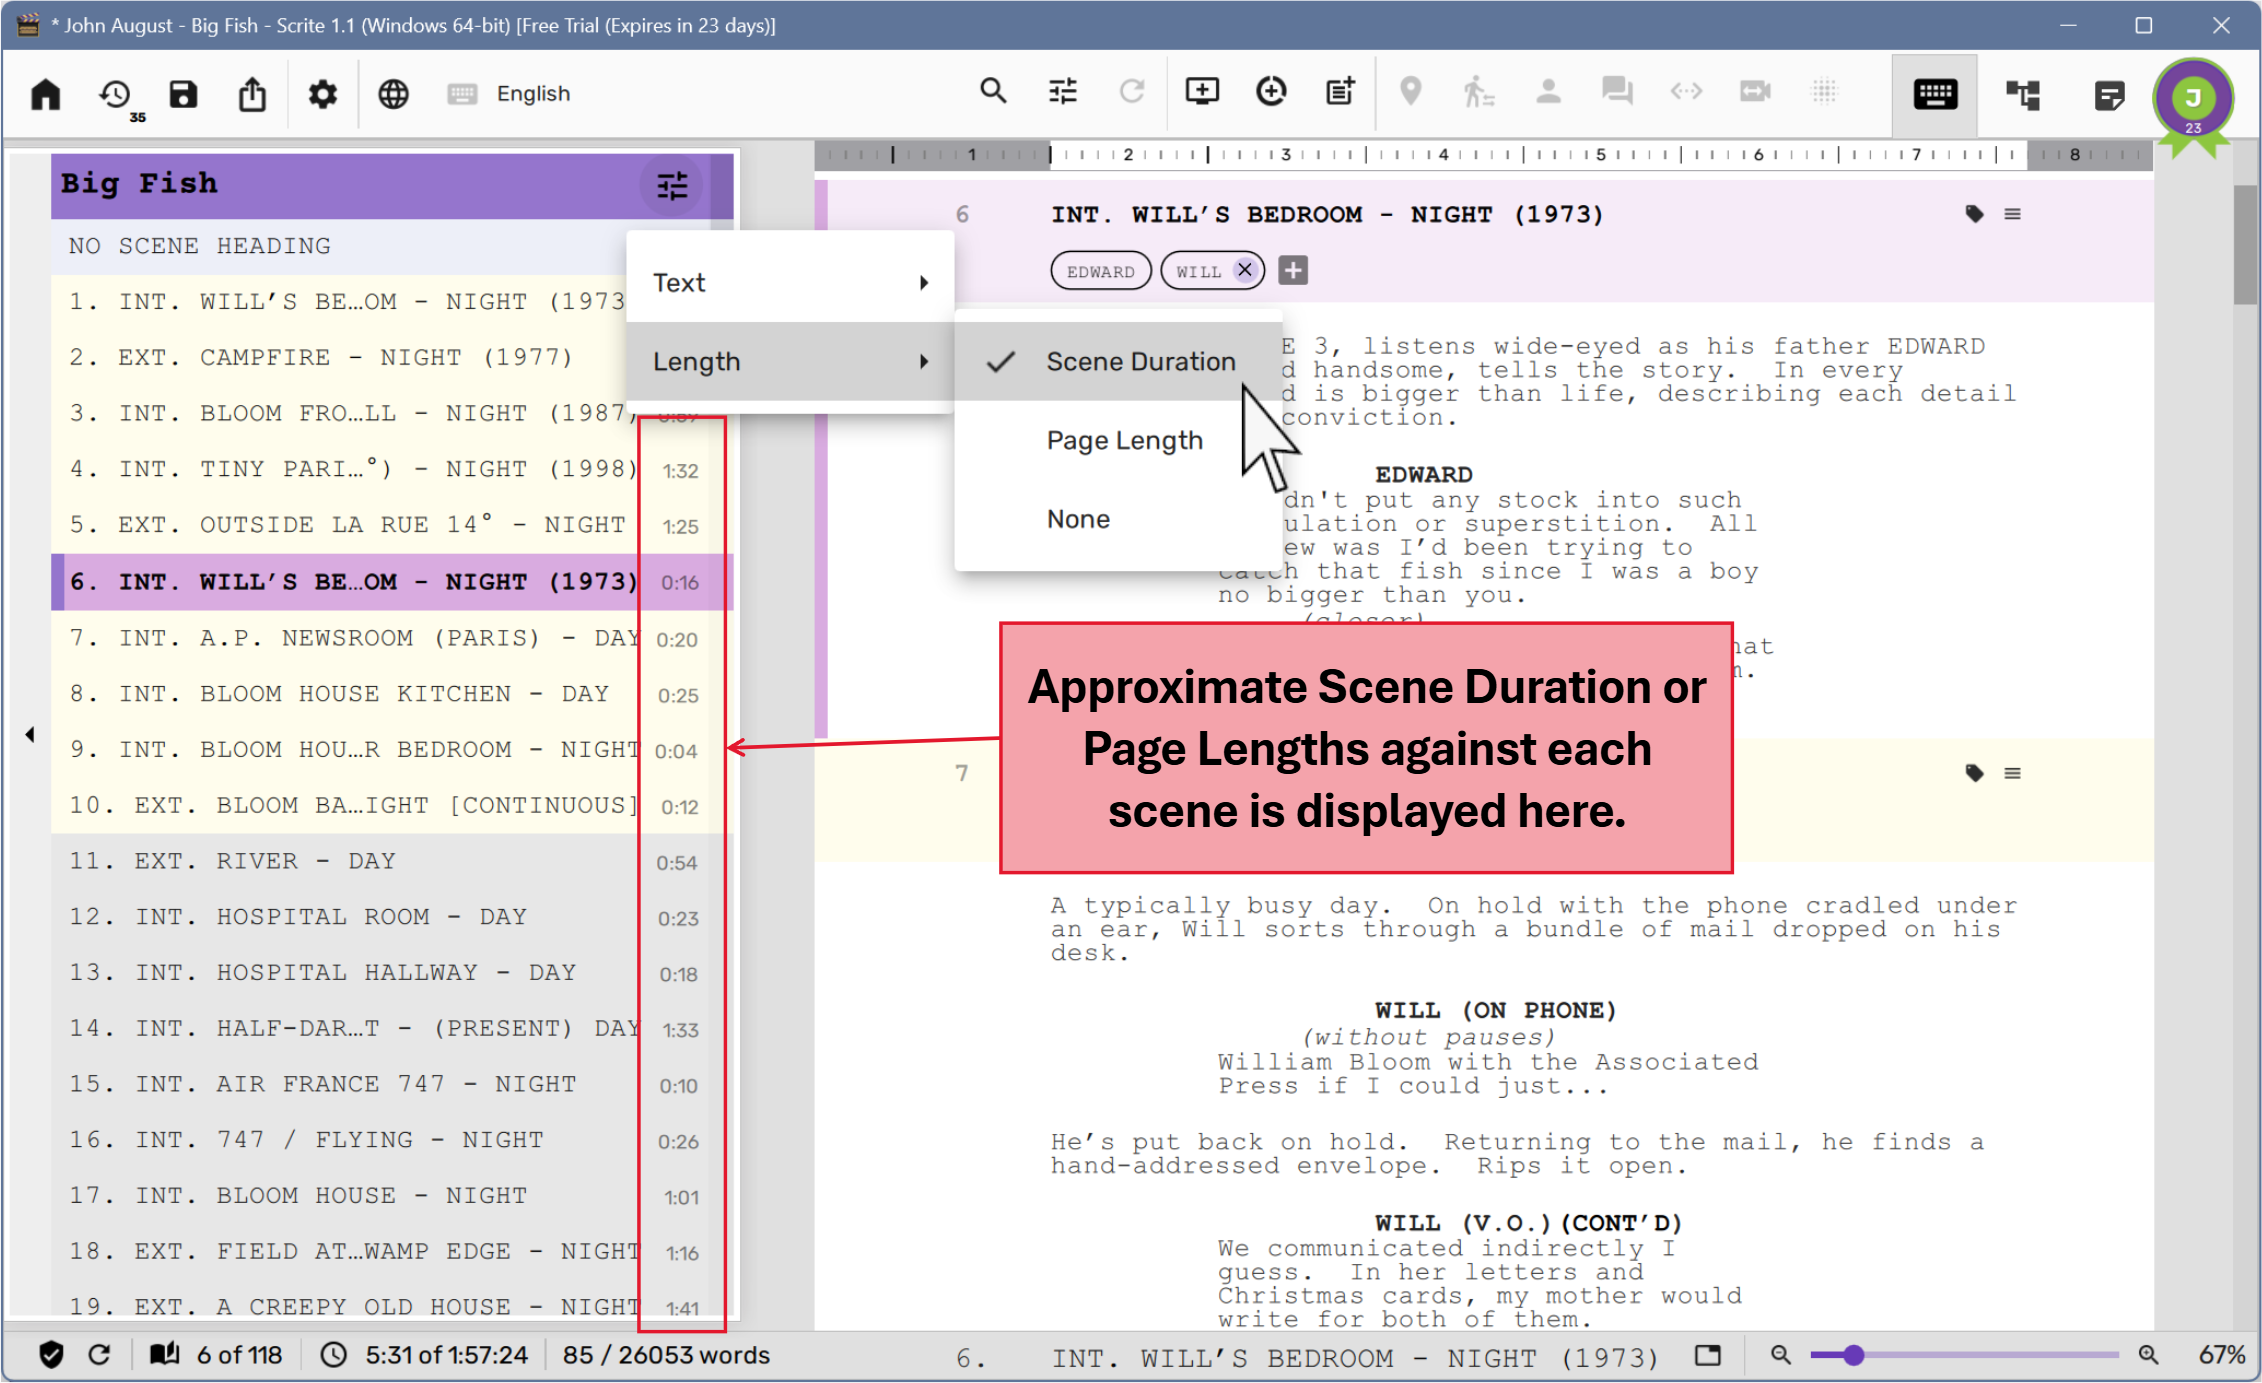
This causes the scene list panel to display approximate scene duration or page lengths against each scene.
Formatting Paragraphs
With Scrite you can format paragraph types and have that format applied to all paragraphs of the said types. Go to Settings -> Screenplay > Formatting Rules to view the currently applied formatting rules.
Click on any of the paragraphs in the preview, and alter any of the properties.
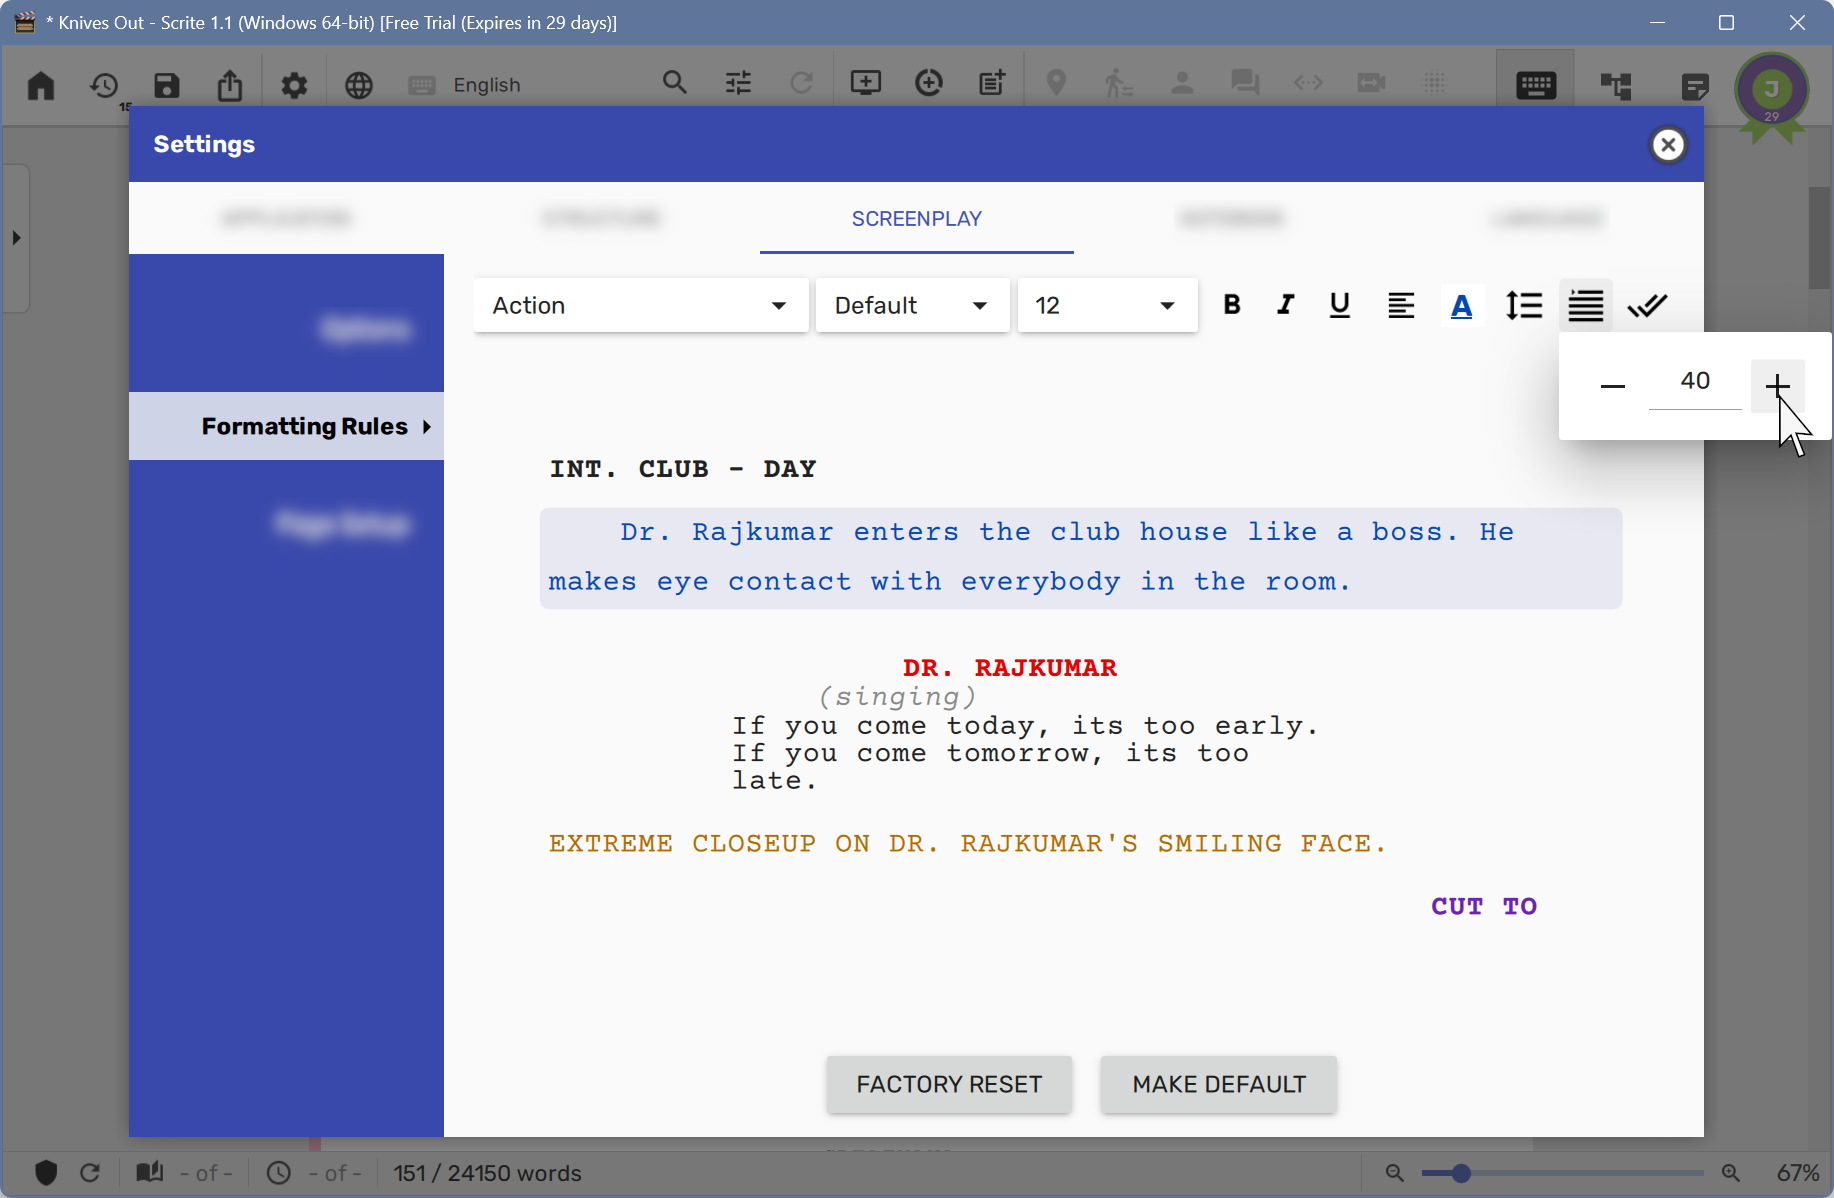
Once you change the properties to suit your preference, simply close the dialog box and notice that Scrite would have applied your formatting rules across all scenes in your screenplay.
The newly configured paragraph formats will also be used in preview, exported PDFs and reports.
Currently Scrite does not support apply special formatting to fragments of text. That means you cannot select text in your screenplay and make them bold, italic or underline; or even apply background and foreground colors.
Formatting options are saved along with the file, and will be reused everytime you open the file – even if you have used a different set of options for another file. This happens because Scrite uses two sets of formatting options:
- Default formatting options, which gets used for every time a new file is created.
- Document specific options, which gets used while viewing/editing a particular file.
If you want to discard document specific formatting options and use your own defaults, you can click on “Factory Reset” button in the Formatting Rules page.
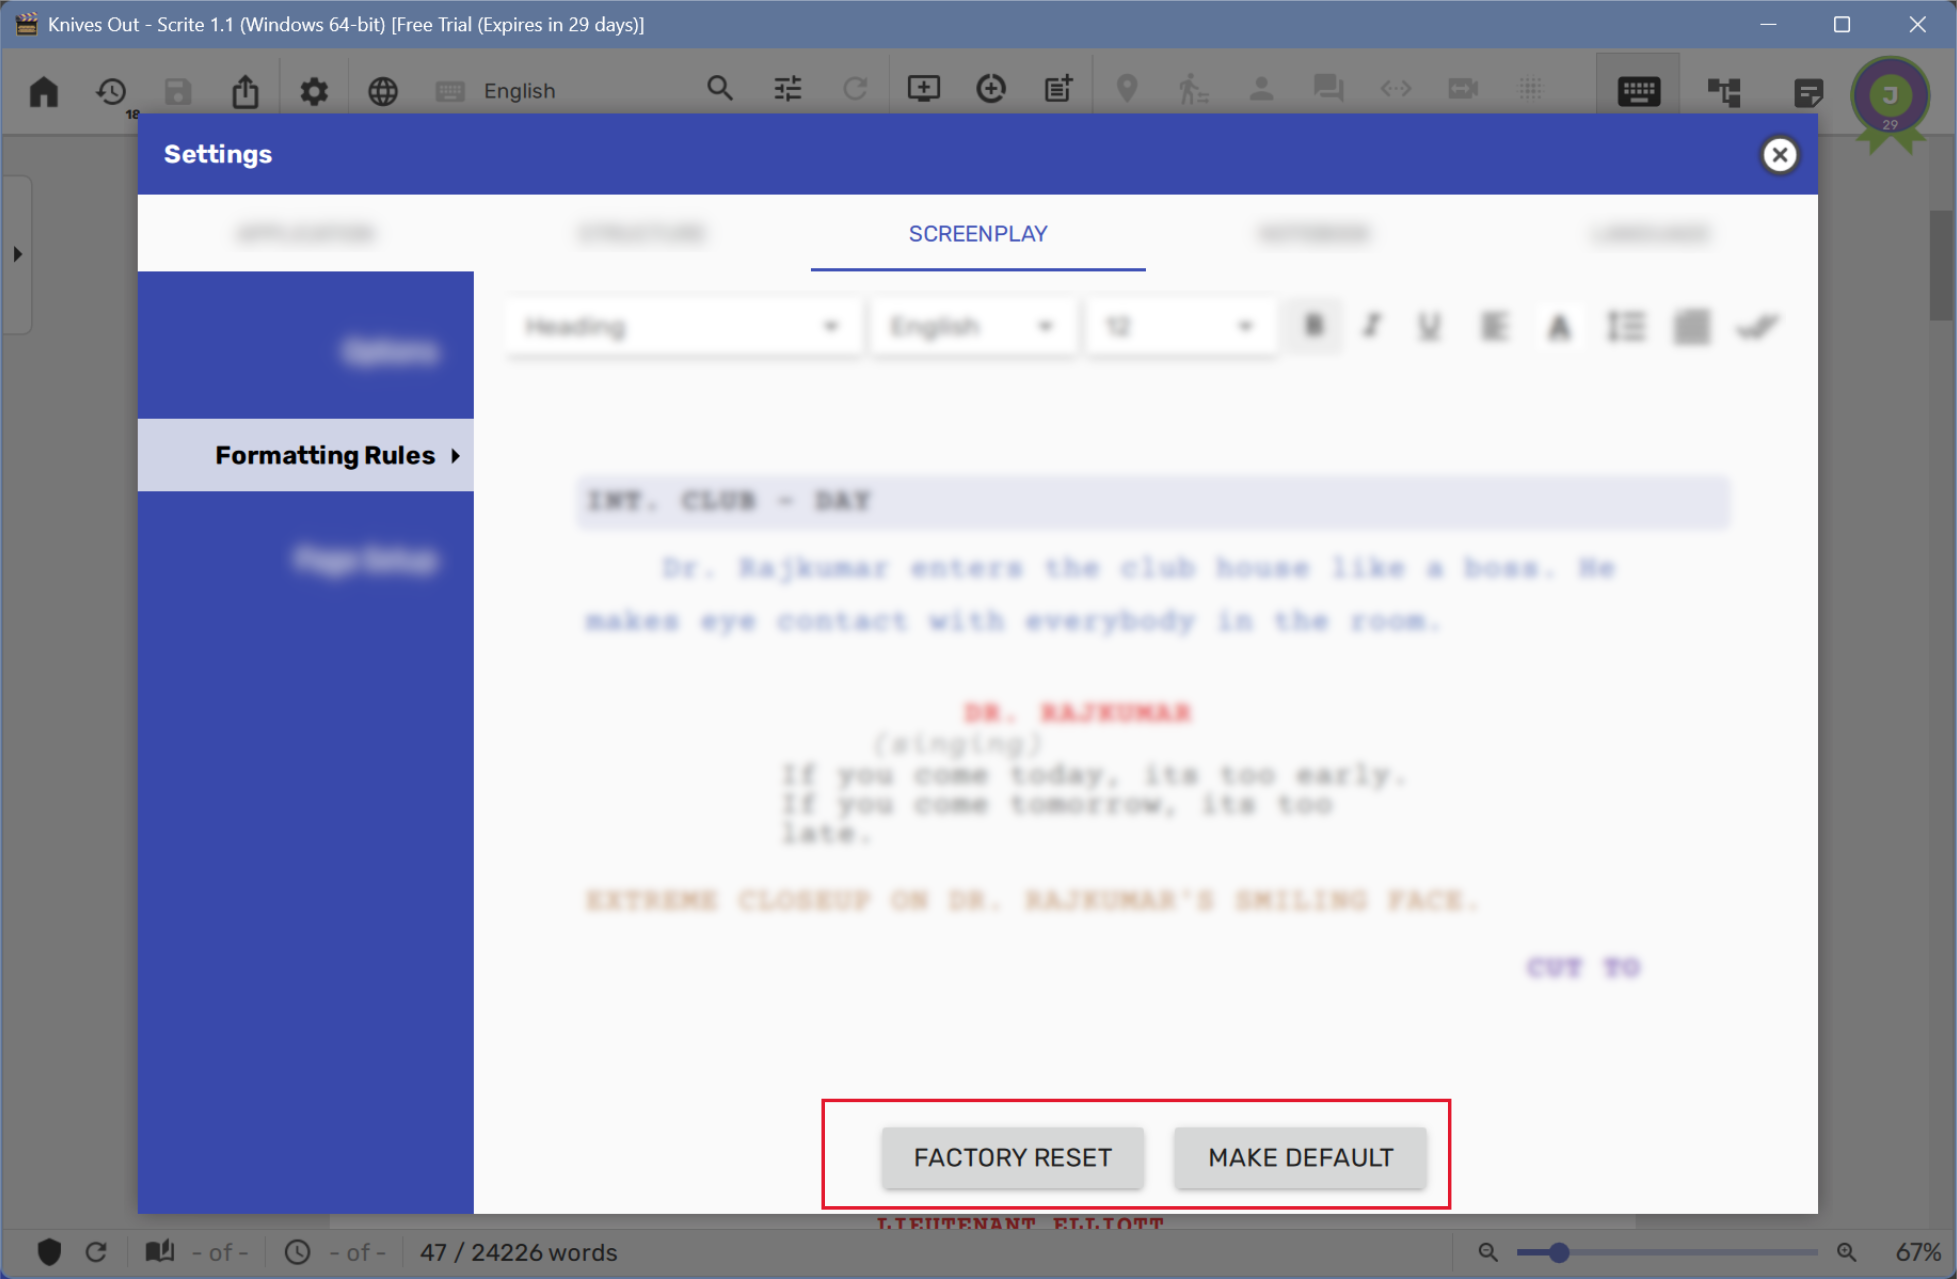
On the other hand, if you prefer to make the current set of formatting options as default from here-onwards, then you can click on the “Make Default” button.
Markup Tools
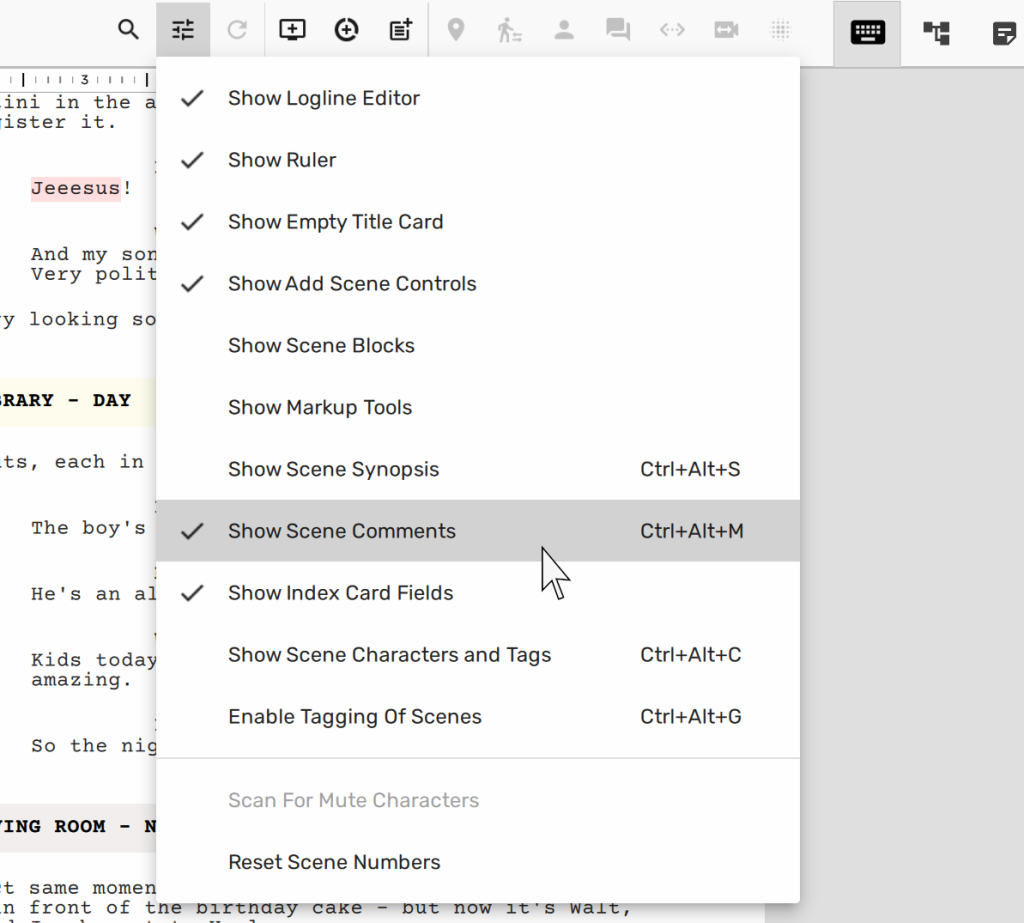
In addition to configuring formatting options across all paragraphs using Screenplay > Formatting Rules, you an apply additional formatting to specific snippets of text. This can be done by using “Markup Tools”. The dock widget on which these tools are shown is hidden by default, but you can toggle it’s visibility from the “Screenplay Editor Options” menu.
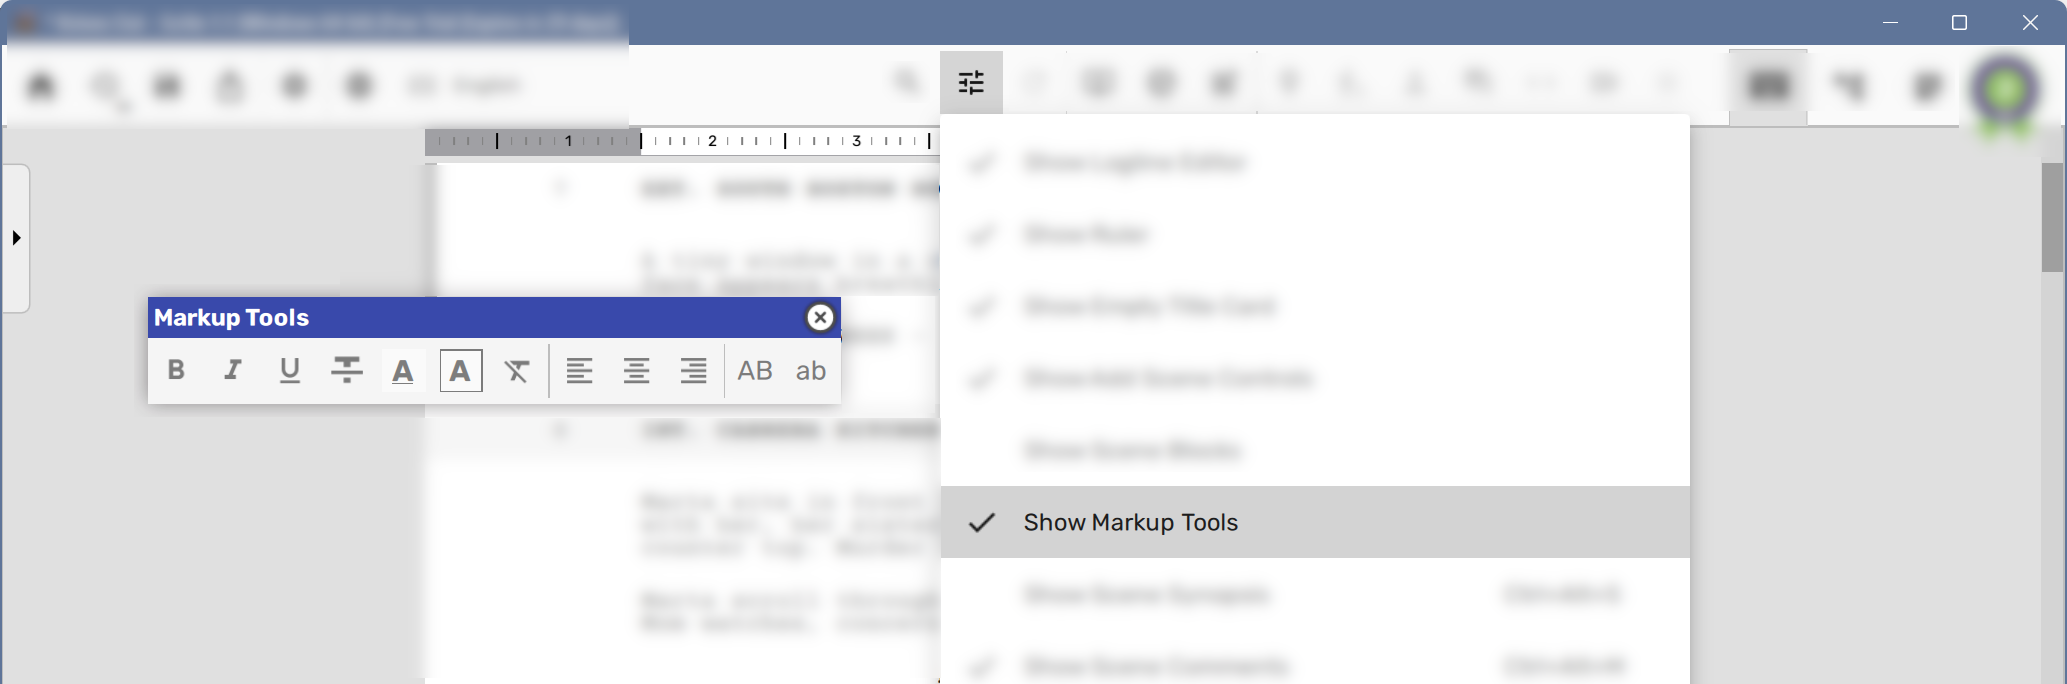
You can move the “Markup Tools” dock widget to any part of the screen so that it doesn’t block your writing.
Once the dock-widget is visible, you can select any text snippet in the screenplay editor and use the options presented in markup tools to apply custom formatting.
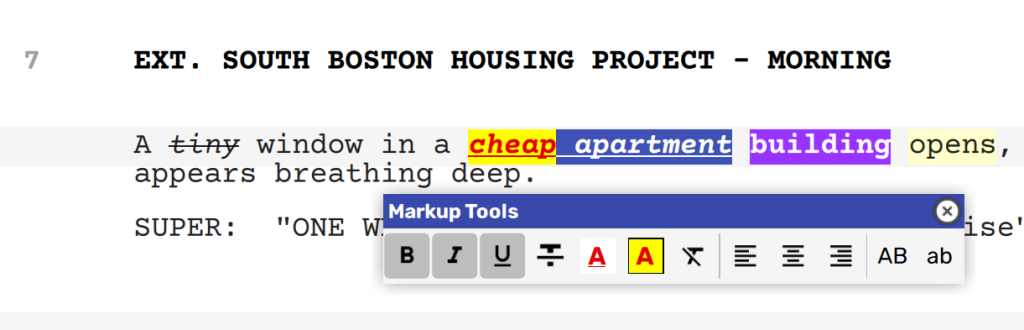
As you hover over the buttons on the markup tools, you will notice keyboard shortcuts for some of the them. Make note of them, and you can use those shortcuts instead of clicking on the buttons in the markup tools.
- Bold: Ctrl+B
- Italics: Ctrl+I
- Underline: Ctrl+U
- Strikeout: Ctrl+R
- ALL CAPS: Shift+F3
- all small caps: Ctrl+Shift+F3
Custom Scene Numbers
By default Scrite generates numbers for your scenes automatically. If you change the scene order or insert scenes in-between, the numbers are regenerated.
Some of our early adopters requested for custom scene numbering. For example, some writers may want to number related scenes using 1, 1A, 1B, 1C and so on. Its now possible to apply custom scene numbers by simply editing the scene number field.
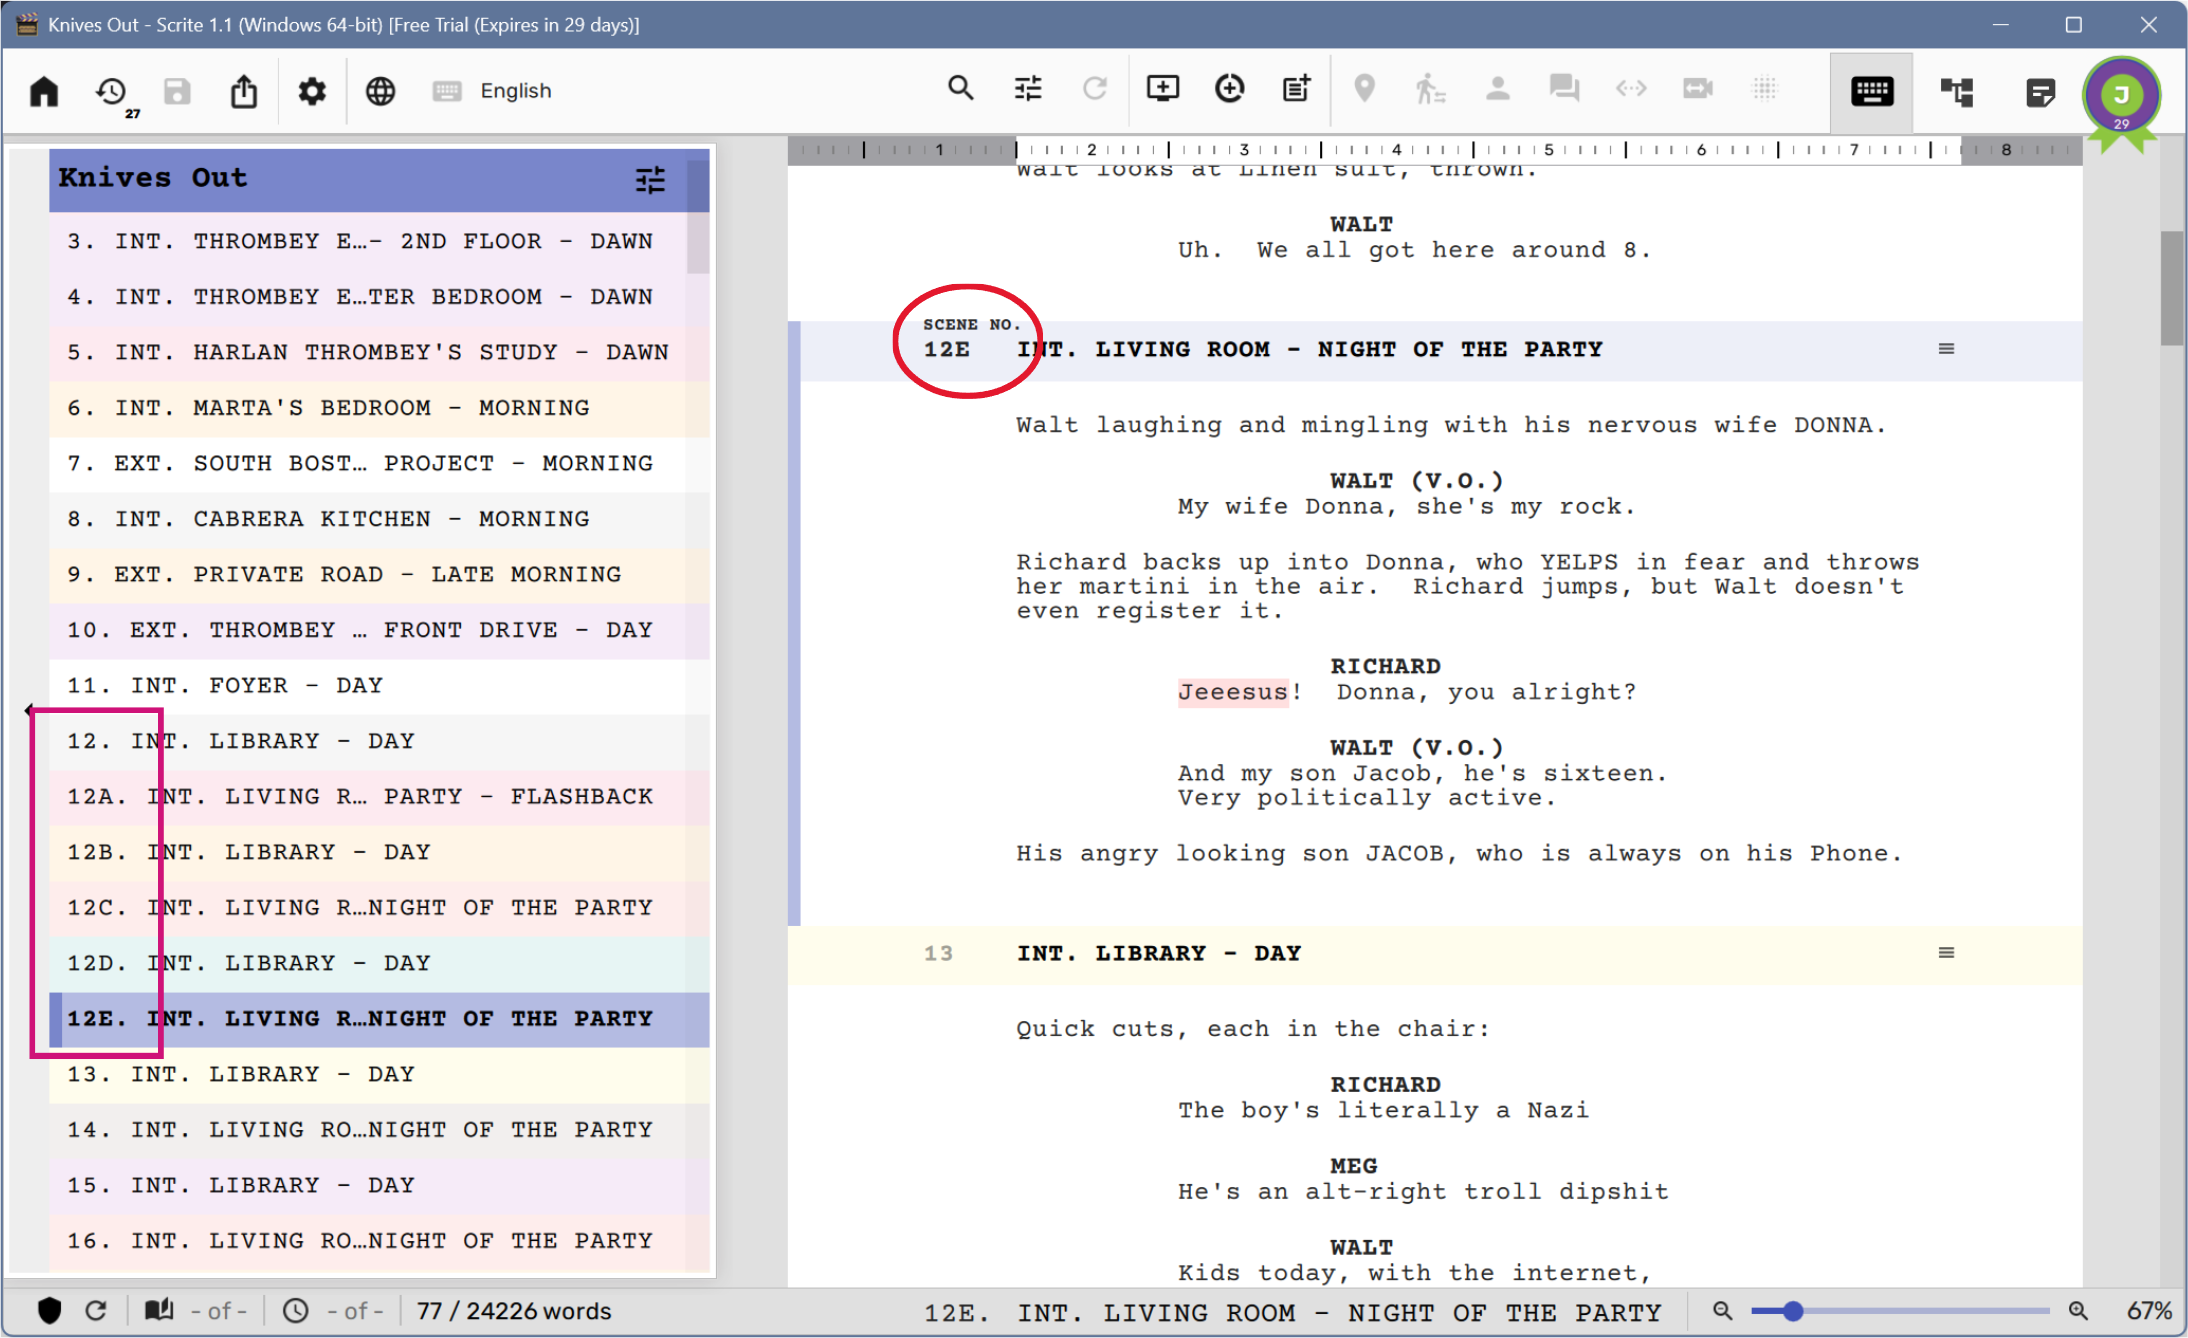
Notice that Scrite resumes automatic numbering for scenes that do not have a custom scene number.
Custom scene numbers are used in preview, exported PDFs and reports as well.
Scene Comments, Featured Image and Index Card Fields
Scrite allows you to capture additional information against each scene, like:
- Comments
- Featured Image
- Index Card Fields
- Photos, Videos, Documents and
- Rich Text Notes
The best place to capture this information is the Notebook tab, but the screenplay editor offers access to certain aspects of this information, so that you can both view and edit them. These aspects are Comments, Featured Image and Index Card Fields. Read on to see how you can view/edit them.
Comments
To capture scene specific comments (in plain text), enable the “Scene Comments” feature in “Screenplay Editor Options” …
… to have the Screenplay Editor offer a pullout against each scene.
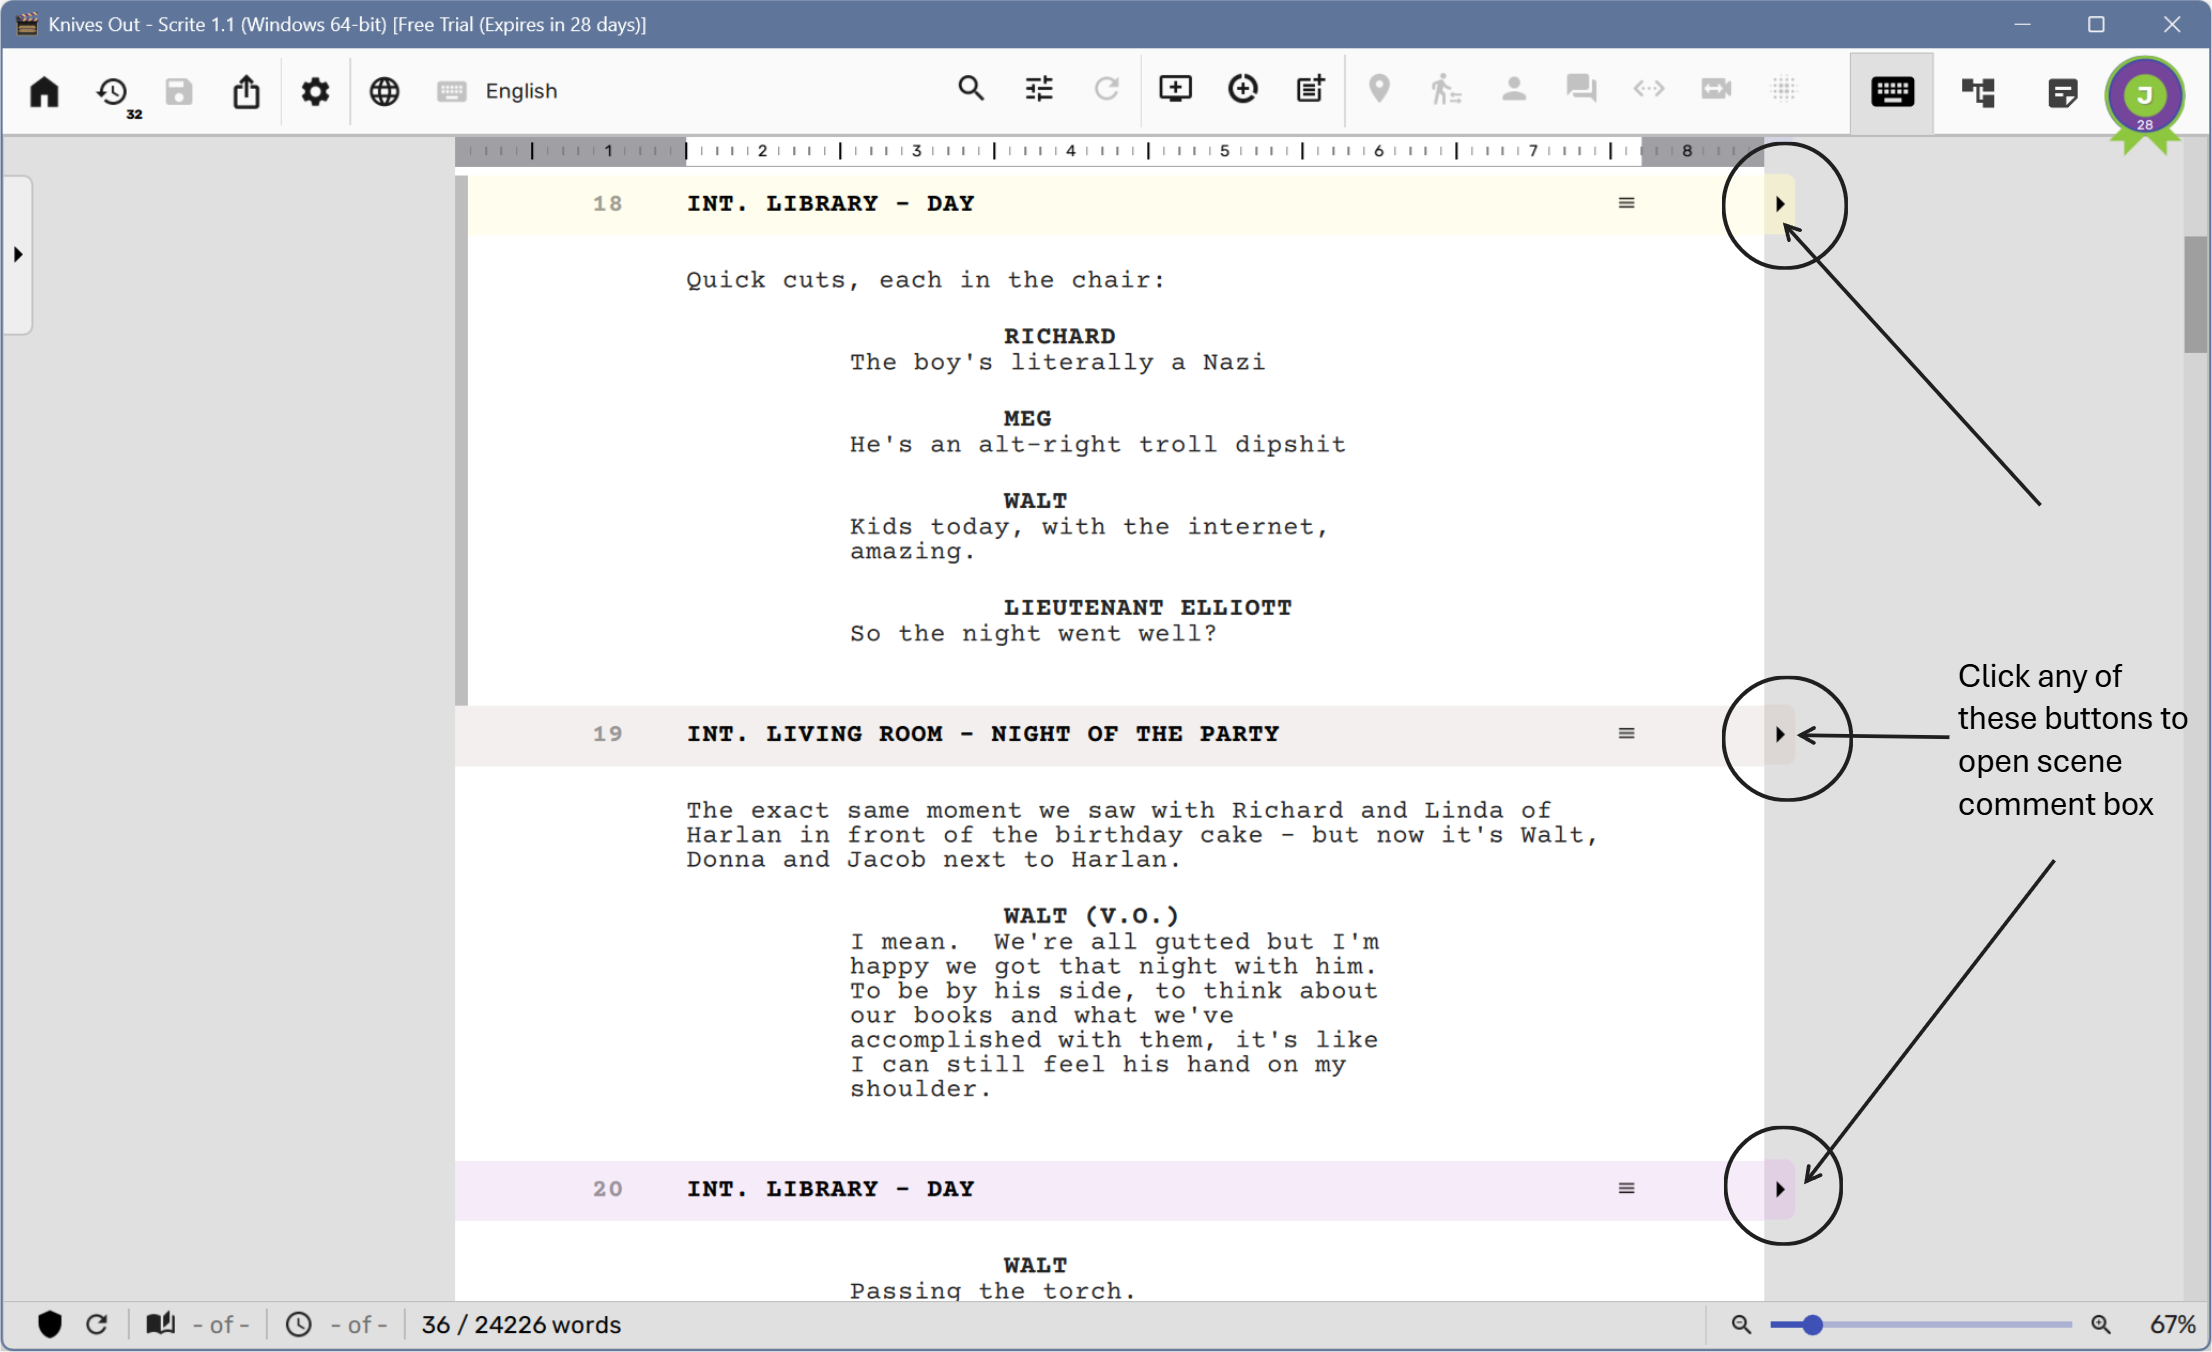
When you click on the pullout, a comment box opens up for every scene in the screenplay editor.
If you have long scenes, then the scene comment box scrolls along with the scene and sports a title bar. This way you are clear about the scene to which a comment box is tagged.
Featured Image
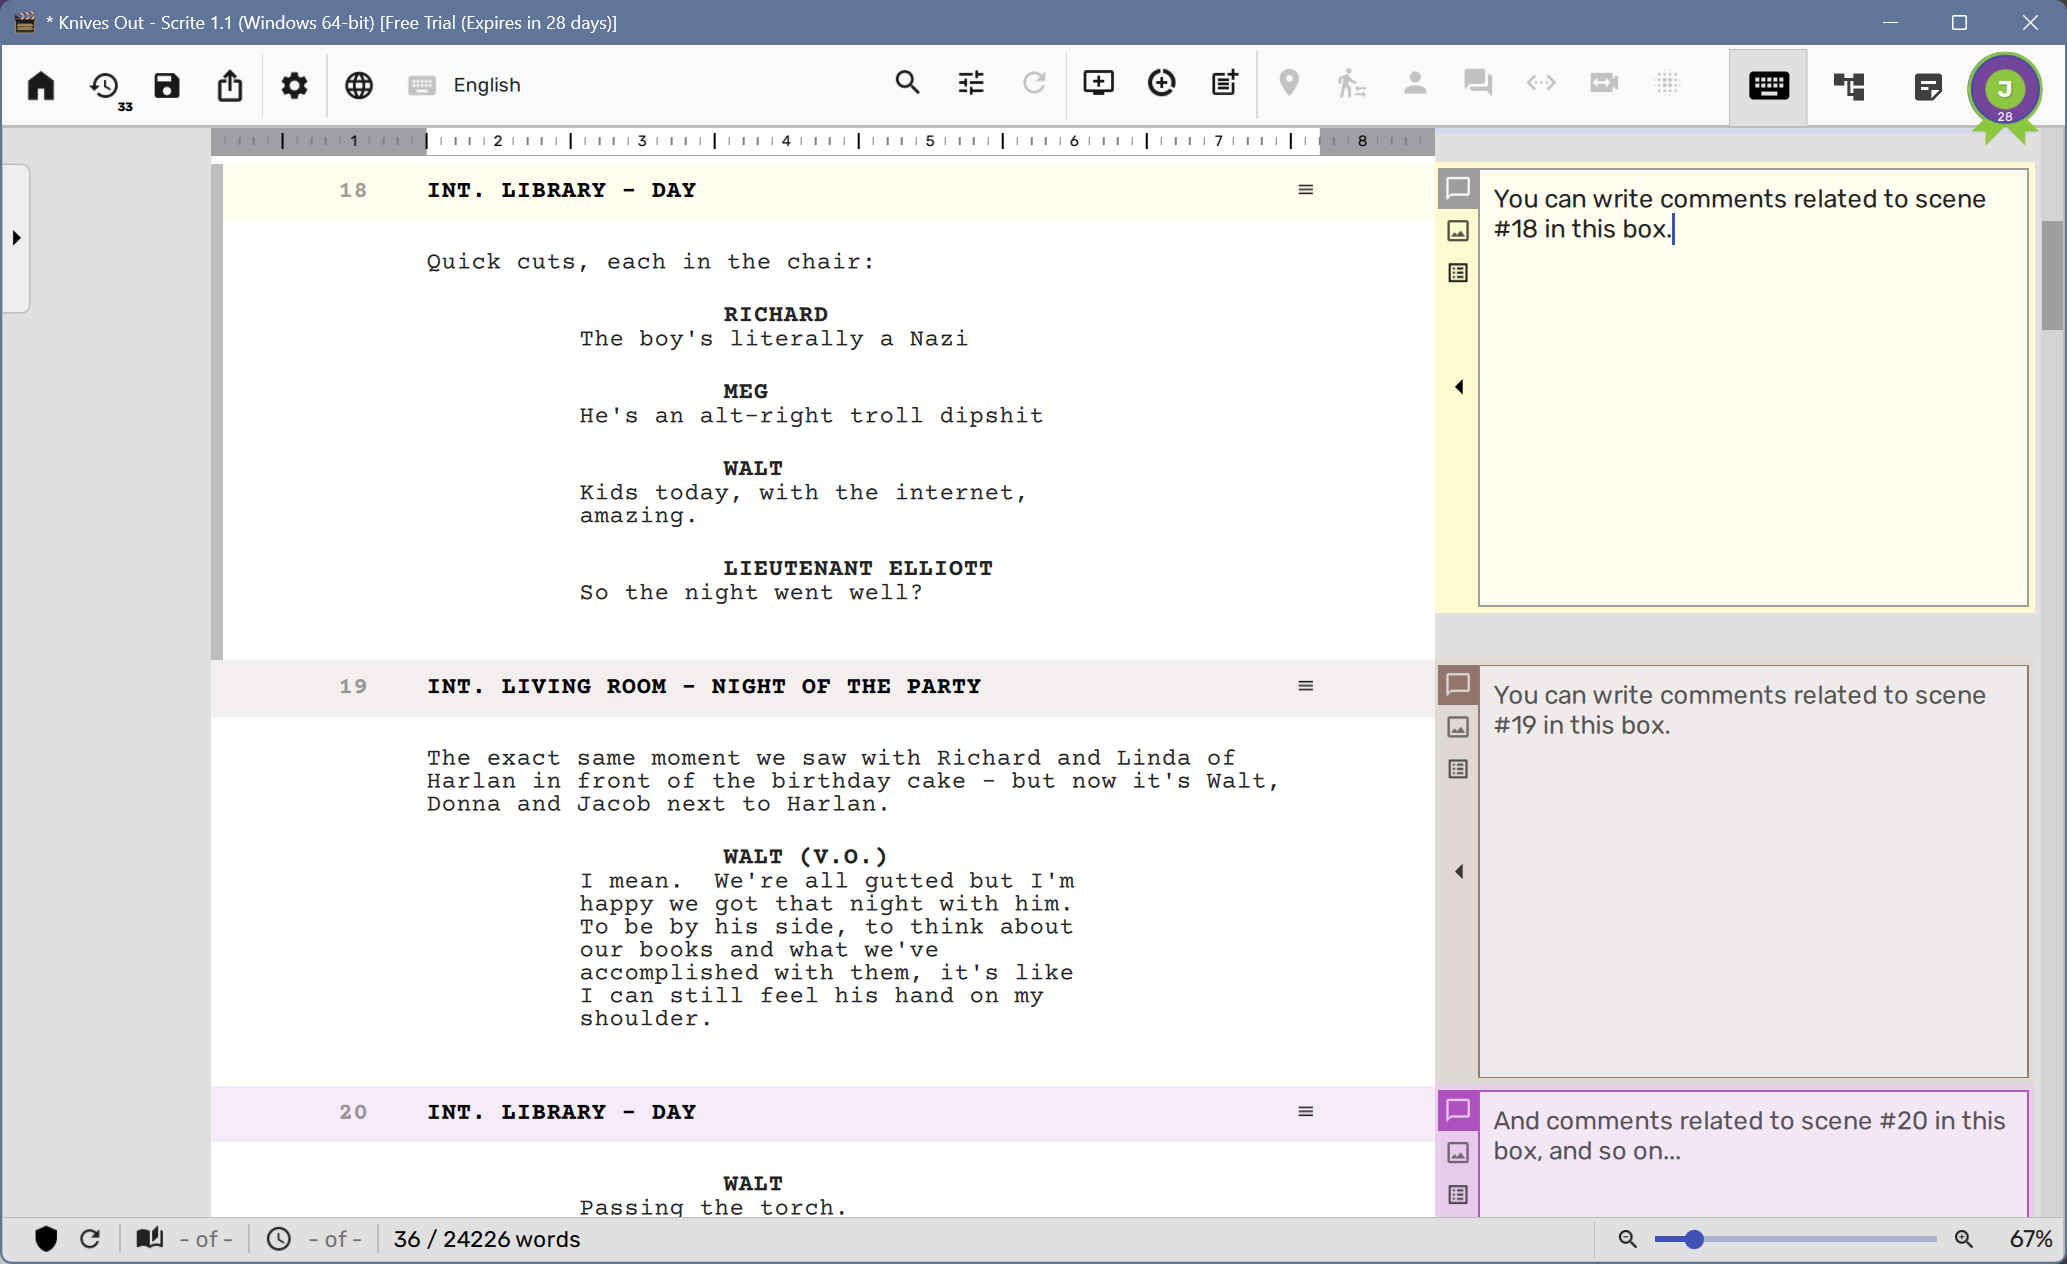
You will notice that the comment box has three tabs.
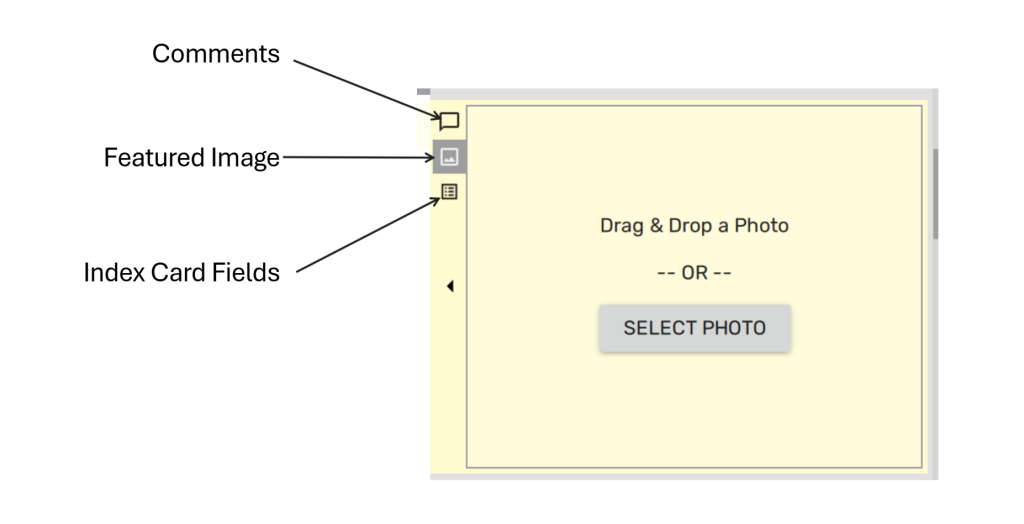
So far, you have been looking at the comments tab. Click on the Featured Image tab to reveal the contents of this tab across all scenes in the screenplay editor.
To this area you can either drag and drop a photo , or click on “Select Photo” and select a photo, to assign it as a featured photo. Each scene can have only one featured photo, and its usually either a storyboard sketch or photo of the location where you (as writer) imagine the scene to unfold. However, you are free to assign any photo you want.
Index Card Fields
Writers who prefer capturing structured meta-data against each scene, as suggested by Blake Snyder in Save The Cat, can switch to the last tab on the comment box. In this box, you will get to see the scene synopsis on the top followed by a table of fields.
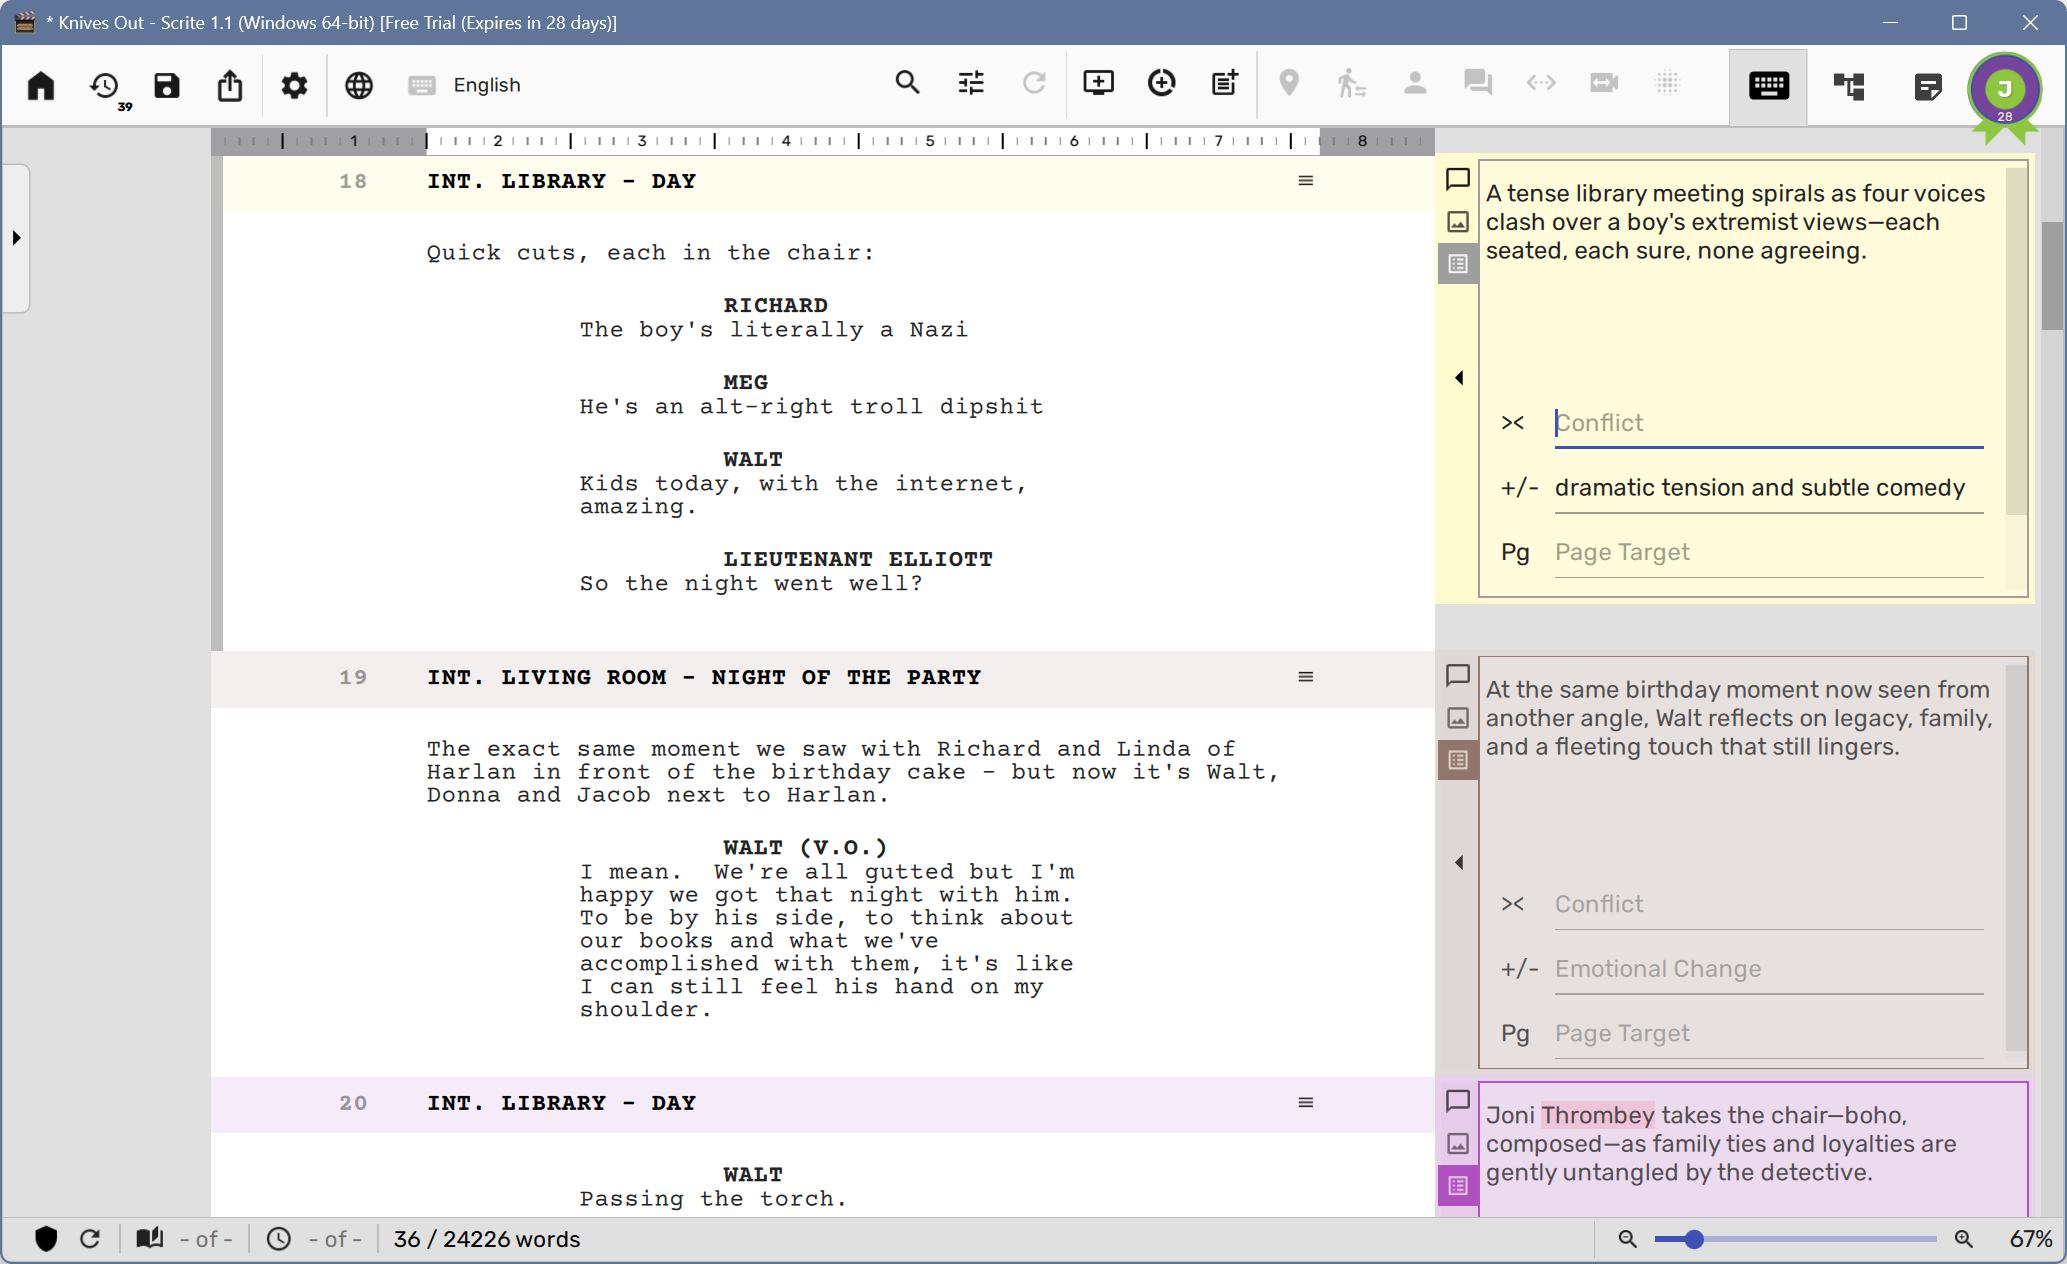
By default “Index Card Fields” table shows three fields
- Conflict
- Emotional Change, and
- Page Target
The purpose and meaning of these fields can be looked up here, although we recommend reading Save The Cat to get a comprehensive grasp of this concept.
If you would like to change the fields shown here, you can scroll down in the box and click on the Edit Icon, to open a dialog box where you can edit these fields.
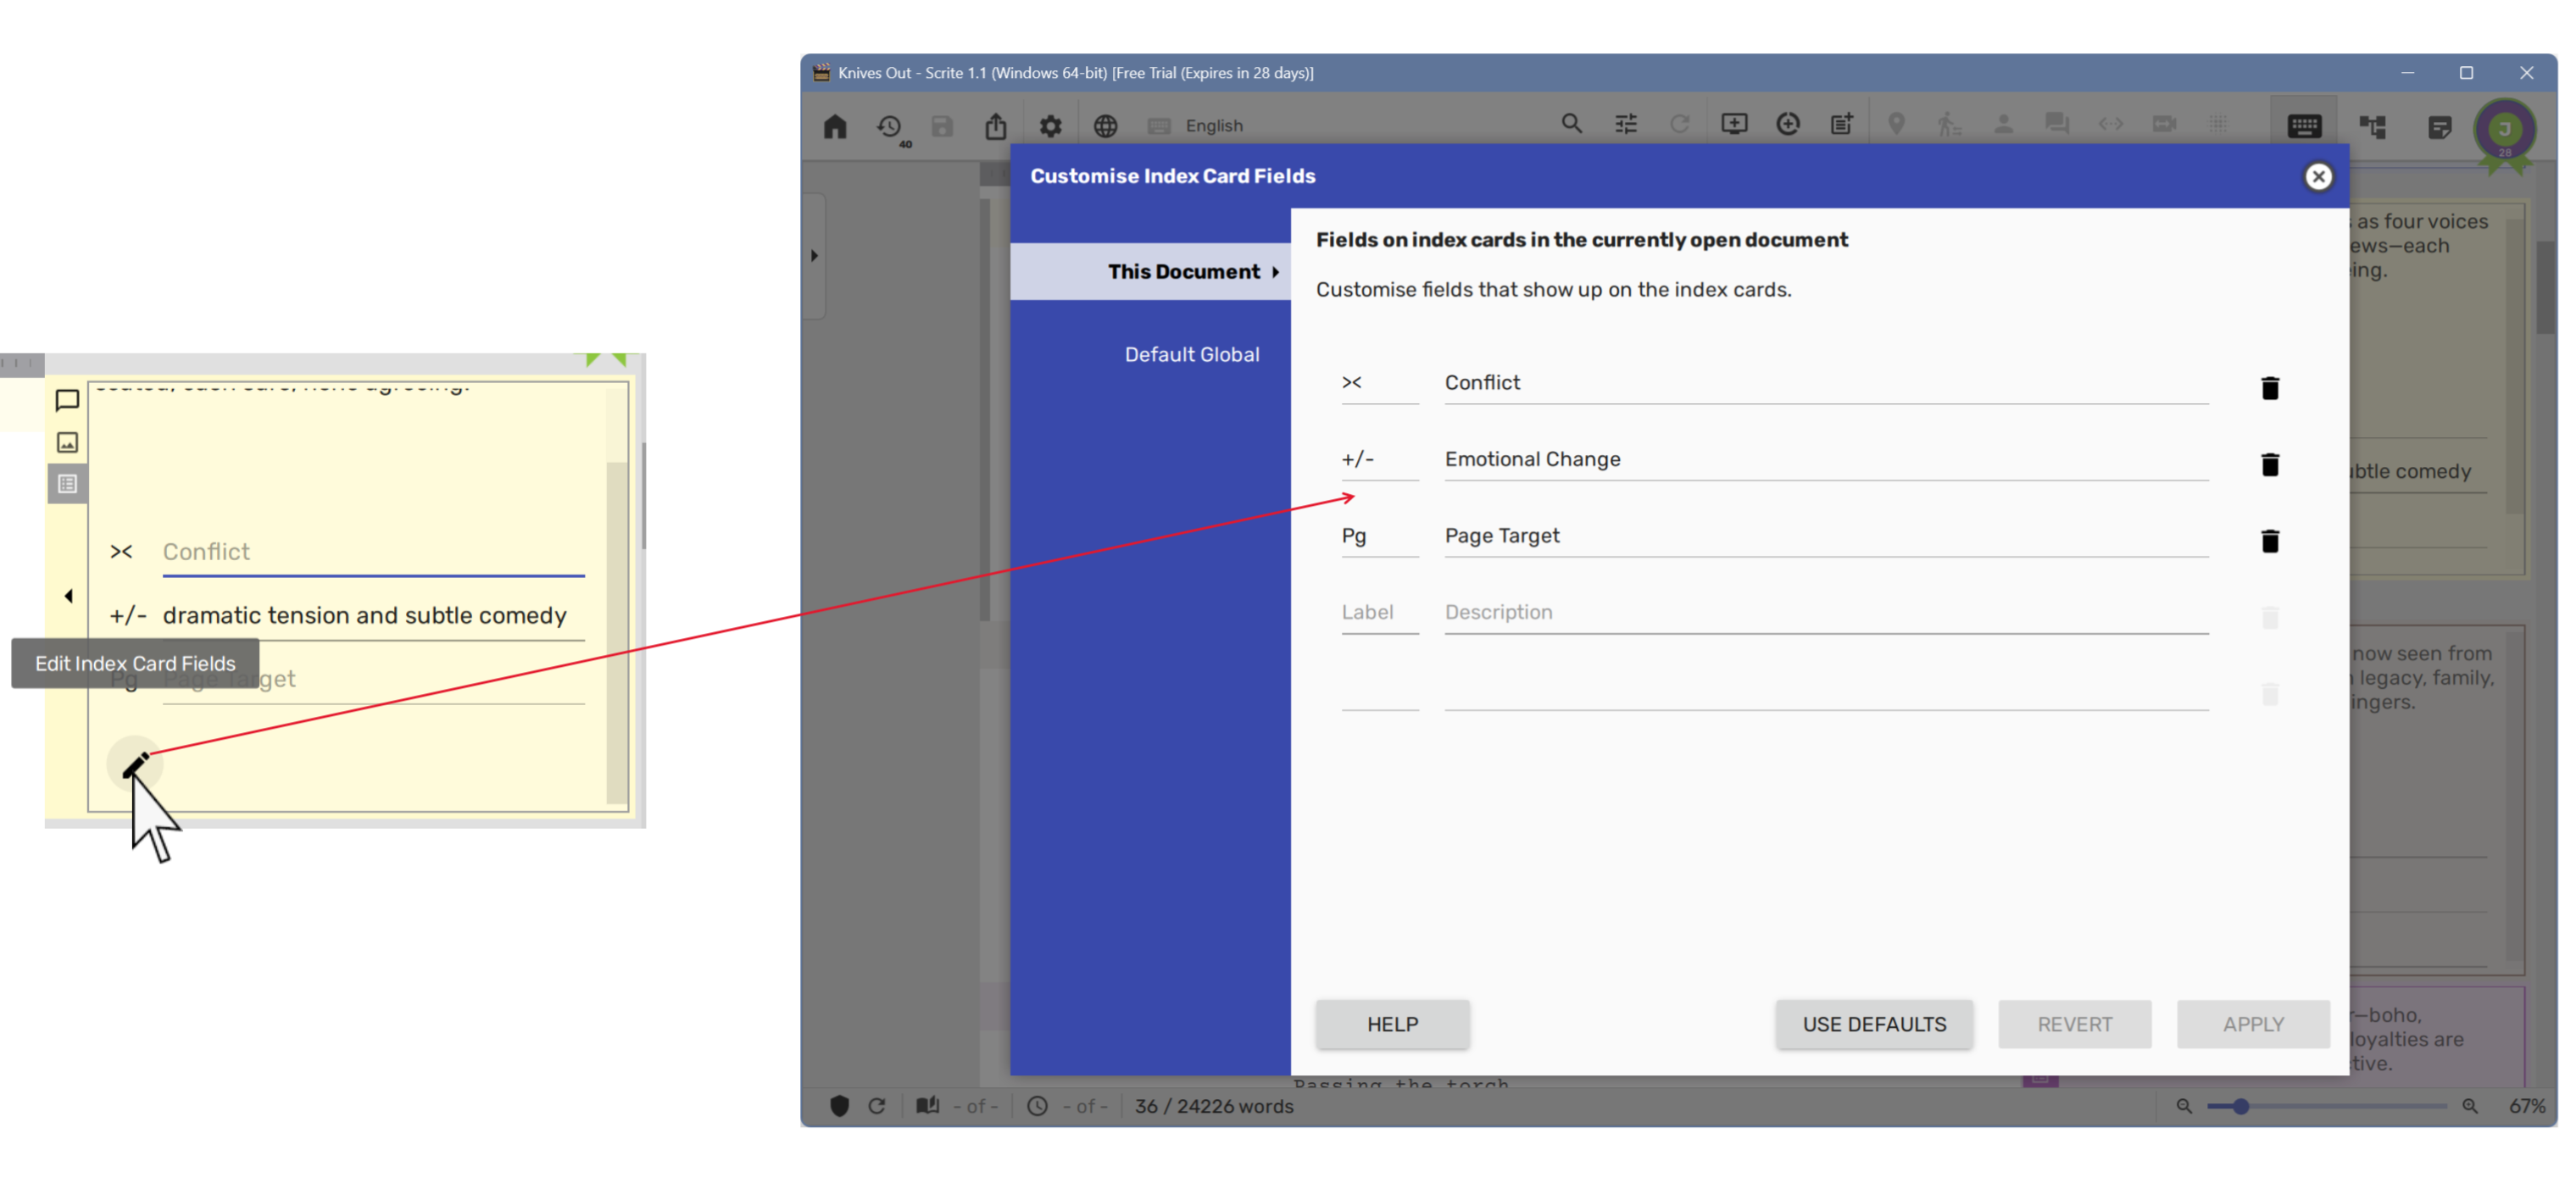
The dialog box lets you configure up to five fields.
NOTE: These fields can also be edited in the structure tab. This will be discussed in another guide, dedicated to the structure tab.
Tagging Character Presence in Scenes
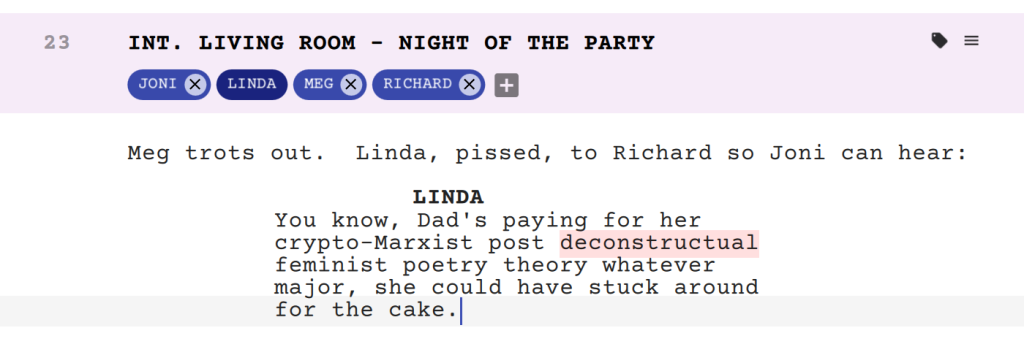
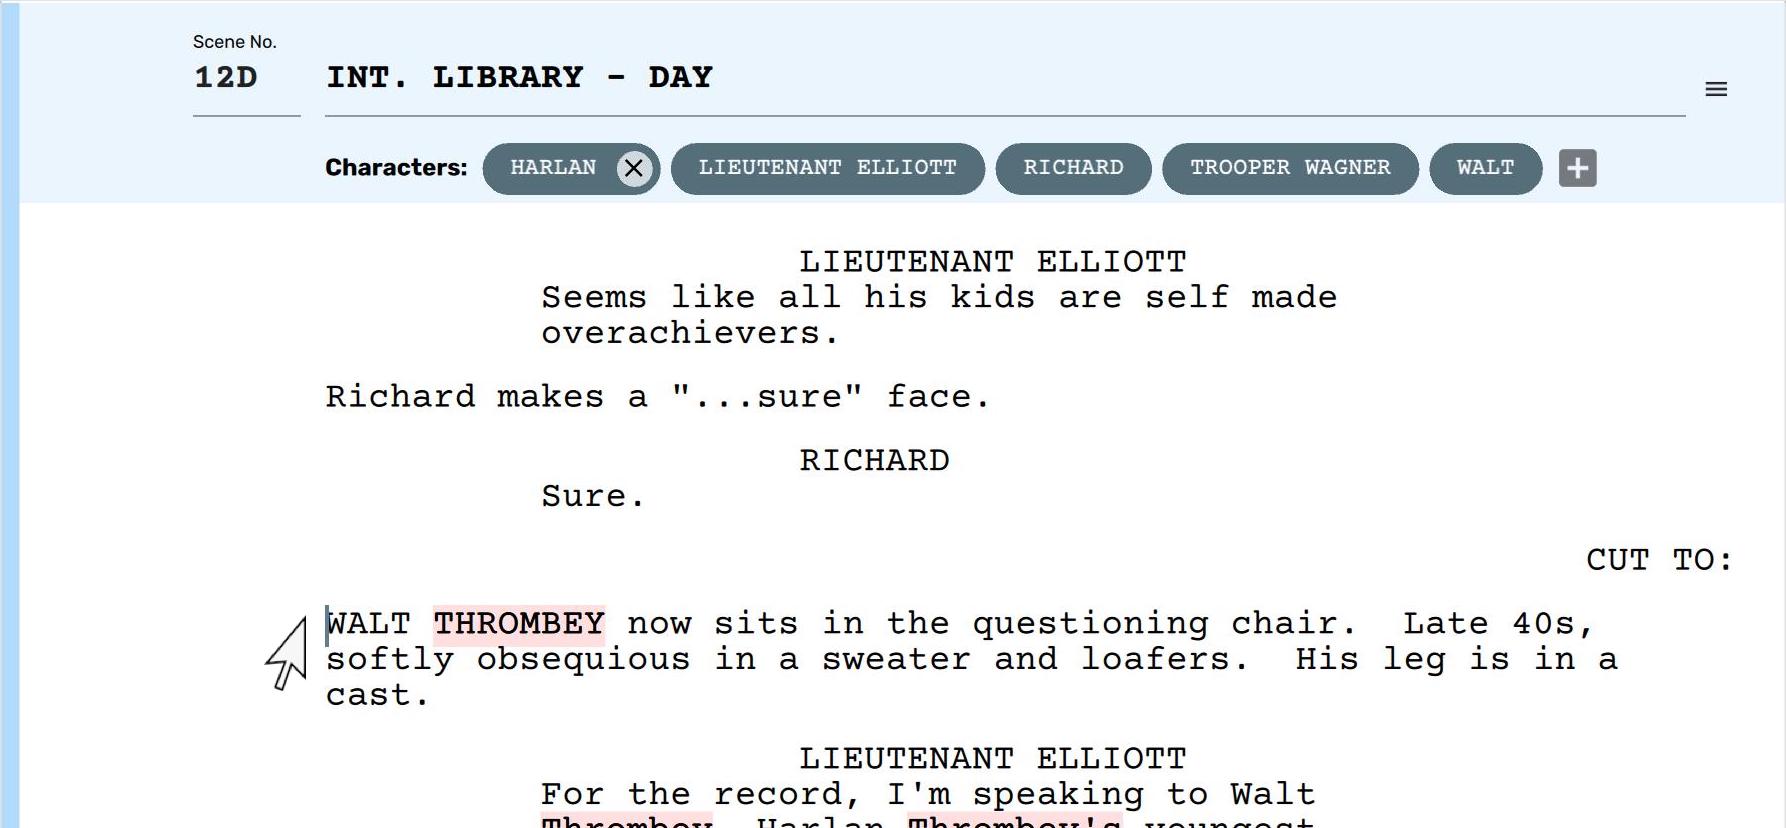
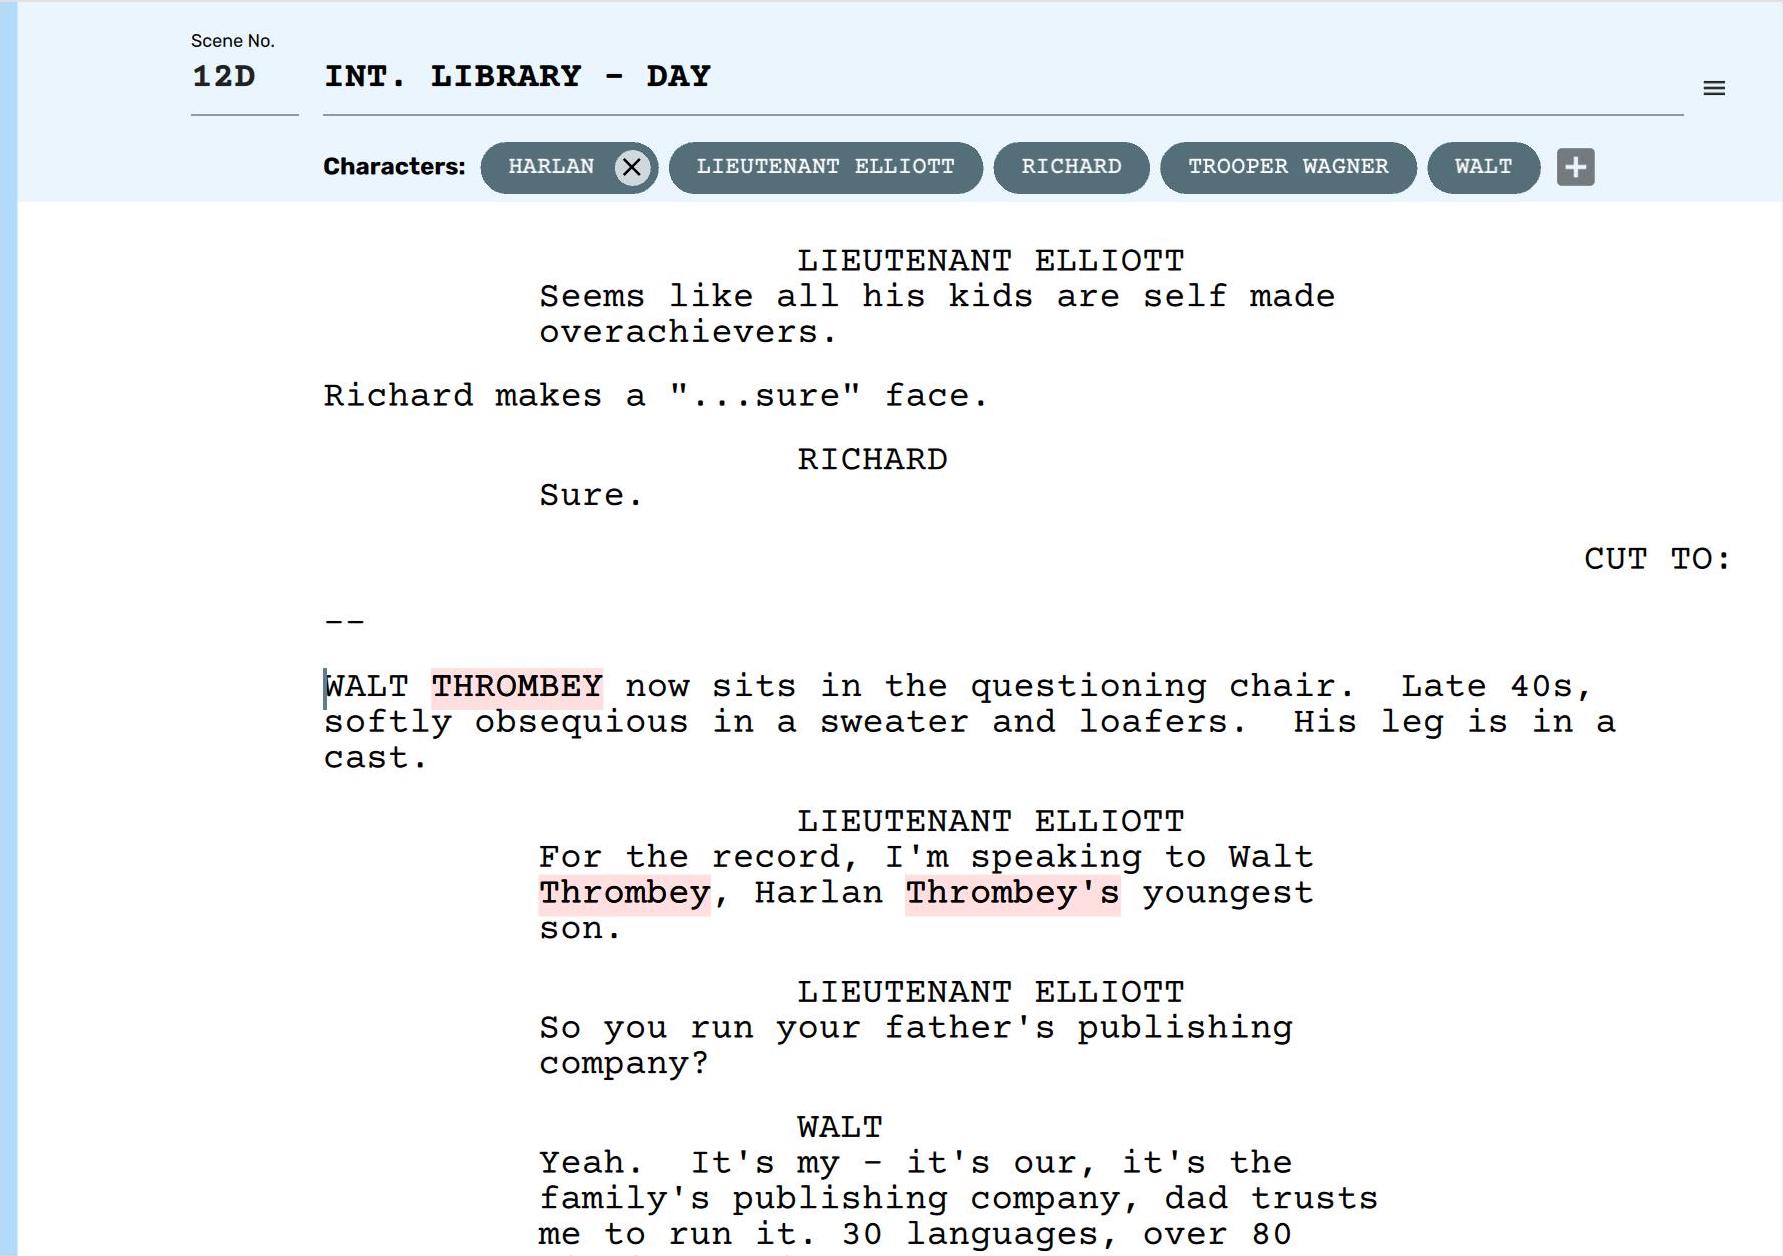
Scrite automatically tags character presence in a scene if they have a dialogue. For example, in the scene #23 below Linda has a dialogue, and you can notice that Scrite has automatically captured the presence of this character.
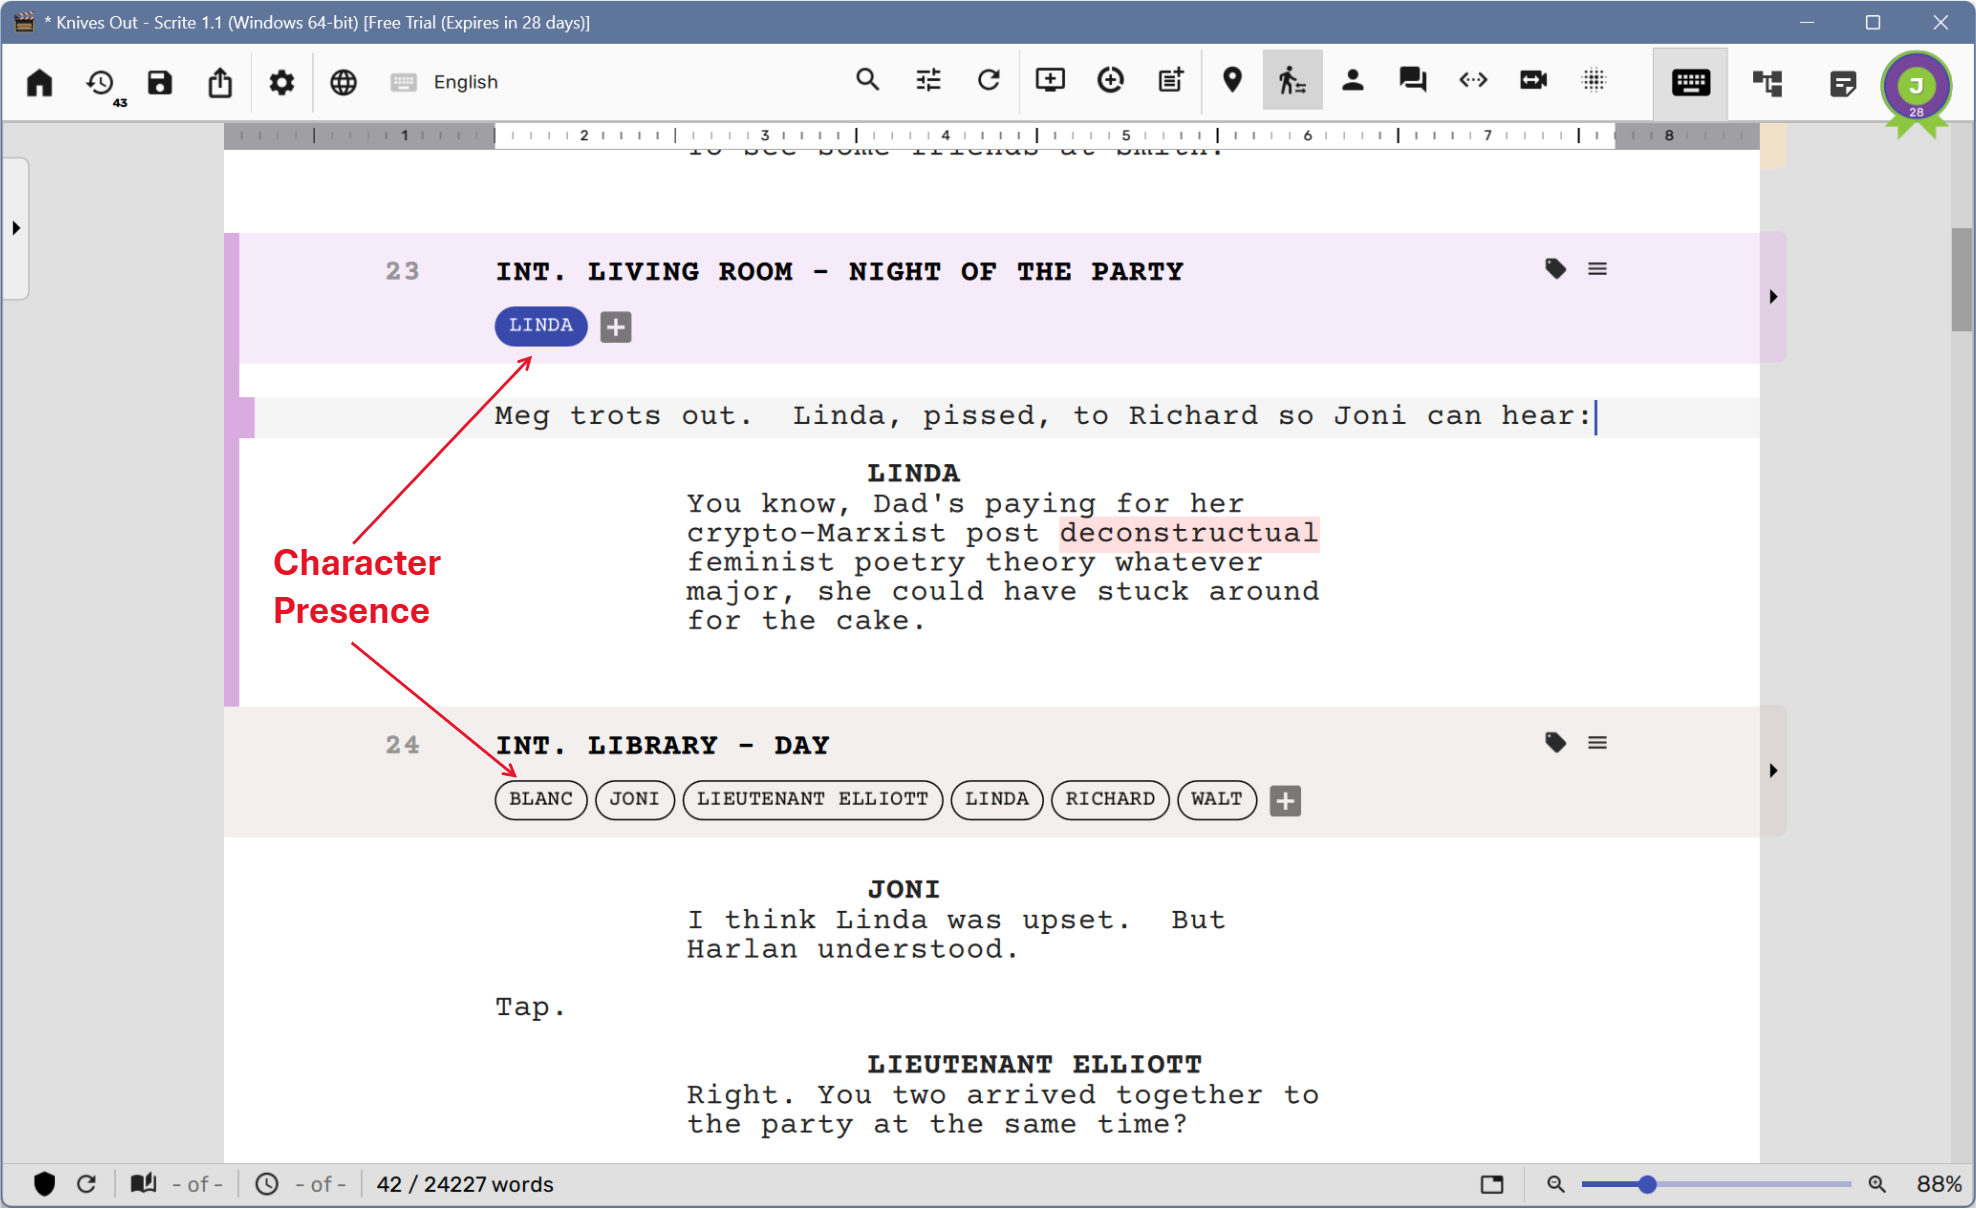
Same is the case with scene #24, where Blank, Joni, Elliot, Linda, Richard and Walt are captured as characters present in that scene.
This kind of tagging is especially useful when it comes to extracting reports. For example, you may want to extract dialogues of a specific character across all scenes, or get a table of character presence across all scenes in the film.
Adding Mute Characters
Notice that in Scene #23, while Linda has a dialogue, Meg, Richard and Joni are also present in the scene, but they are mute. So, strictly speaking they are present in the scene and as such should be tagged as well.
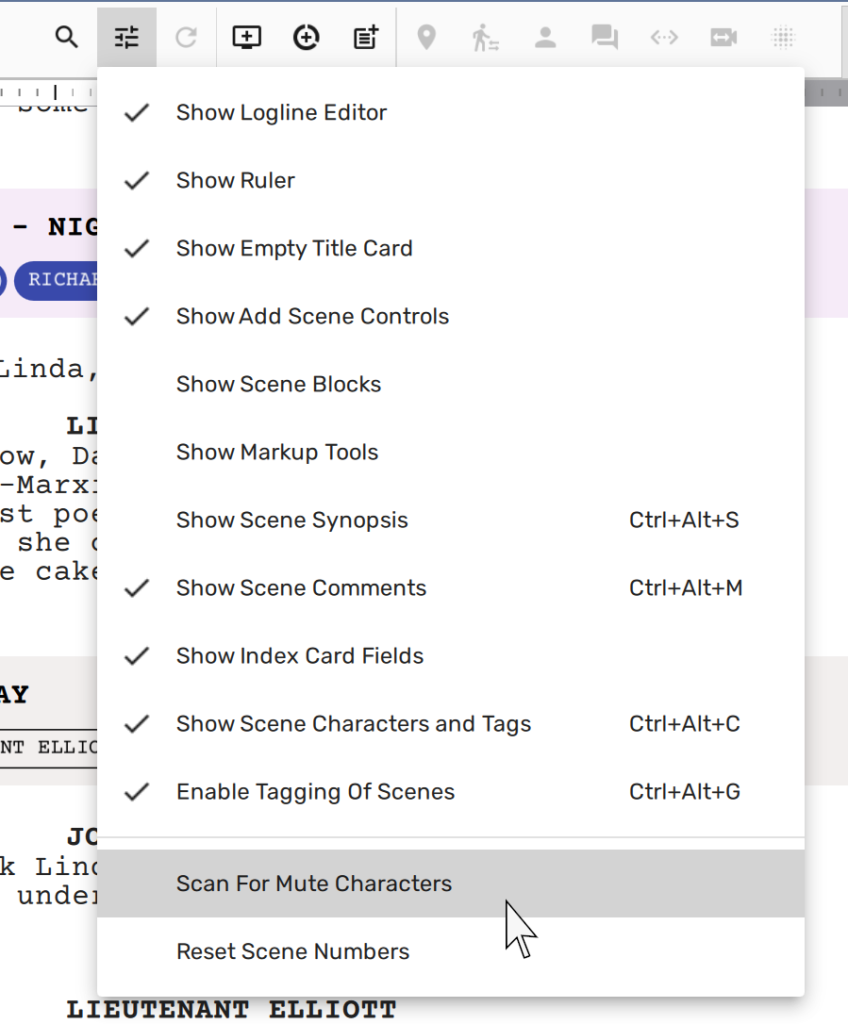
You can add mute characters to the scene either manually, or by asking Scrite to scan for mute characters automatically. To manually add a mute character, click on the + icon and enter the character name.
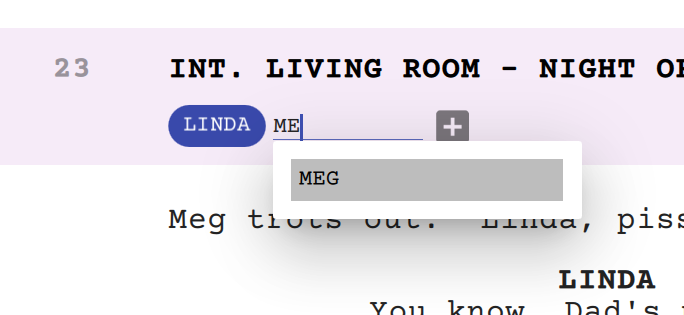
You can add as multiple mute characters. Notice that mute characters will have a cancel icon, which makes it possible to remove them from the scene.
To automatically scan for mute characters, select the “Scan for Mute Characters” option in the “Screenplay Editor Options” menu.
Scrite will look for references to character names in the scene, who may not have a dialogue but are present in the scene nevertheless. However, please note that Scrite only recognizes characters as mute in a scene if they are present in atleast one other scene in the screenplay, either because they have a dialogue or because they are mute.
NOTE: Scanning for mute characters currently works only for character names in English.
Invisible Characters
In some cases, it is possible that a character has a dialogue in the scene but is invisible.
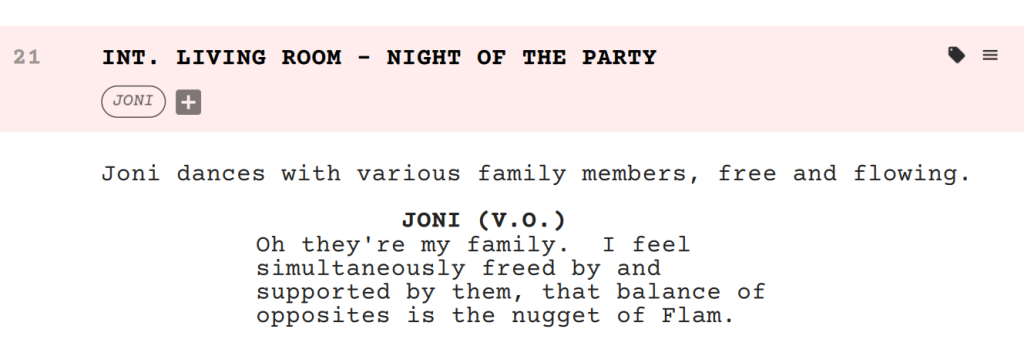
In the scene above, Joni has a dialogue but is invisible, because we only hear Joni’s voice but don’t actually see Joni on the scene. Said in other words, Joni is invisible.
While extracting character presence reports, we need to make sure that Joni’s presence is not marked in this scene, let it impacts scheduling chart that an AD may create for the actor who plays Joni.
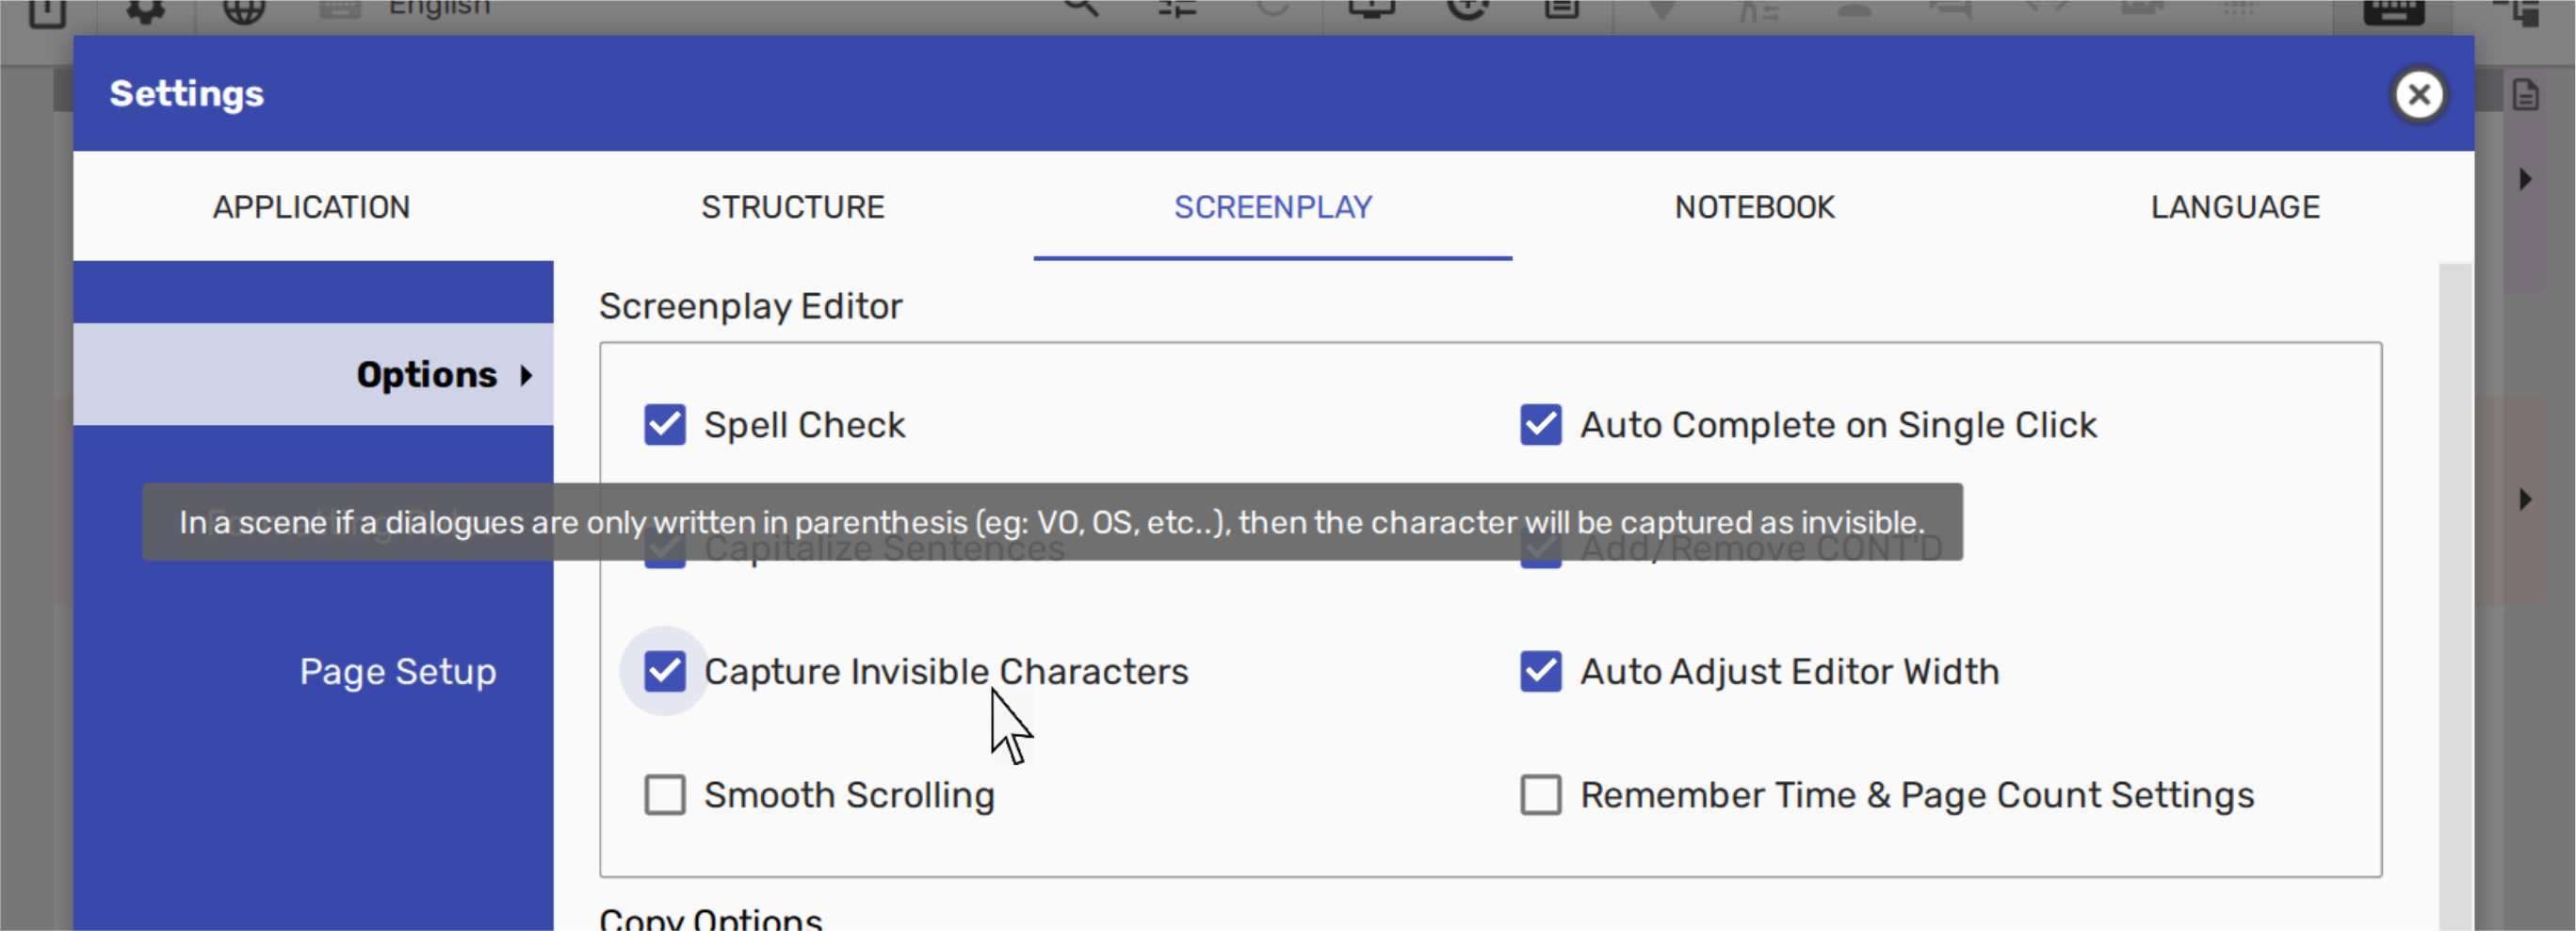
Invisible character names are shown in italics, if “Capture Invisible Character” is checked in Settings > Screenplay > Options page.
Rename Character
If you have “Show Scene Characters and Tags” turned on in Screenplay Editor options, then you can click on a character name in the character list shown under scene heading and select “Rename/Merge Character” option ….
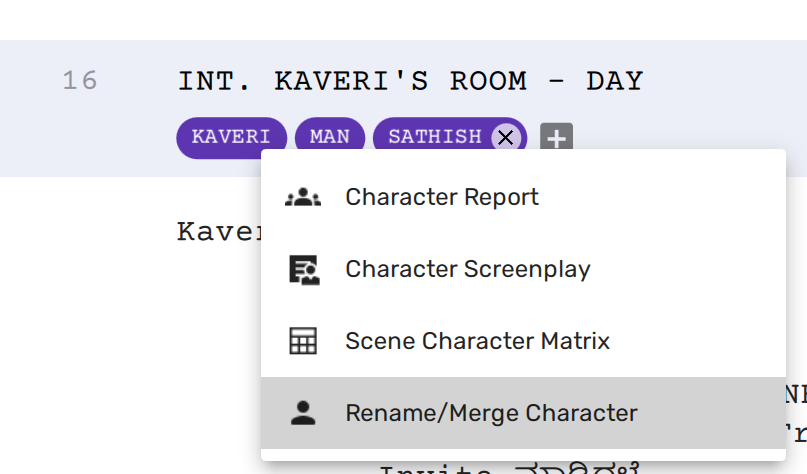
… and Scrite will then present a dialog box for you where you can provide a new name for your character.
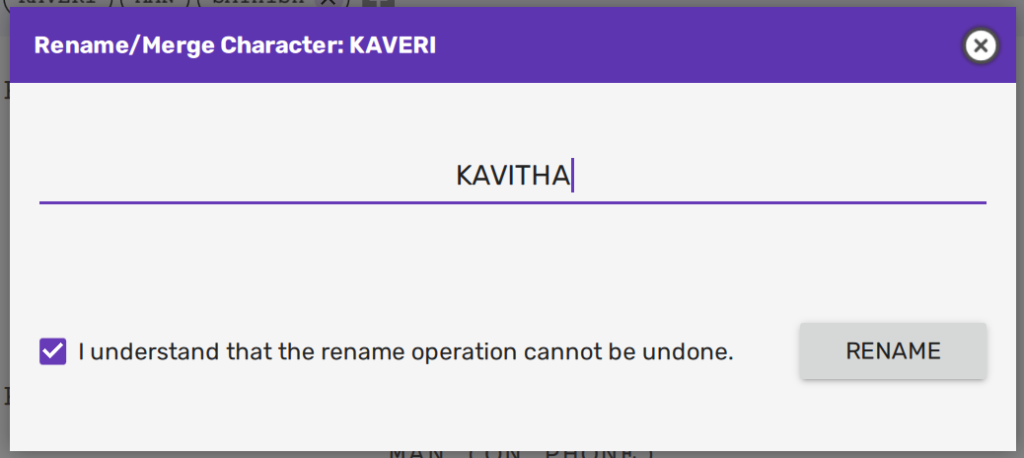
In this dialogue you can either provide a new name and Scrite will rename it for you.
Once renamed, the changes cannot be undone. However, you can rename the new name back to its original name.
Scrite not only changes the name in character paragraphs, but also in scene headings and other paragraphs, including references to the name in scene synopsis and notes.
NOTE: Character renaming works best with English names written in Latin charset. If you have written your entire Screenplay in other language(s), then Scrite can’t properly rename your characters unless an entire word is found with the character name in it.
Merge Characters
Suppose that you have a screenplay where you may have accidentally used two names for the same character. In this case, Maya and Mayavi.
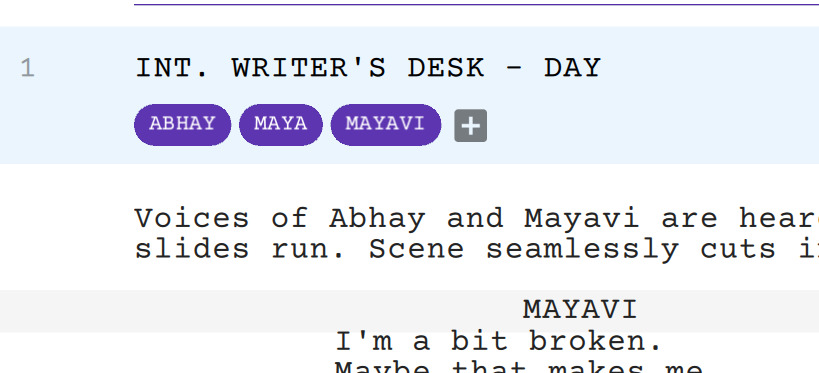
You may want to merge Mayavi into Maya across the entire screenplay, even if the name is used in action or dialogue paragraphs. Just like you would rename characters, you can click on Mayavi and select the “Rename/Merge Character” option.
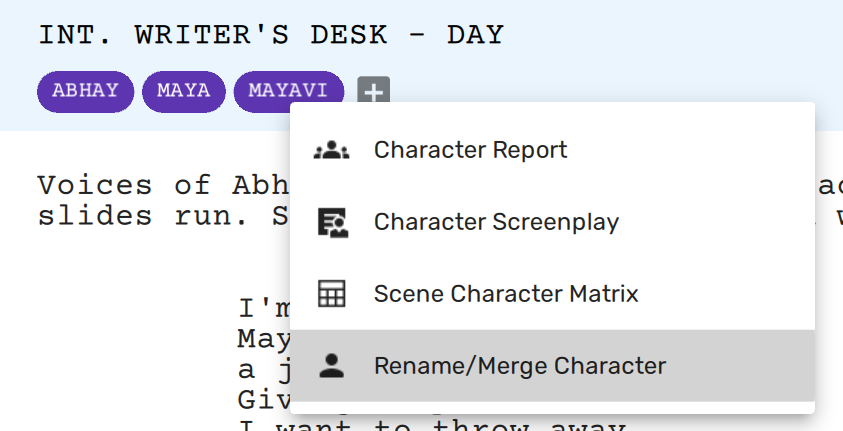
Scrite will present a dialog for you to enter the new character name. In that dialog box, write the name of the character you want to merge this one with.
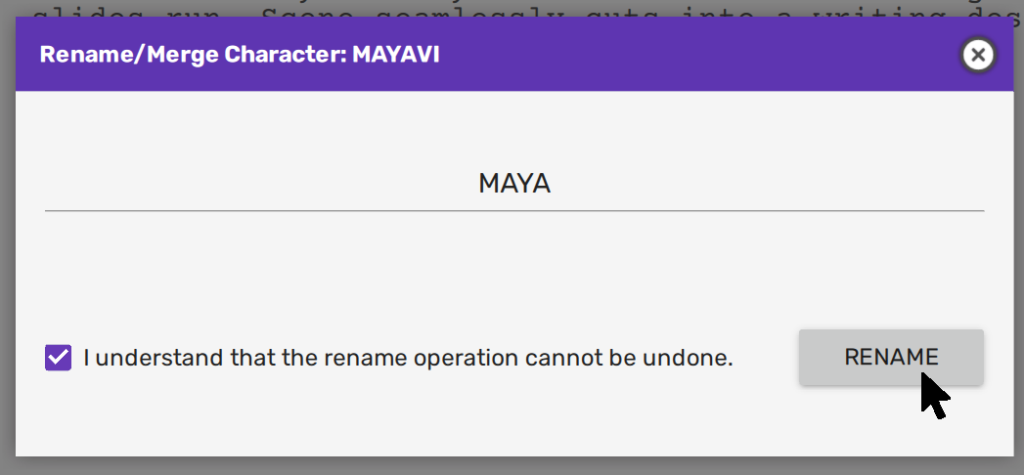
Now, upon clicking the “Rename” button, you will notice that Scrite recognizes it as a merge workflow and will ask you to confirm it.
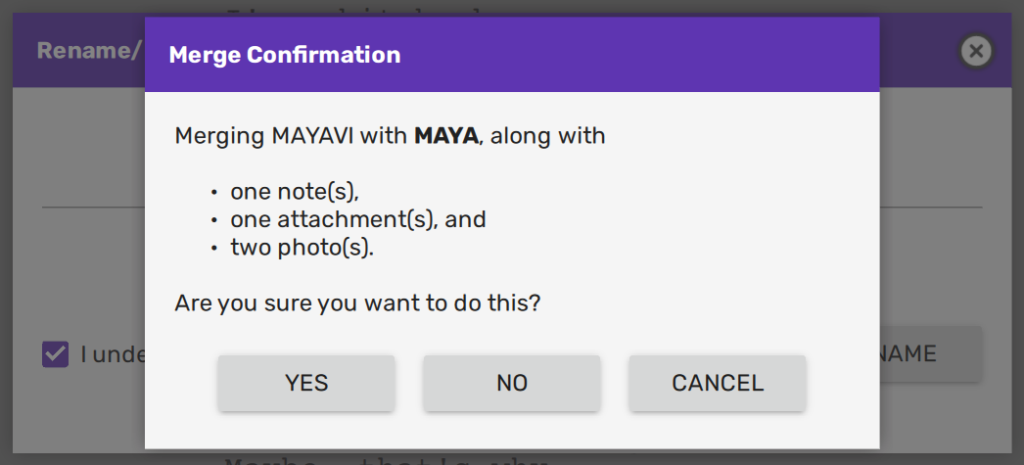
Upon clicking “Yes” in this dialog box, Scrite not only changes Mayavi to Maya everywhere in the screenplay, but it will also move notes, attachments, and photos associated with Mayavi with the notes, attachments, and photos of Maya.
NOTE: This works works best with English names written in Latin charset. If you have written your entire Screenplay in other language(s), then Scrite can’t properly rename your characters unless an entire word is found with the character name in it.
Writing with Scene-Centric Precision in Scrite
Scrite is built around a scene-centric approach to screenwriting, which not only aligns with how screenplays are typically structured but also directly informs the software’s architecture. Each scene in Scrite is treated as a discrete block of text, allowing the app to load only the content necessary for what’s currently visible in the screenplay editor. This design keeps memory usage low and ensures smooth performance while writing and editing.
If you examine most professionally written screenplays, you’ll notice that the majority of scenes are under a page long—often much shorter—with occasional scenes extending up to two pages. This isn’t just a stylistic trend; it’s an established storytelling practice that supports pacing, clarity, and reader engagement. Scrite is optimized for this style of writing.
While Scrite fully supports longer scenes, it’s important to understand that performance can degrade if the majority of your scenes exceed two pages. In such cases, you may experience sluggish behavior or reduced responsiveness in the editor. To get the most out of Scrite, we strongly recommend structuring your screenplay with short, focused scenes.
Best Practices for Scene Length in Scrite
- Aim to keep most of your scenes under a page in length.
- It’s perfectly fine to include a few longer scenes—up to two pages—but use them sparingly.
- If you find yourself writing a long, continuous scene set in a single location, consider breaking it into multiple smaller scenes. For example:
- Start with a properly formatted scene with a scene heading.
- Divide the action or conversation into logical beats or shifts in focus.
- Only the first scene in the sequence needs a scene heading; the subsequent ones can continue the flow without one, helping keep the narrative dynamic.
This approach not only maintains app performance but also results in a screenplay that reads with better rhythm and visual clarity—something both readers and audiences will appreciate.
Read on to learn how to insert, split, and merge scenes in Scrite to structure your screenplay effectively.
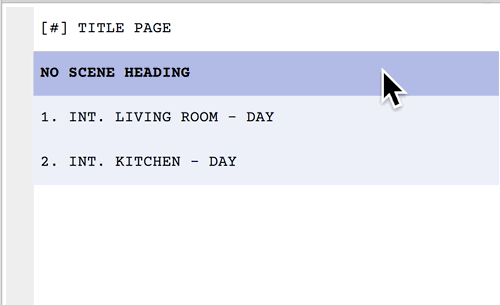
Scenes Without Heading
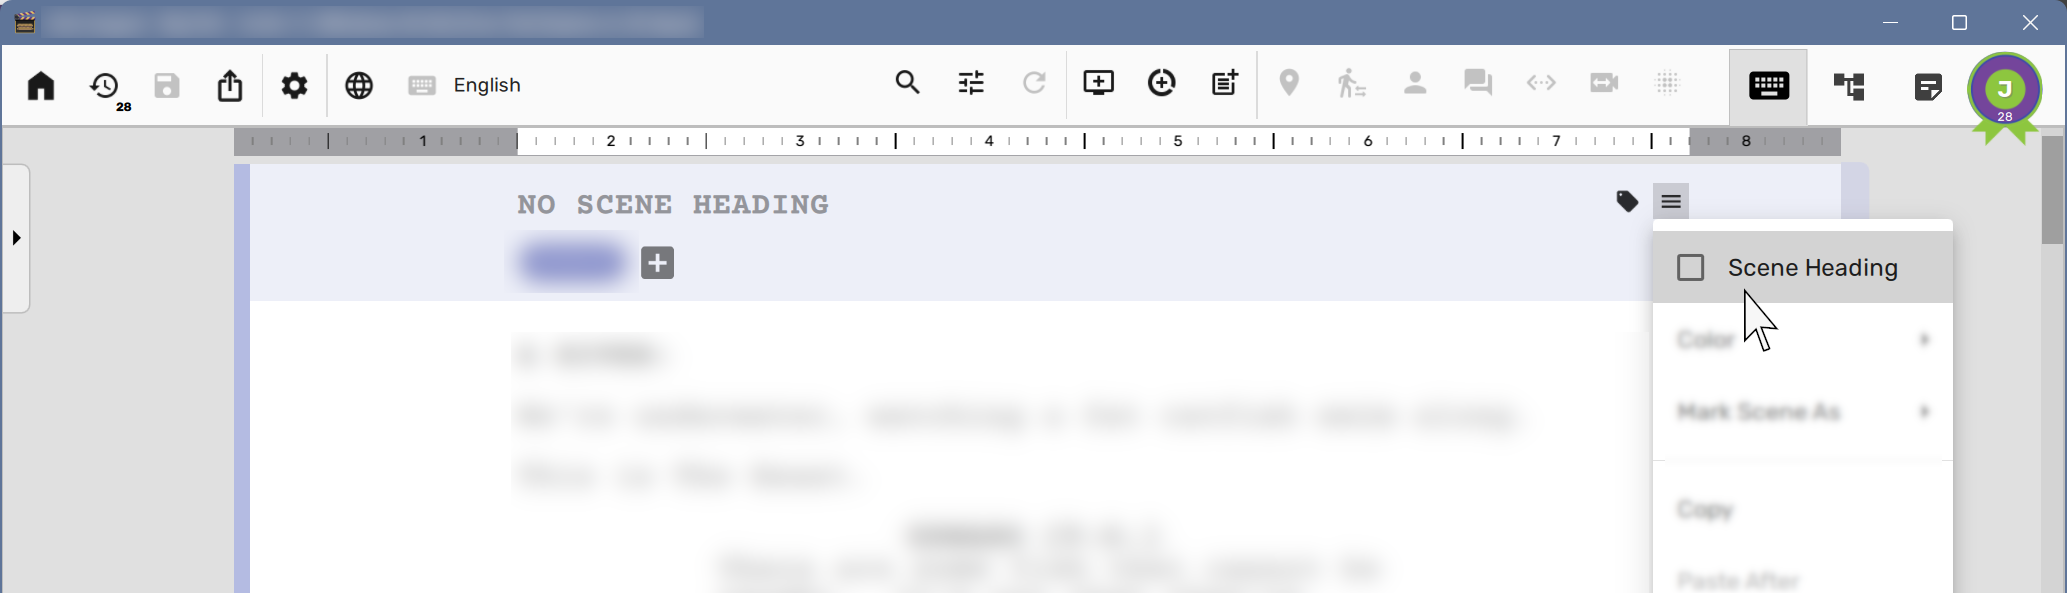
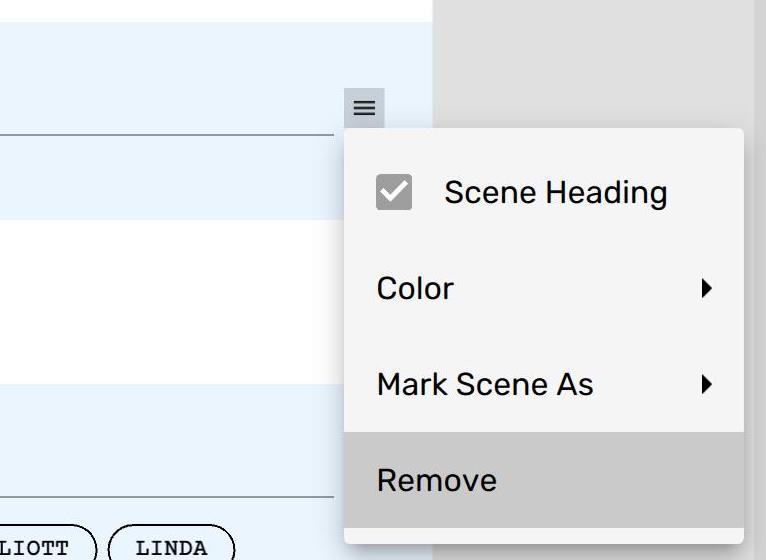
Although Scrite enables scene heading for every scene, you can manually turn off scene headings for specific scenes. This may actually be useful at times.
Simply pull out the scene menu and uncheck the “Scene Heading” option. Scrite immediately replaces the scene heading with a “NO SCENE HEADING” text.
Scenes without a heading are shown as is in preview and exported as such in PDF and reports.
Heading-less scenes are useful when you have a situation written down but want to retain the flexibility of moving them into the screenplay at an appropriate place, or you want to break a large scene into many smaller ones, with each capturing a distinct story beat or shift in focus.
Inserting Scenes
To insert a scene in-between two existing scenes in the screenplay, simply make the first of the two scenes active…
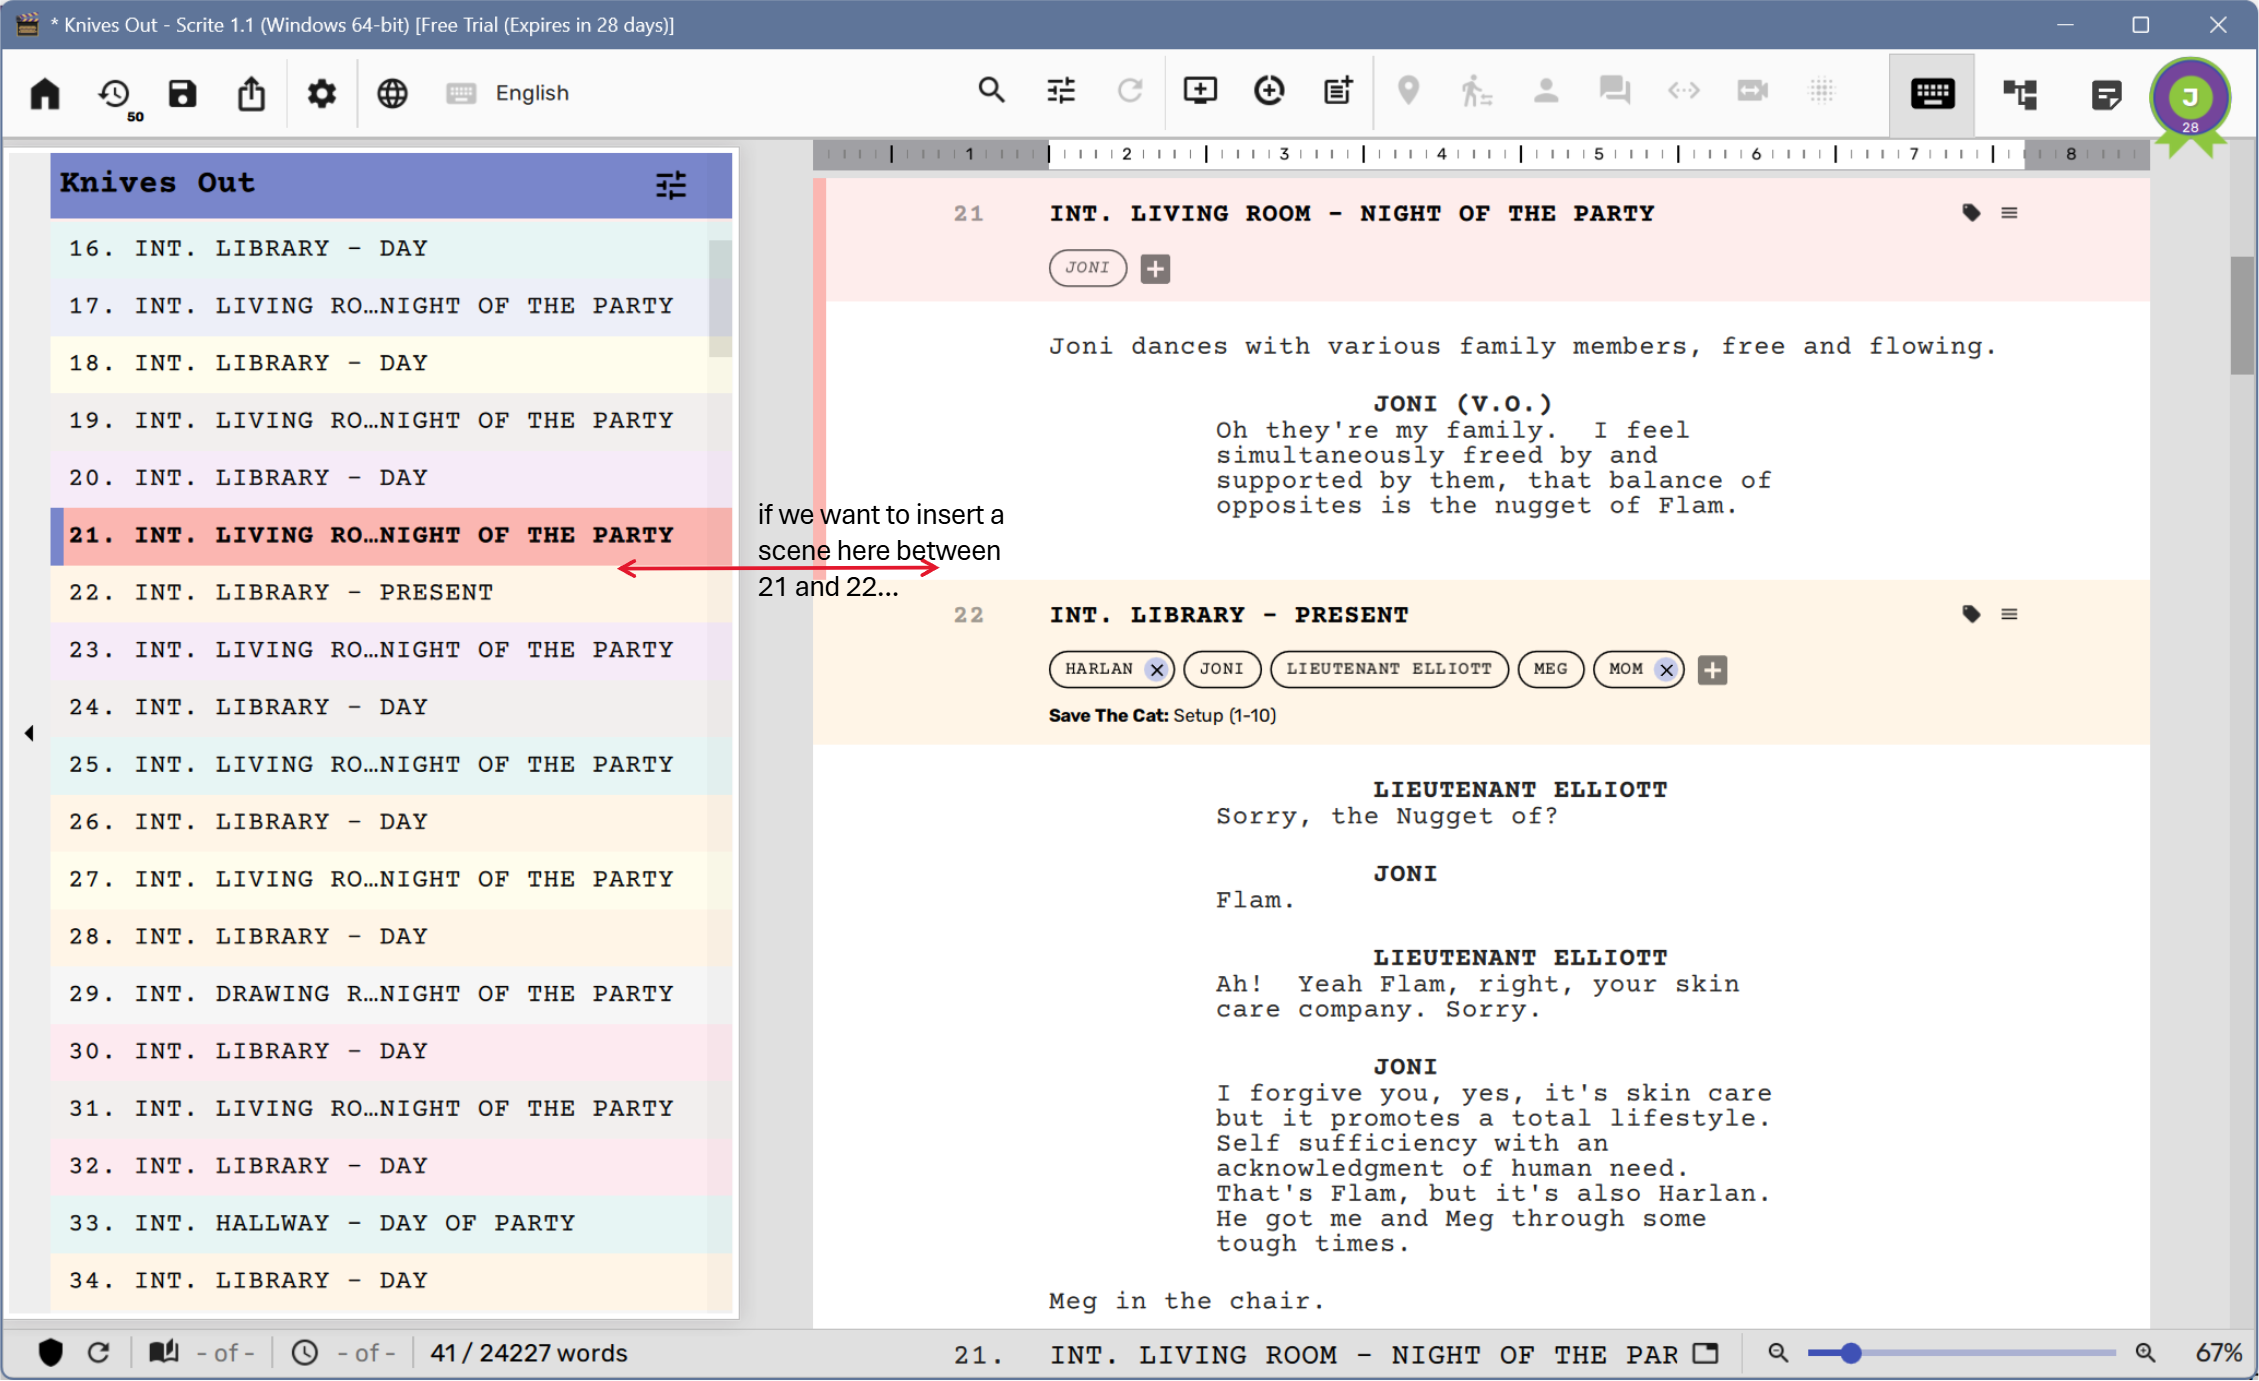
… then click on the add scene button in the toolbar …

… or use the keyboard shortcut Ctrl+Shift+N.

Scrite automatically adds a scene, whose heading is a slight variation of the previous scene. You can edit both the scene heading and the scene contents.
Removing Scenes
Removing a scene is as simple as pulling out the scene menu and selecting the “Remove” option.
Removed scenes are not deleted, they are just no longer a part of the screenplay. You can always add them back by switching to the Structure tab.
Splitting Scenes
Sometimes you may want to split a long scene into two parts. Simply place the cursor before the first character of the paragraph across which you want to split…
Then you can either right-click and select the “Split Scene” option or use the keyboard shortcut Ctrl+Shift+Return or Ctrl+Shit+Enter on Windows & Linux, ⌘+Shift+Return on Mac to split the scene across the selected paragraph.
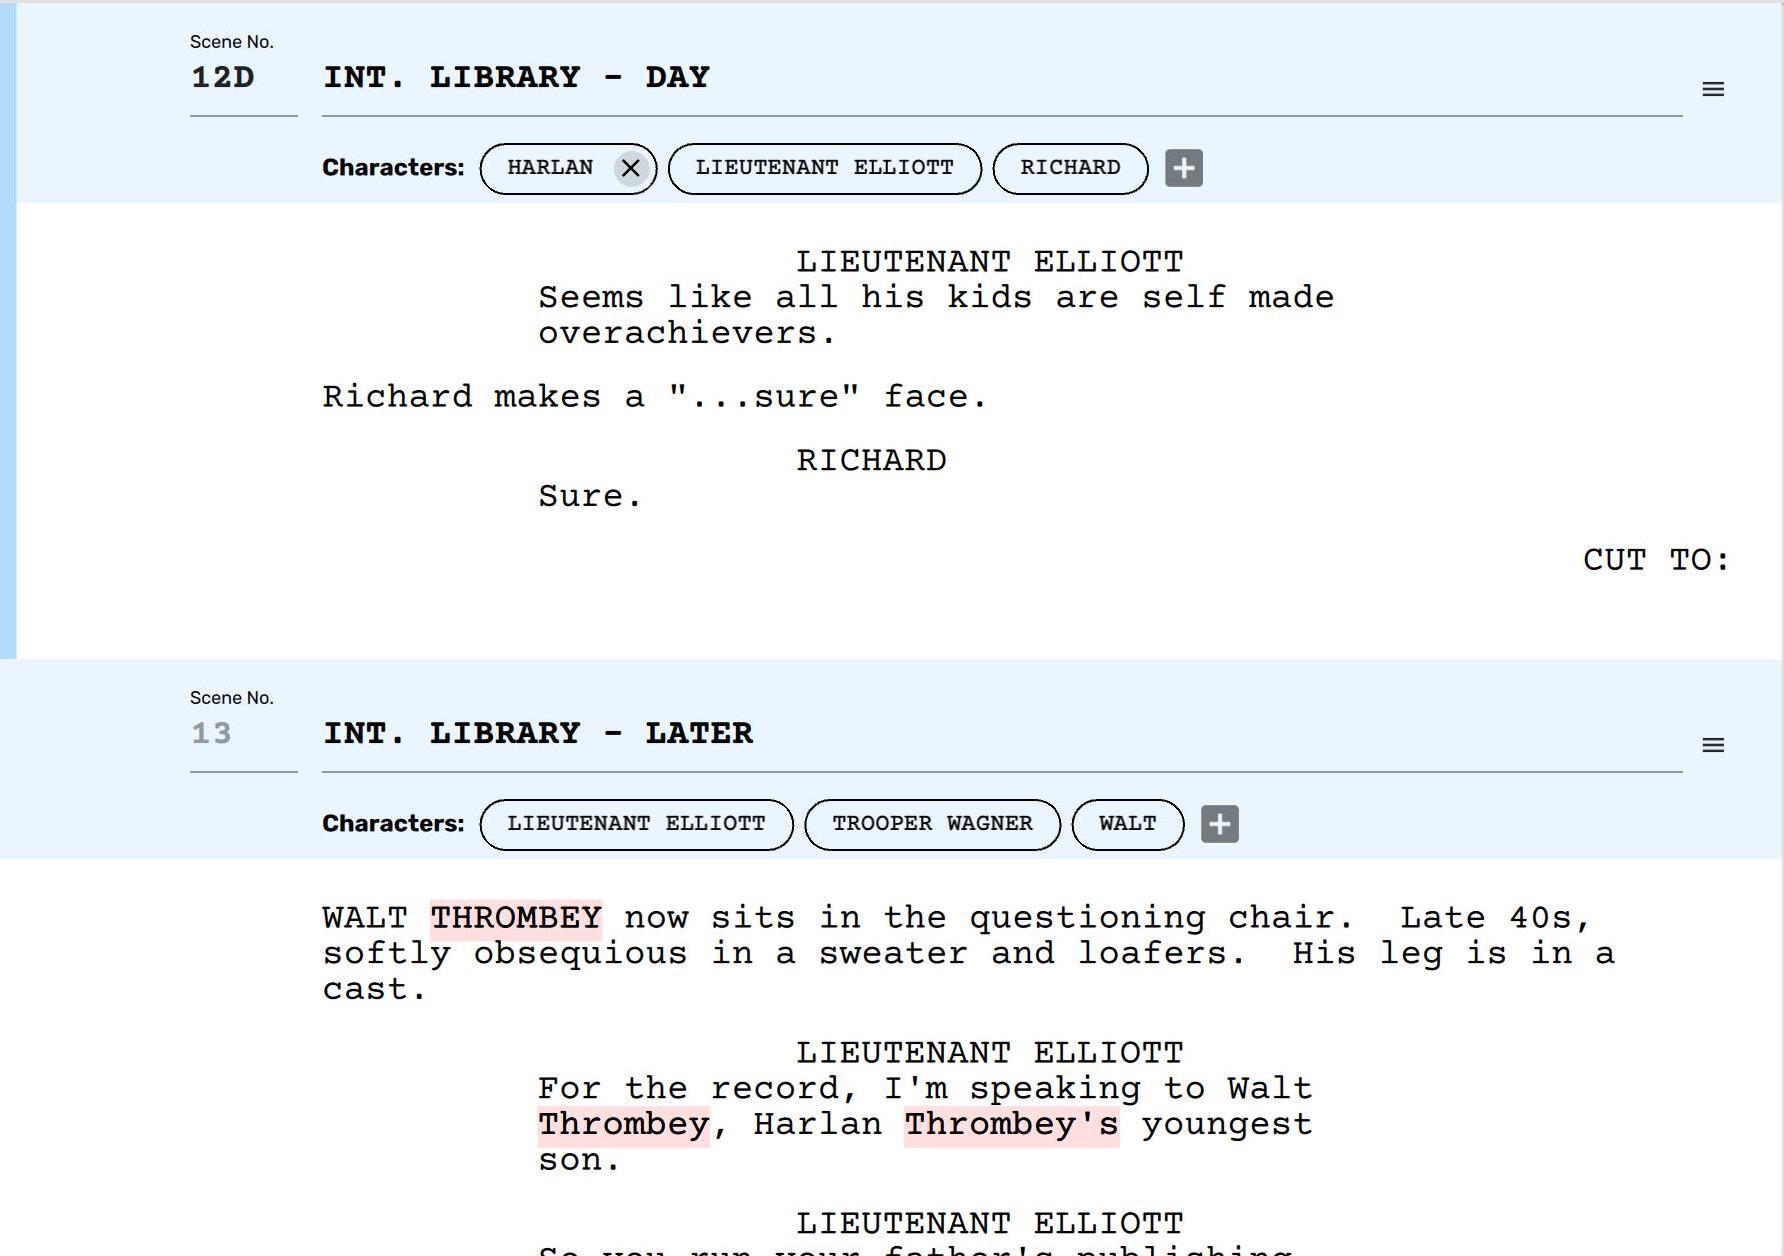
NOTE: While splitting, Scrite splits the character list with dialogues accurately, but retains mute characters in the original scene from which the split was initiated.
Merging Scenes
You can merge one scene with the scene preceding it by simply taking the cursor to the first line of the scene…
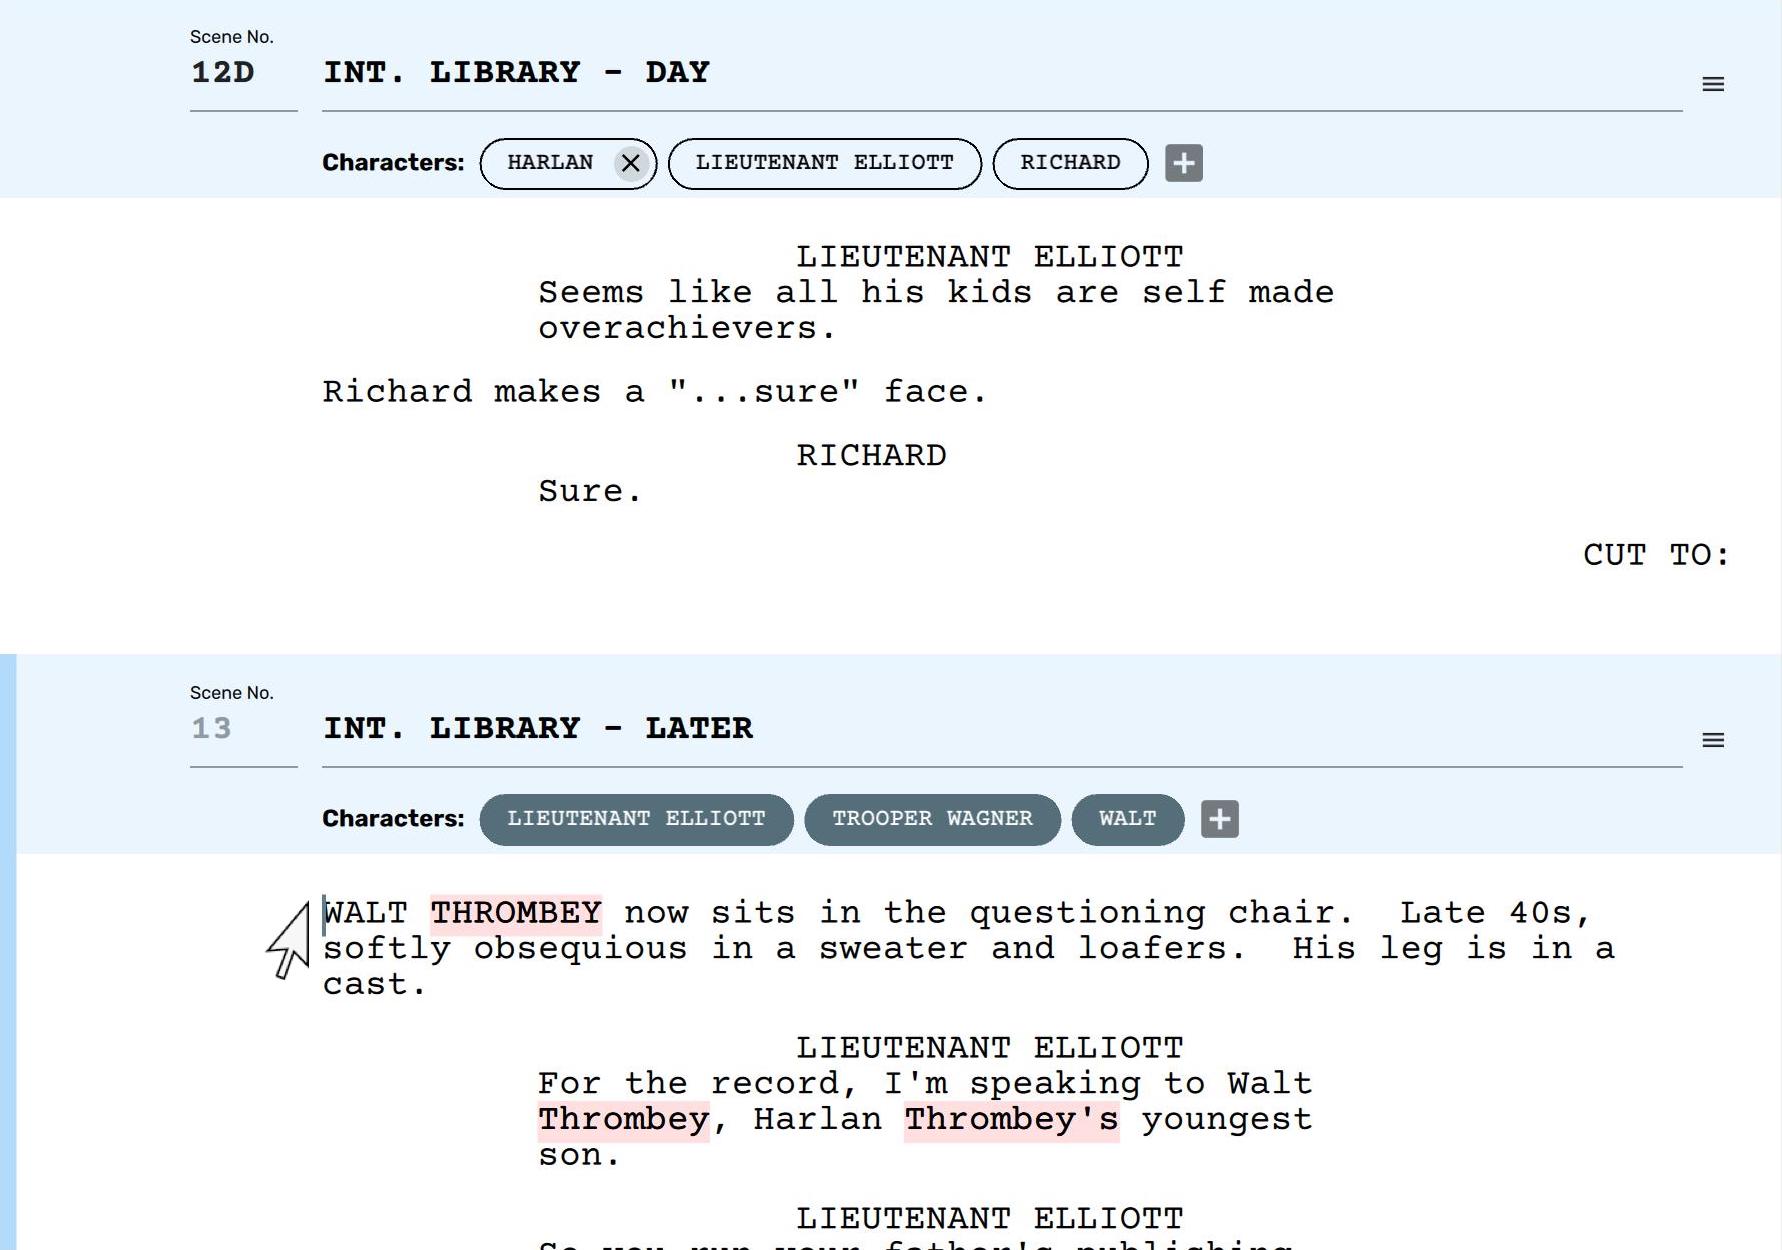
You can now either right-click and select “Join Previous Scene” option or use the keyboard shortcut Ctrl+Shift+Backspace on Windows and Linux, ⌘+Shift+Backspace on Mac to merge scenes.
Scrite inserts a — separator paragraph between the scenes that were merged, but you can explicitly delete them.
Splitting and merging scenes may seem a bit round about in Scrite, because its not a page-centric app like many other screenwriting apps. Scrite employs a scene-centric UI, so splitting and merging of scenes are consistent with its design philosophy.
Reordering Scenes
Which brings us to the next topic, which is reordering scenes. Suppose we want the heading-less scene created in the previous section to now show up after Scene #1, we can simply drag the scene into place on the scene list panel.
Now the scene which was only a possibility until the last section, suddenly has context and a place in the screenplay.
If you move the heading-less scene to another location in the screenplay, it will inherit the context set by the previous scene in its new location.
Spell Check
Scrite bundles integration with the native Spell Check software already available on your operating system. This way we can share dictionaries with other apps you are already using on your computer.
As of writing, Scrite only supports spell check for English language. In a future update we hope to offer spell check for all supported languages in Scrite.
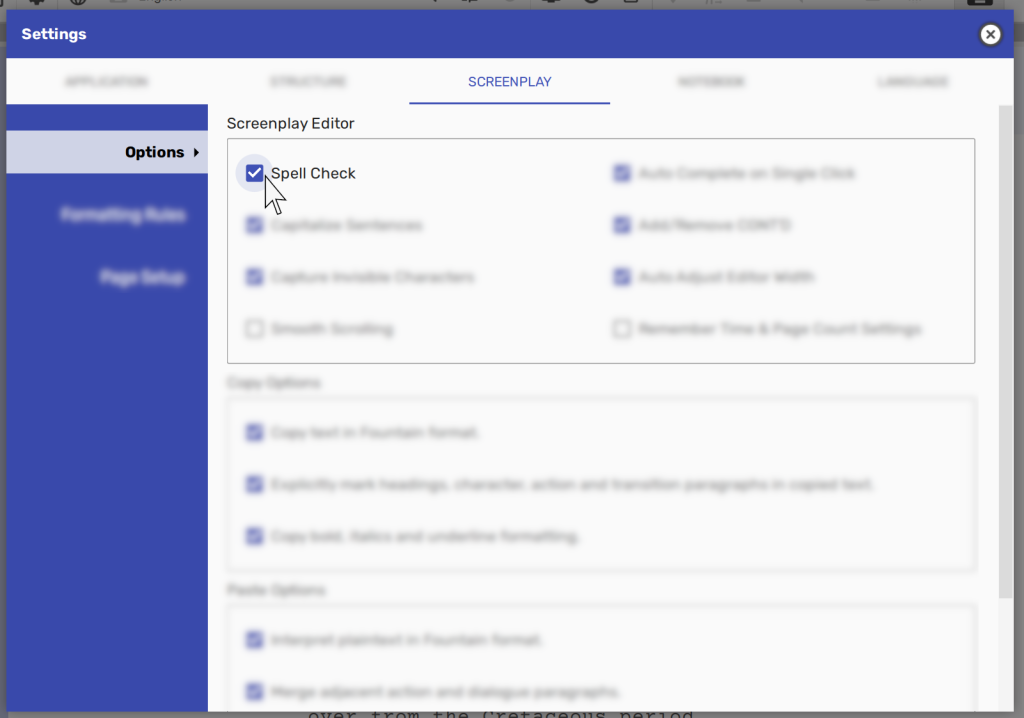
By default spell check is enabled in Scrite, but you can manually toggle it in Settings.
Once enabled, Scrite will highlight in red any spelling mistake in your screenplay text. When you right click on the highlighted word, you will be presented with options to correct the spelling mistake.
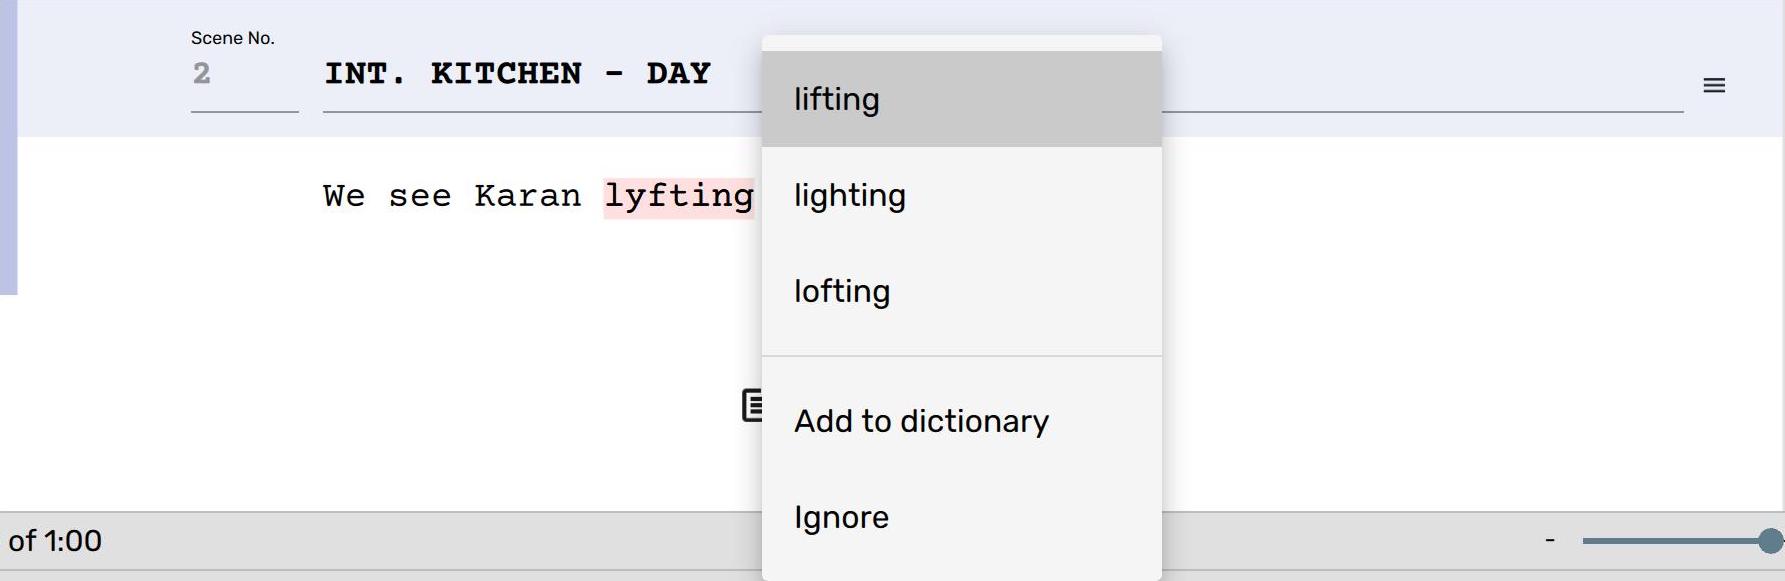
You can pick from the selected options or manually correct the spelling mistake. If you believe that you have spelt the word correctly, you can either
- Add to dictionary: in which case Scrite will register your word in the system wide dictionary, so that other apps recognize your word as spelt-correct. –OR–
- Ignore: so that Scrite will only recognize your word as spelt-correct in the currently open document.
Scrite automatically recognizes all character names as correct spellings.
NOTE: Scrite doesn’t yet have grammar check. We hope to introduce that feature in a future update.
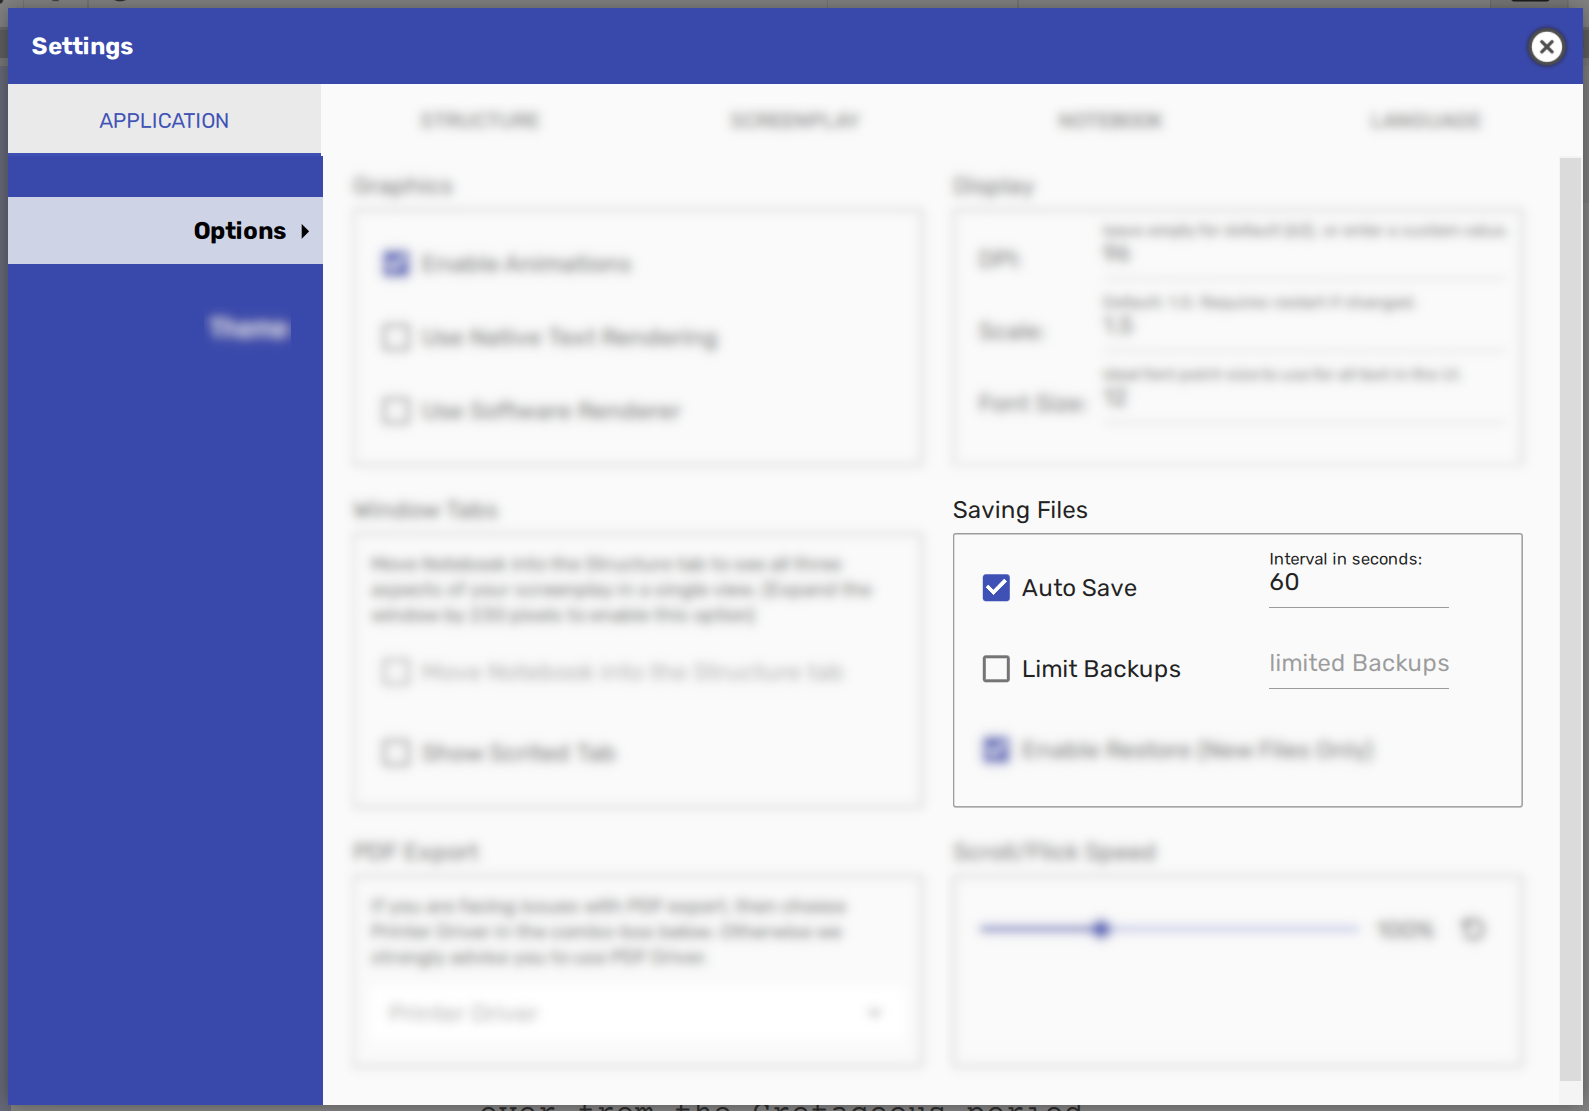
Auto Save
Scrite auto-saves documents by default every once in 60 seconds.
NOTE:
Auto-Save kicks in only after you save your work into a .scrite file once.
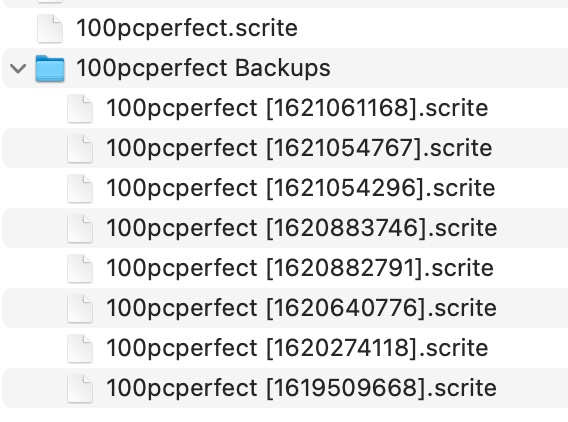
By default Scrite creates a folder in the same path as your .scrite file, into which it stores up backups, every once in 60 seconds by default.
You can toggle auto-save, change the interval, and limit number of backups to store in Settings > Application > Options page.
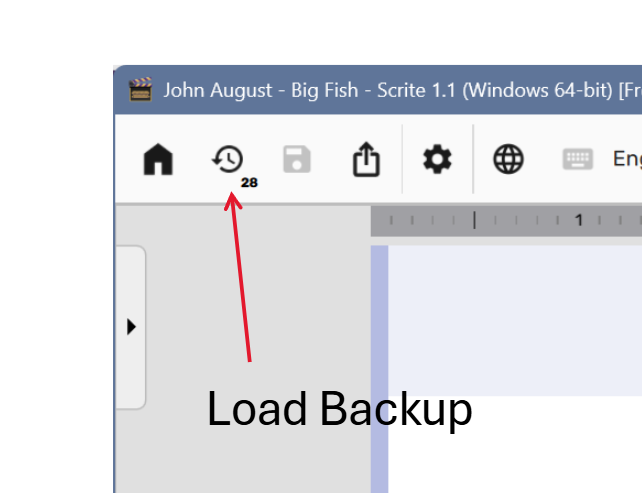
Loading A Backup
Scrite features a button on the toolbar that lets you know how the number of backups available for the currently opened screenplay.
Clicking on that button pulls out a dialog box from where you can select a specific backup and open it either in a new window or in the current window itself.
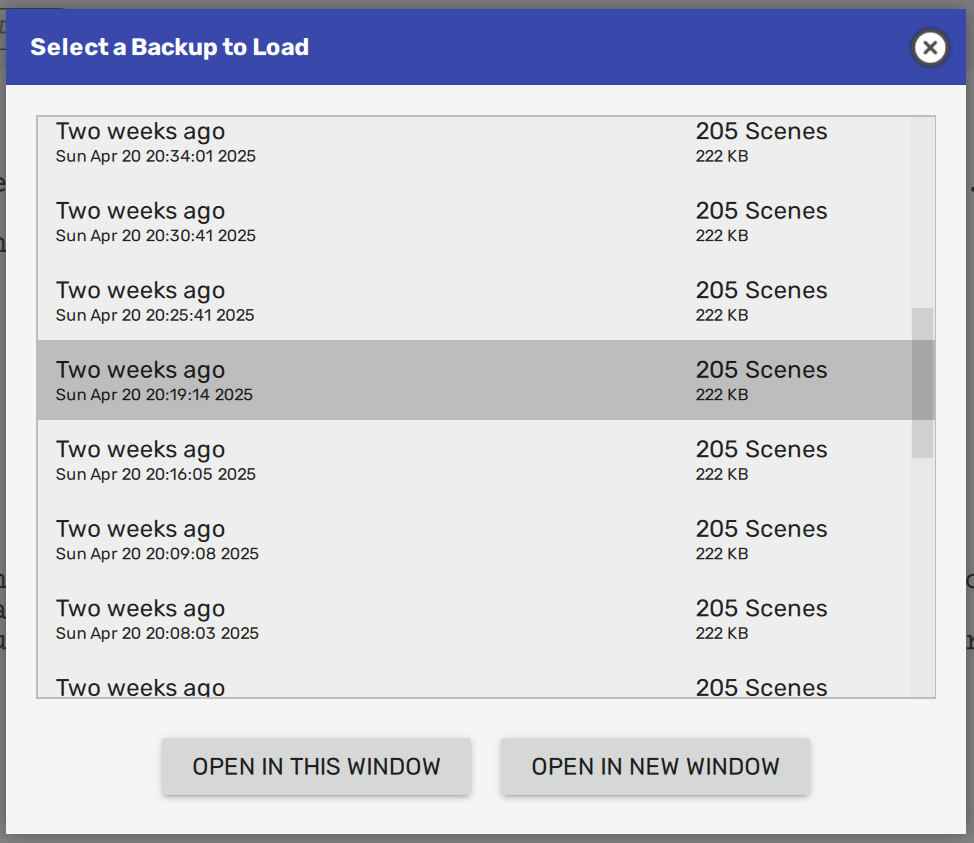
Backups are always loaded anonymously. This means that you will have to explicitly save the backup by providing a file name and that it wont over write the file from which it was loaded.
Shield
By default Scrite stores screenplays in an interoperable format as described in this page here. This means anybody can unpack the contents of the Scrite document and further process its contents. This ensures easy integration with other tools, and even custom tools written by studios and independent software developers.
If you want to prohibit anybody from opening your Scrite document, and ensure that it opens only on those systems where your email-id is used to activate the Scrite installation, then you can use the Sheild feature to lock your screenplays.
Click on the shield icon on the bottom left corner of the screenplay editor.
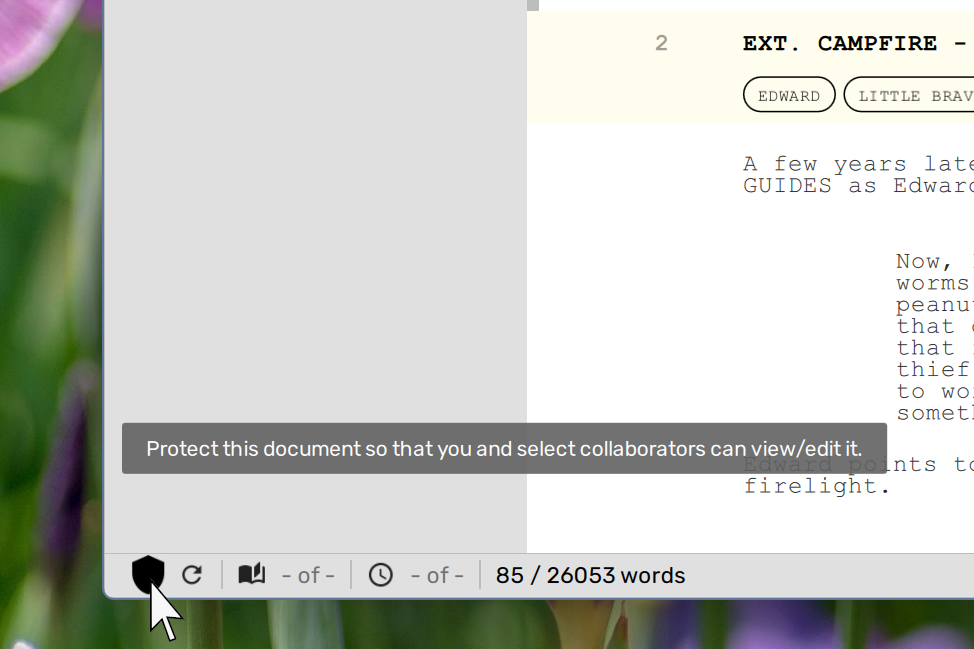
This launches a dialog box where you can toggle protection, to lock the screenplay so it can only be opened on devices where Scrite is activated using your email-id.

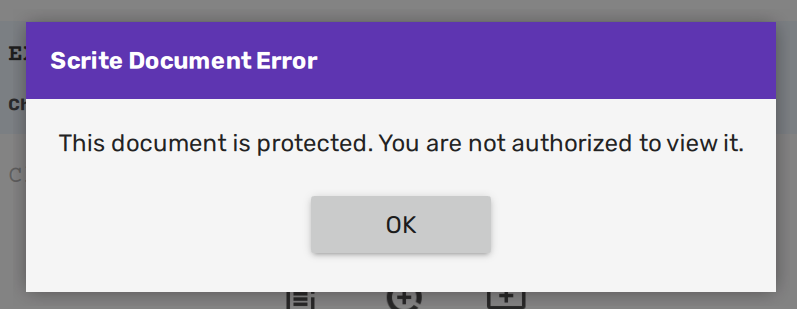
Optionally, you can add email ids of one or more collaborators who you want to hand-pick and permit opening the file. This means that the file can now be opened on devices with Scrite activated using either your email-id or any one of your collaborator’s email ids.
If anybody else attempts to open the screenplay, they will see this message.
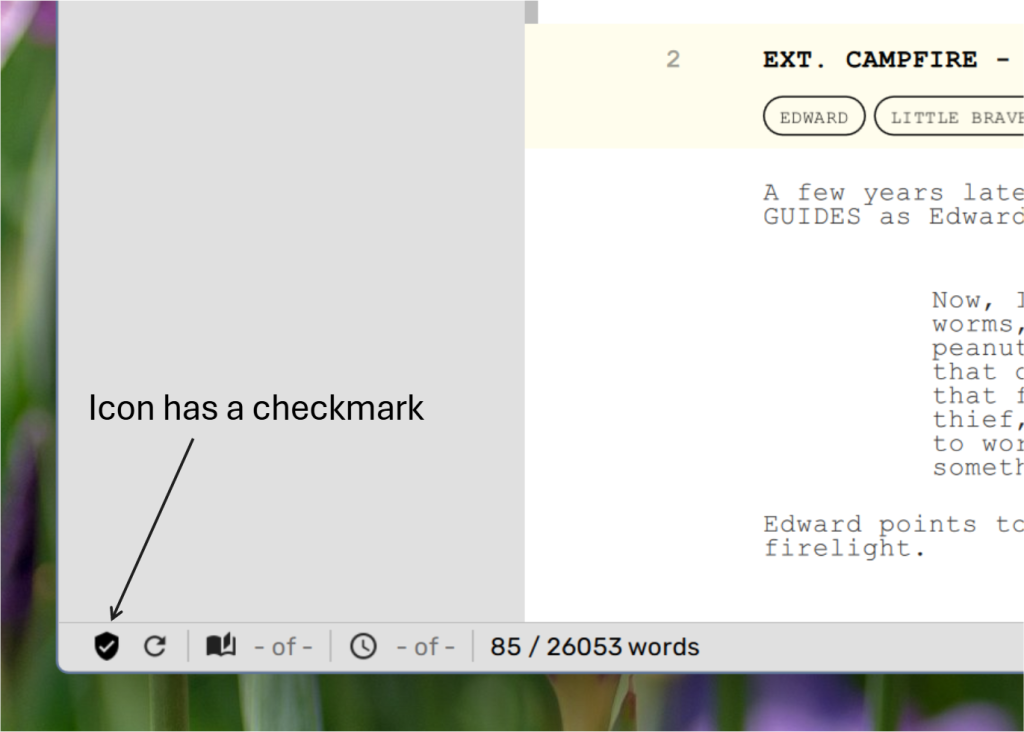
Once locked, the shield icon on the status bar shows up as checked.
At any time, you can turn off Shield protection for your files by going back to the shield dialog box.
Please note that your collaborators will not be able to turn off shield, or add additional collaborators. That right rests only with you.
NOTE: By turning on Shield, contents of your screenplay, notebook and structure tabs will be encrypted. However, photos and attachments in notebook and the title page will not be encrypted. In a future version we hope to encrypt them as well. Please be aware that while our encryption keys are not public, we do not guarantee that the encryption mechanism is hack-proof. It is possible that someone may be able to decrypt the contents of your file, but we imagine that it isn’t too easy to do so.
What’s next?
In the next article, we show how you can write in Indian languages using Scrite.